
THE ANNORITE GUIDE
Everything, in order.
For Annorite 2027 on Mac, iPad and iPhone. Pick your device on the left and the instructions change to match. New here? The quick start takes five minutes.
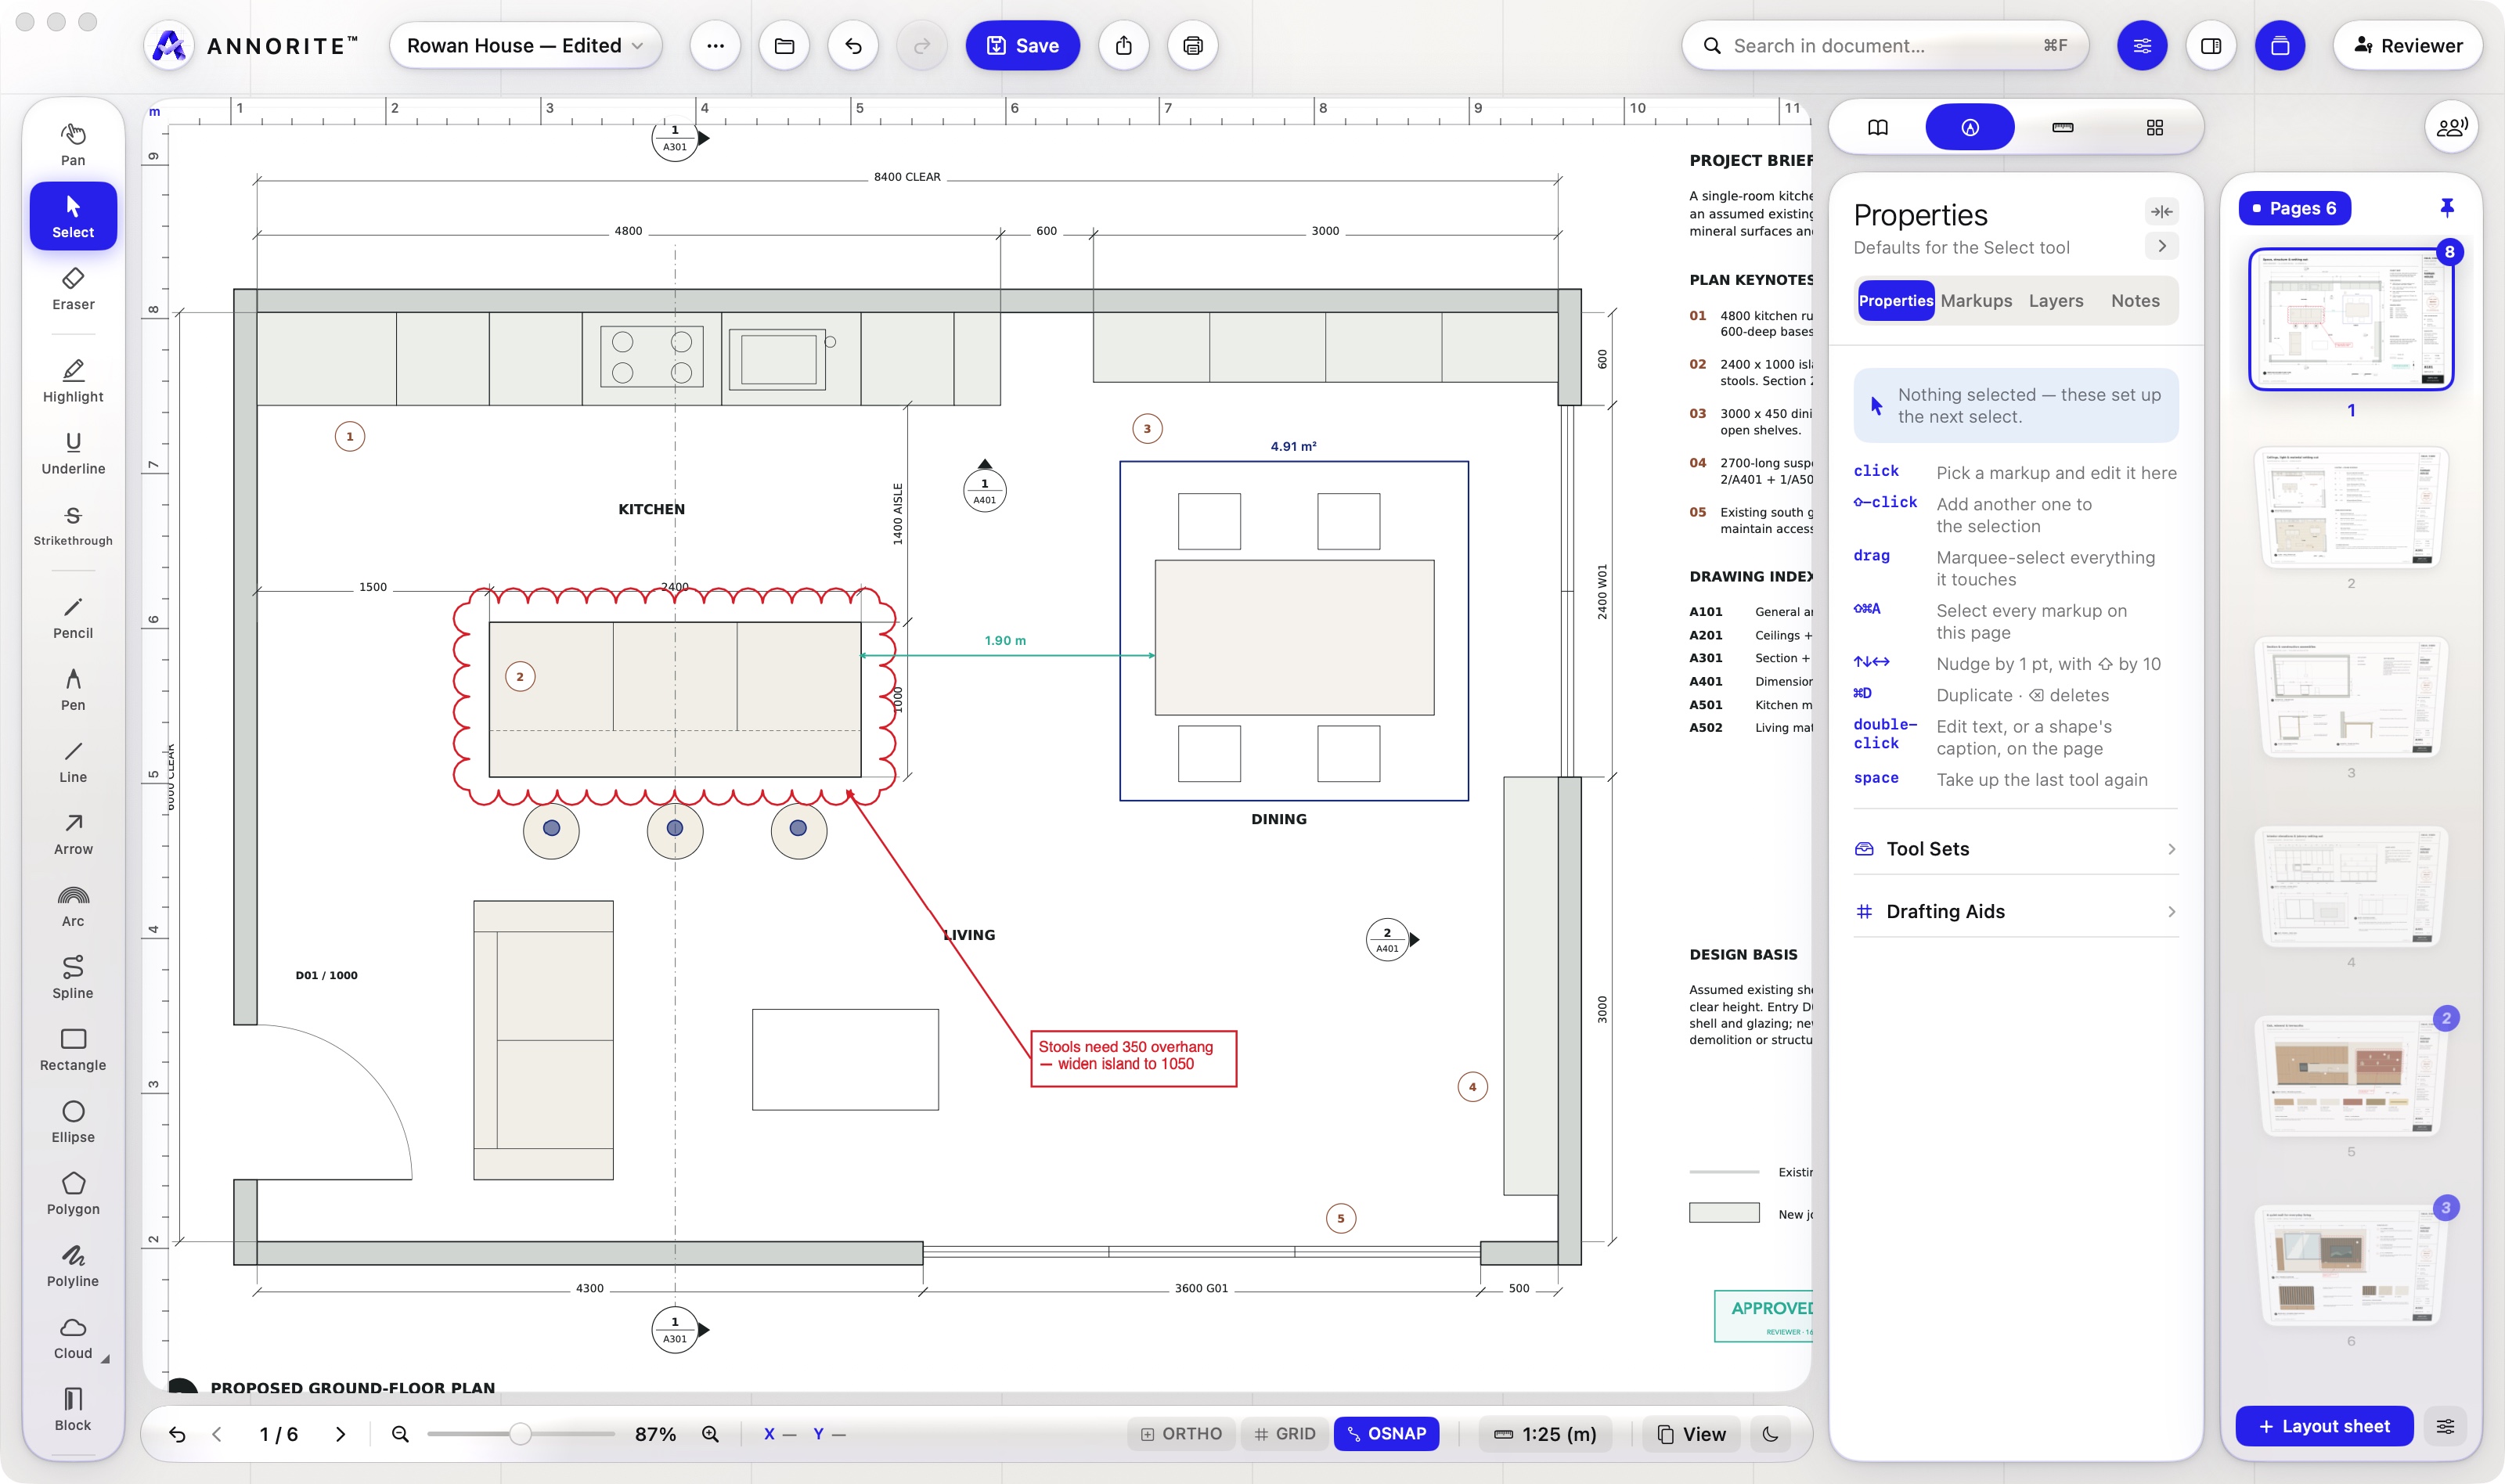
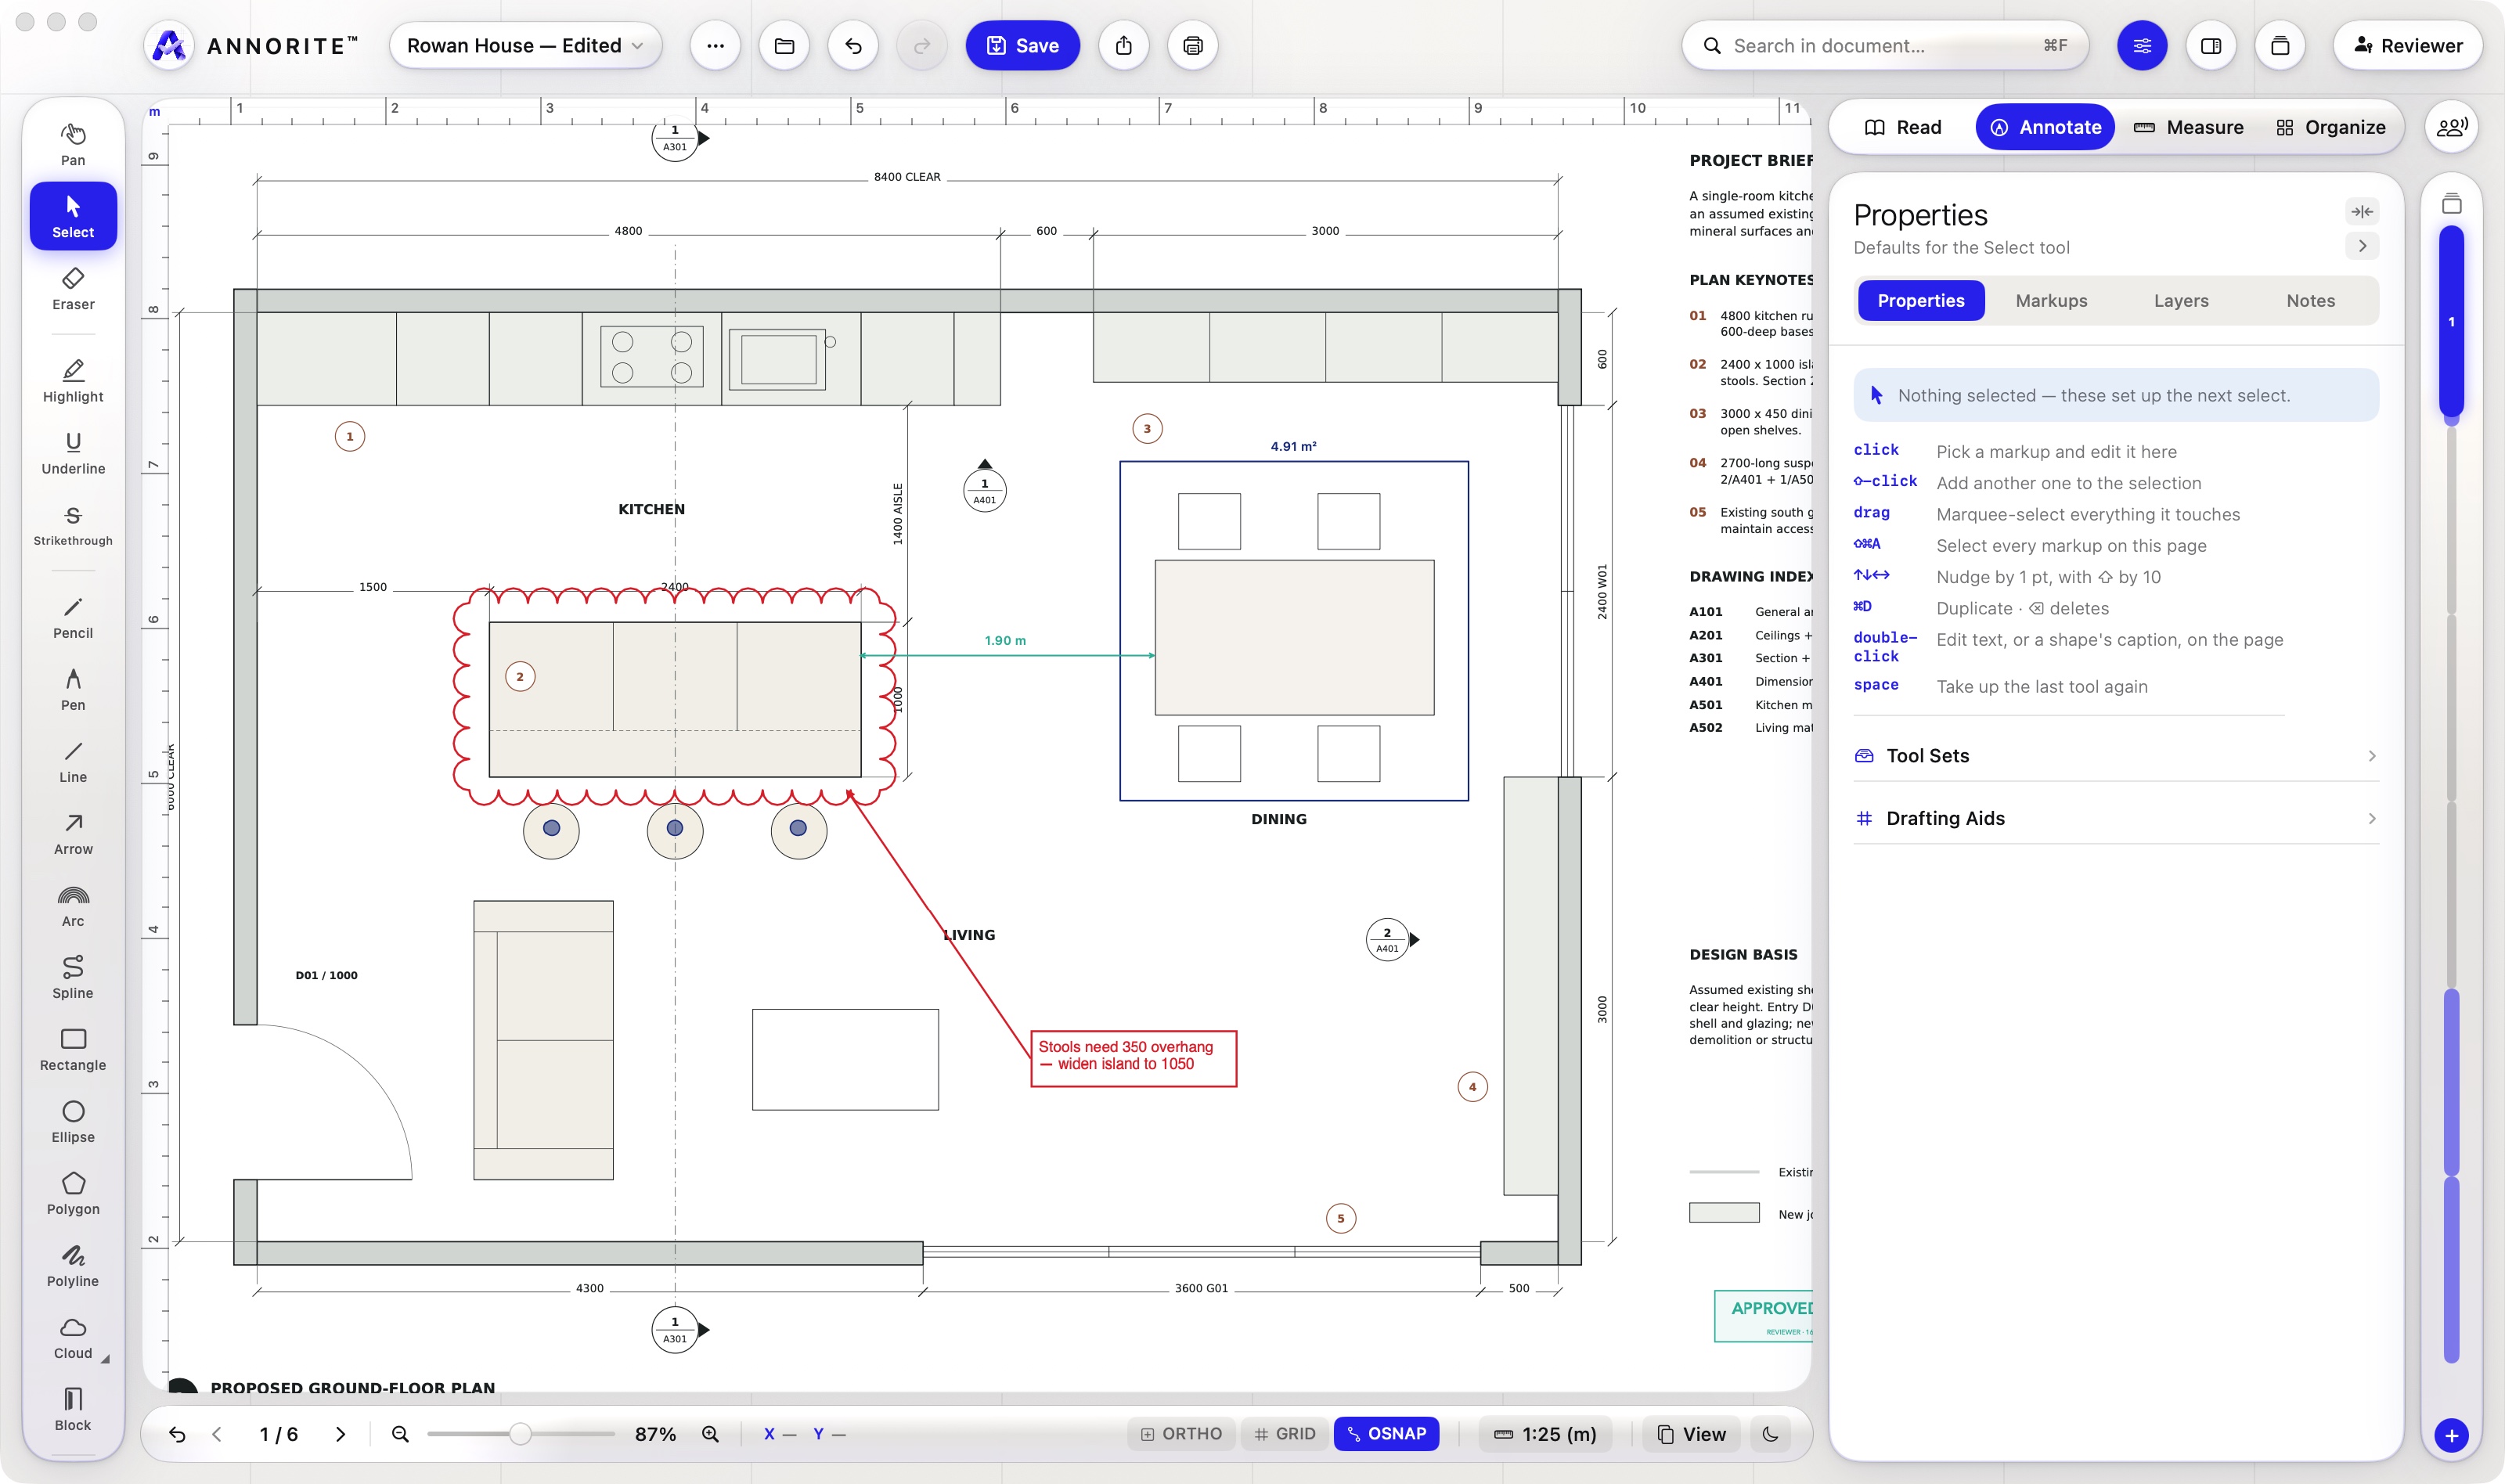
The window
Click a dot to see what that part does.
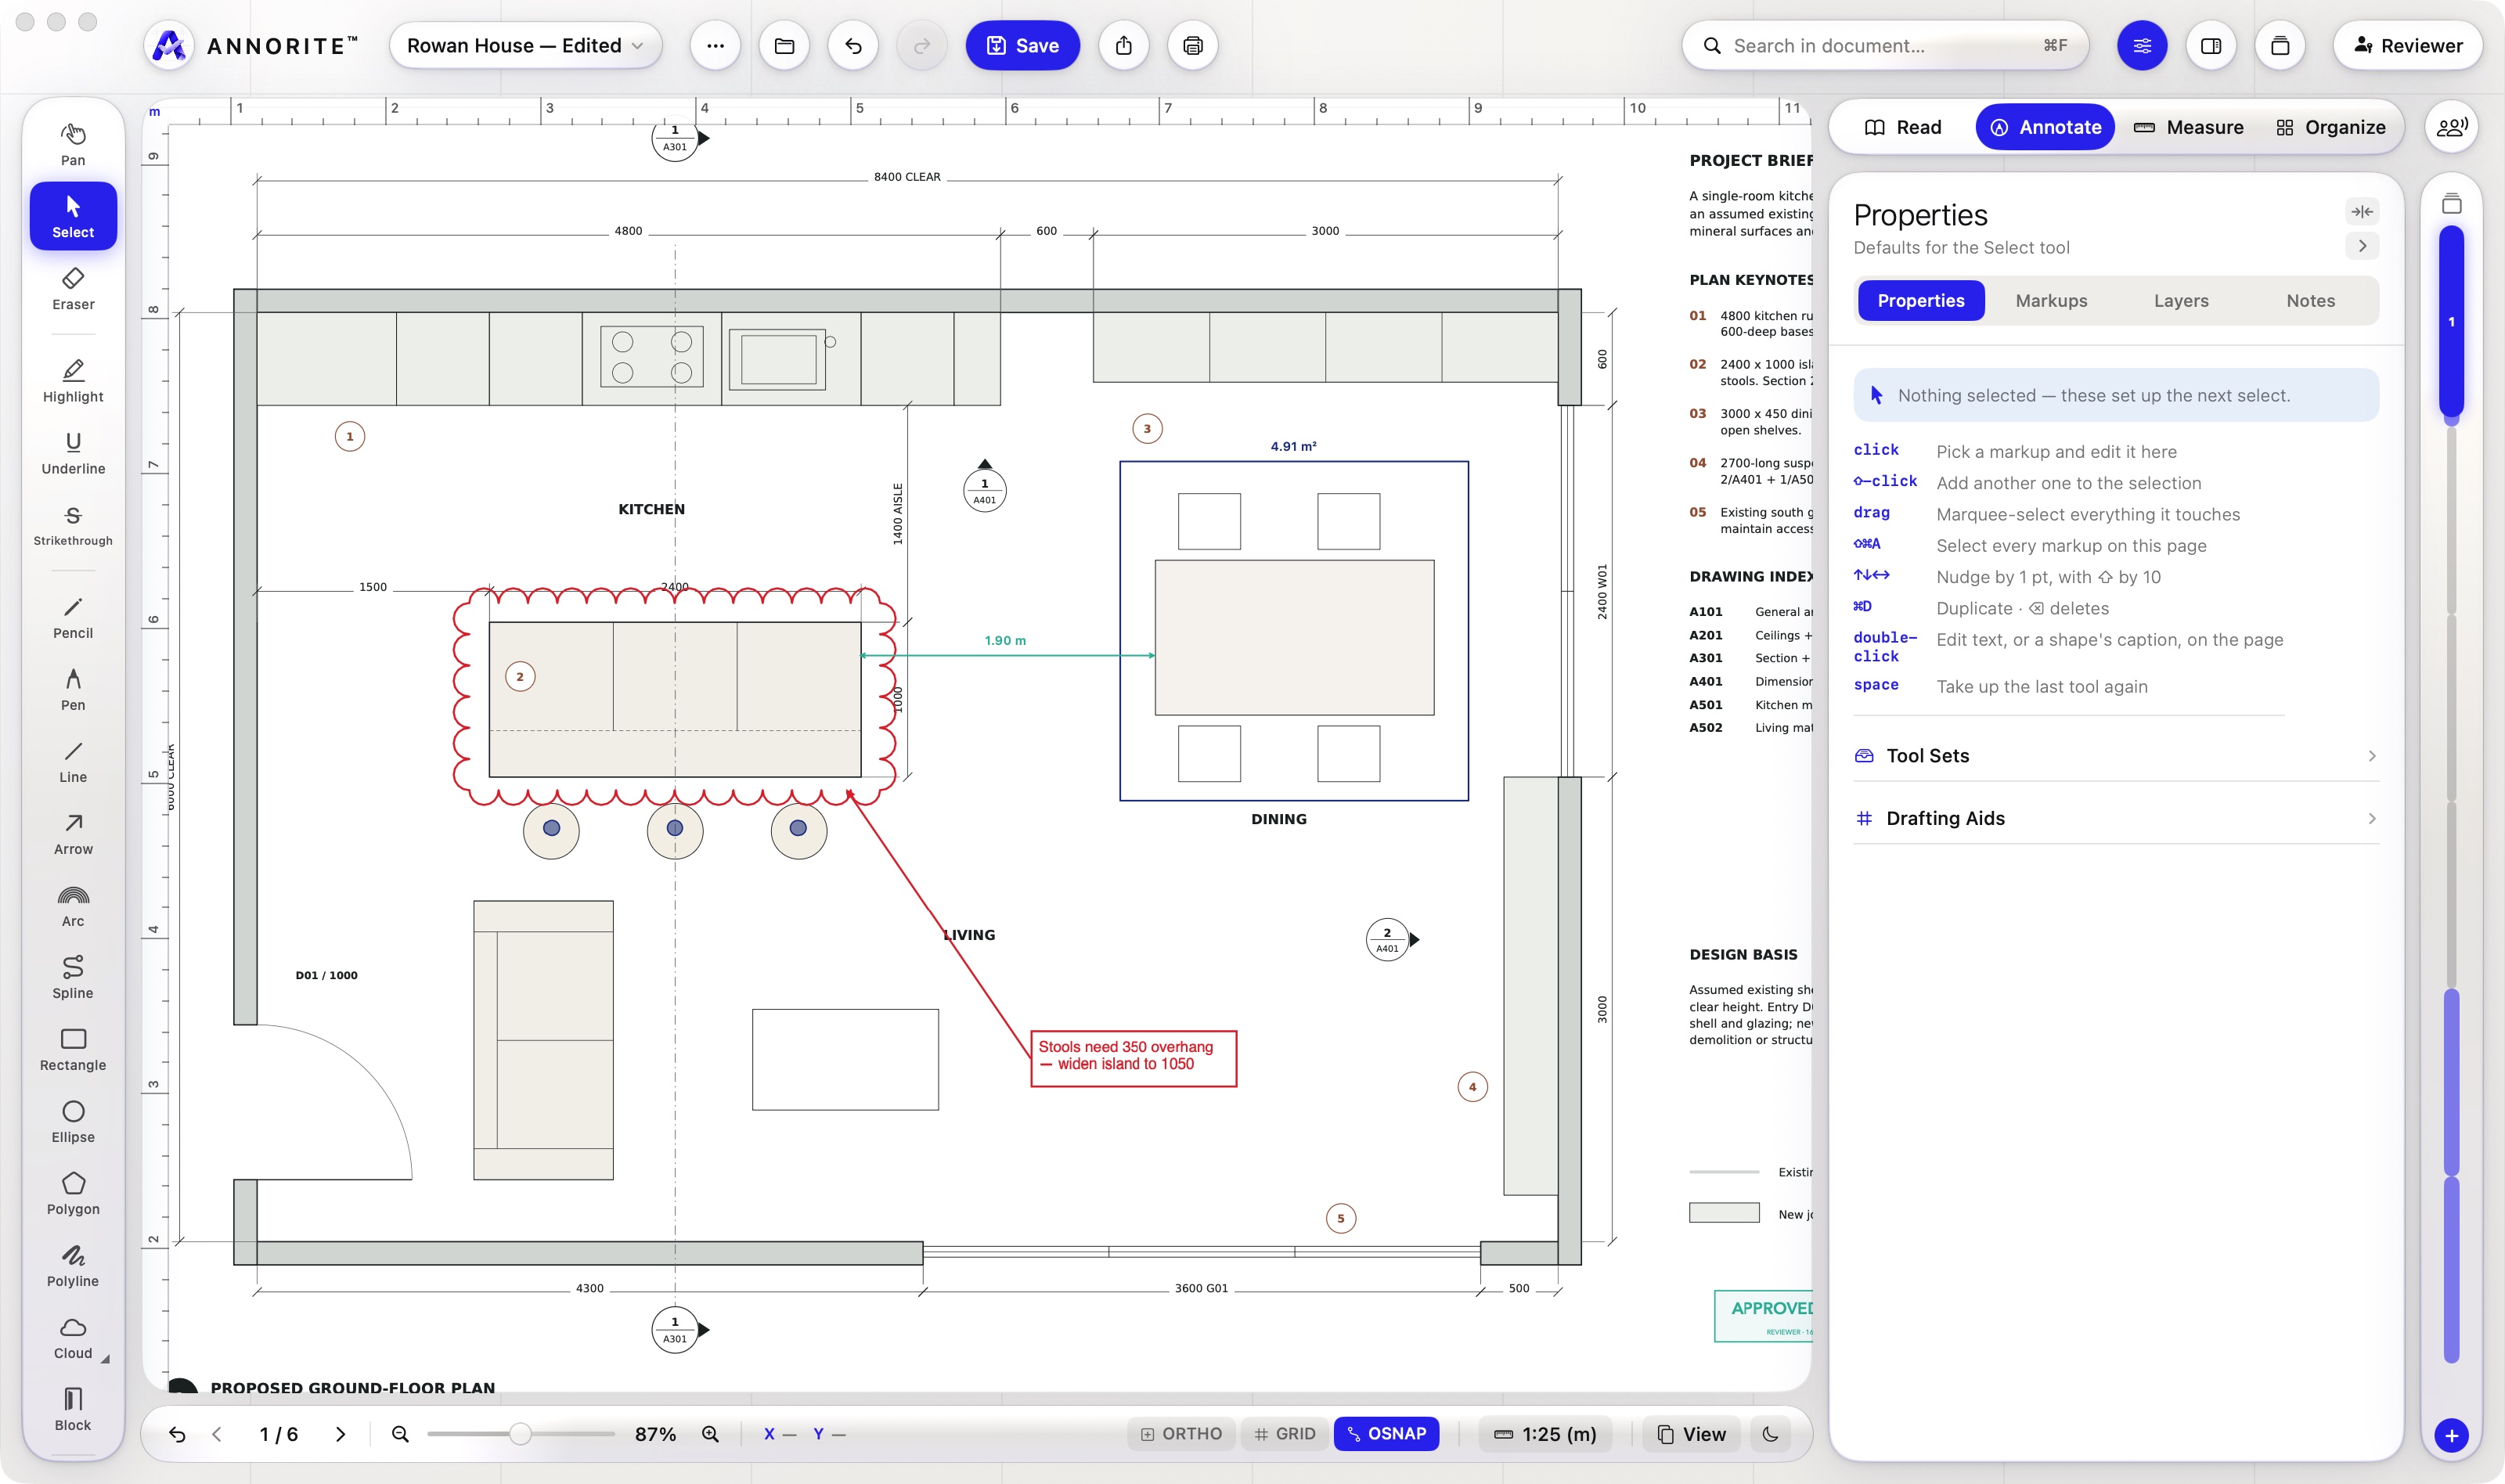
- Annorite mark. Opens Settings: theme, your author name, grip size, the quick symbols, the review summary logo and Annorite Labs.
- File name. This file: close it, reopen a closed tab, copy its path or show it in Finder. With several files open, each has a tab here; ⌃Tab steps through them.
- ⋯ Document menu. Everything done to the document: Open, Save As, Export, Insert, Sheet Options, Trace, Overlay, Markups, Print and Close.
- Undo and Redo. ⌘Z and ⇧⌘Z. Every tab keeps its own history.
- Save. Lights up when there are unsaved changes. Markups are saved into the PDF as standard annotations.
- Share and Print. Share the editable PDF or a flattened copy with the markups burned in. Print with ⌘P.
- Search. Searches the drawing’s text (⌘F). Results open in the navigator; click one to go to it.
- Panel buttons. Show or hide the inspector, the navigator (outline, bookmarks, search) and the page carousel.
- Account. Your plan and license.
- Modes. Read, Annotate, Measure and Organize, as wide as the inspector below. Each shows only the tools for that job. ⌘1 to ⌘4. In Read mode, with the inspector folded, they stack as icons.
- Collaboration. Start or join a live session, and share or merge markups. During a session it turns indigo and shows how many are connected.
- Tool rail. The tools of the current mode. Most have a one-letter shortcut, shown when the pointer rests on them. A corner mark means there is a second tool under a right-click.
- Rulers. Marked in the drawing’s units at the current scale. ⌘R shows or hides them.
- The sheet. Scroll to move, pinch or ⌘= / ⌘- to zoom. Right-click a markup for arrange, align, lock and style commands.
- Inspector. Four tabs. Properties styles the selected markup, or the next one you draw. Markups lists every markup. Layers and Notes are the other two.
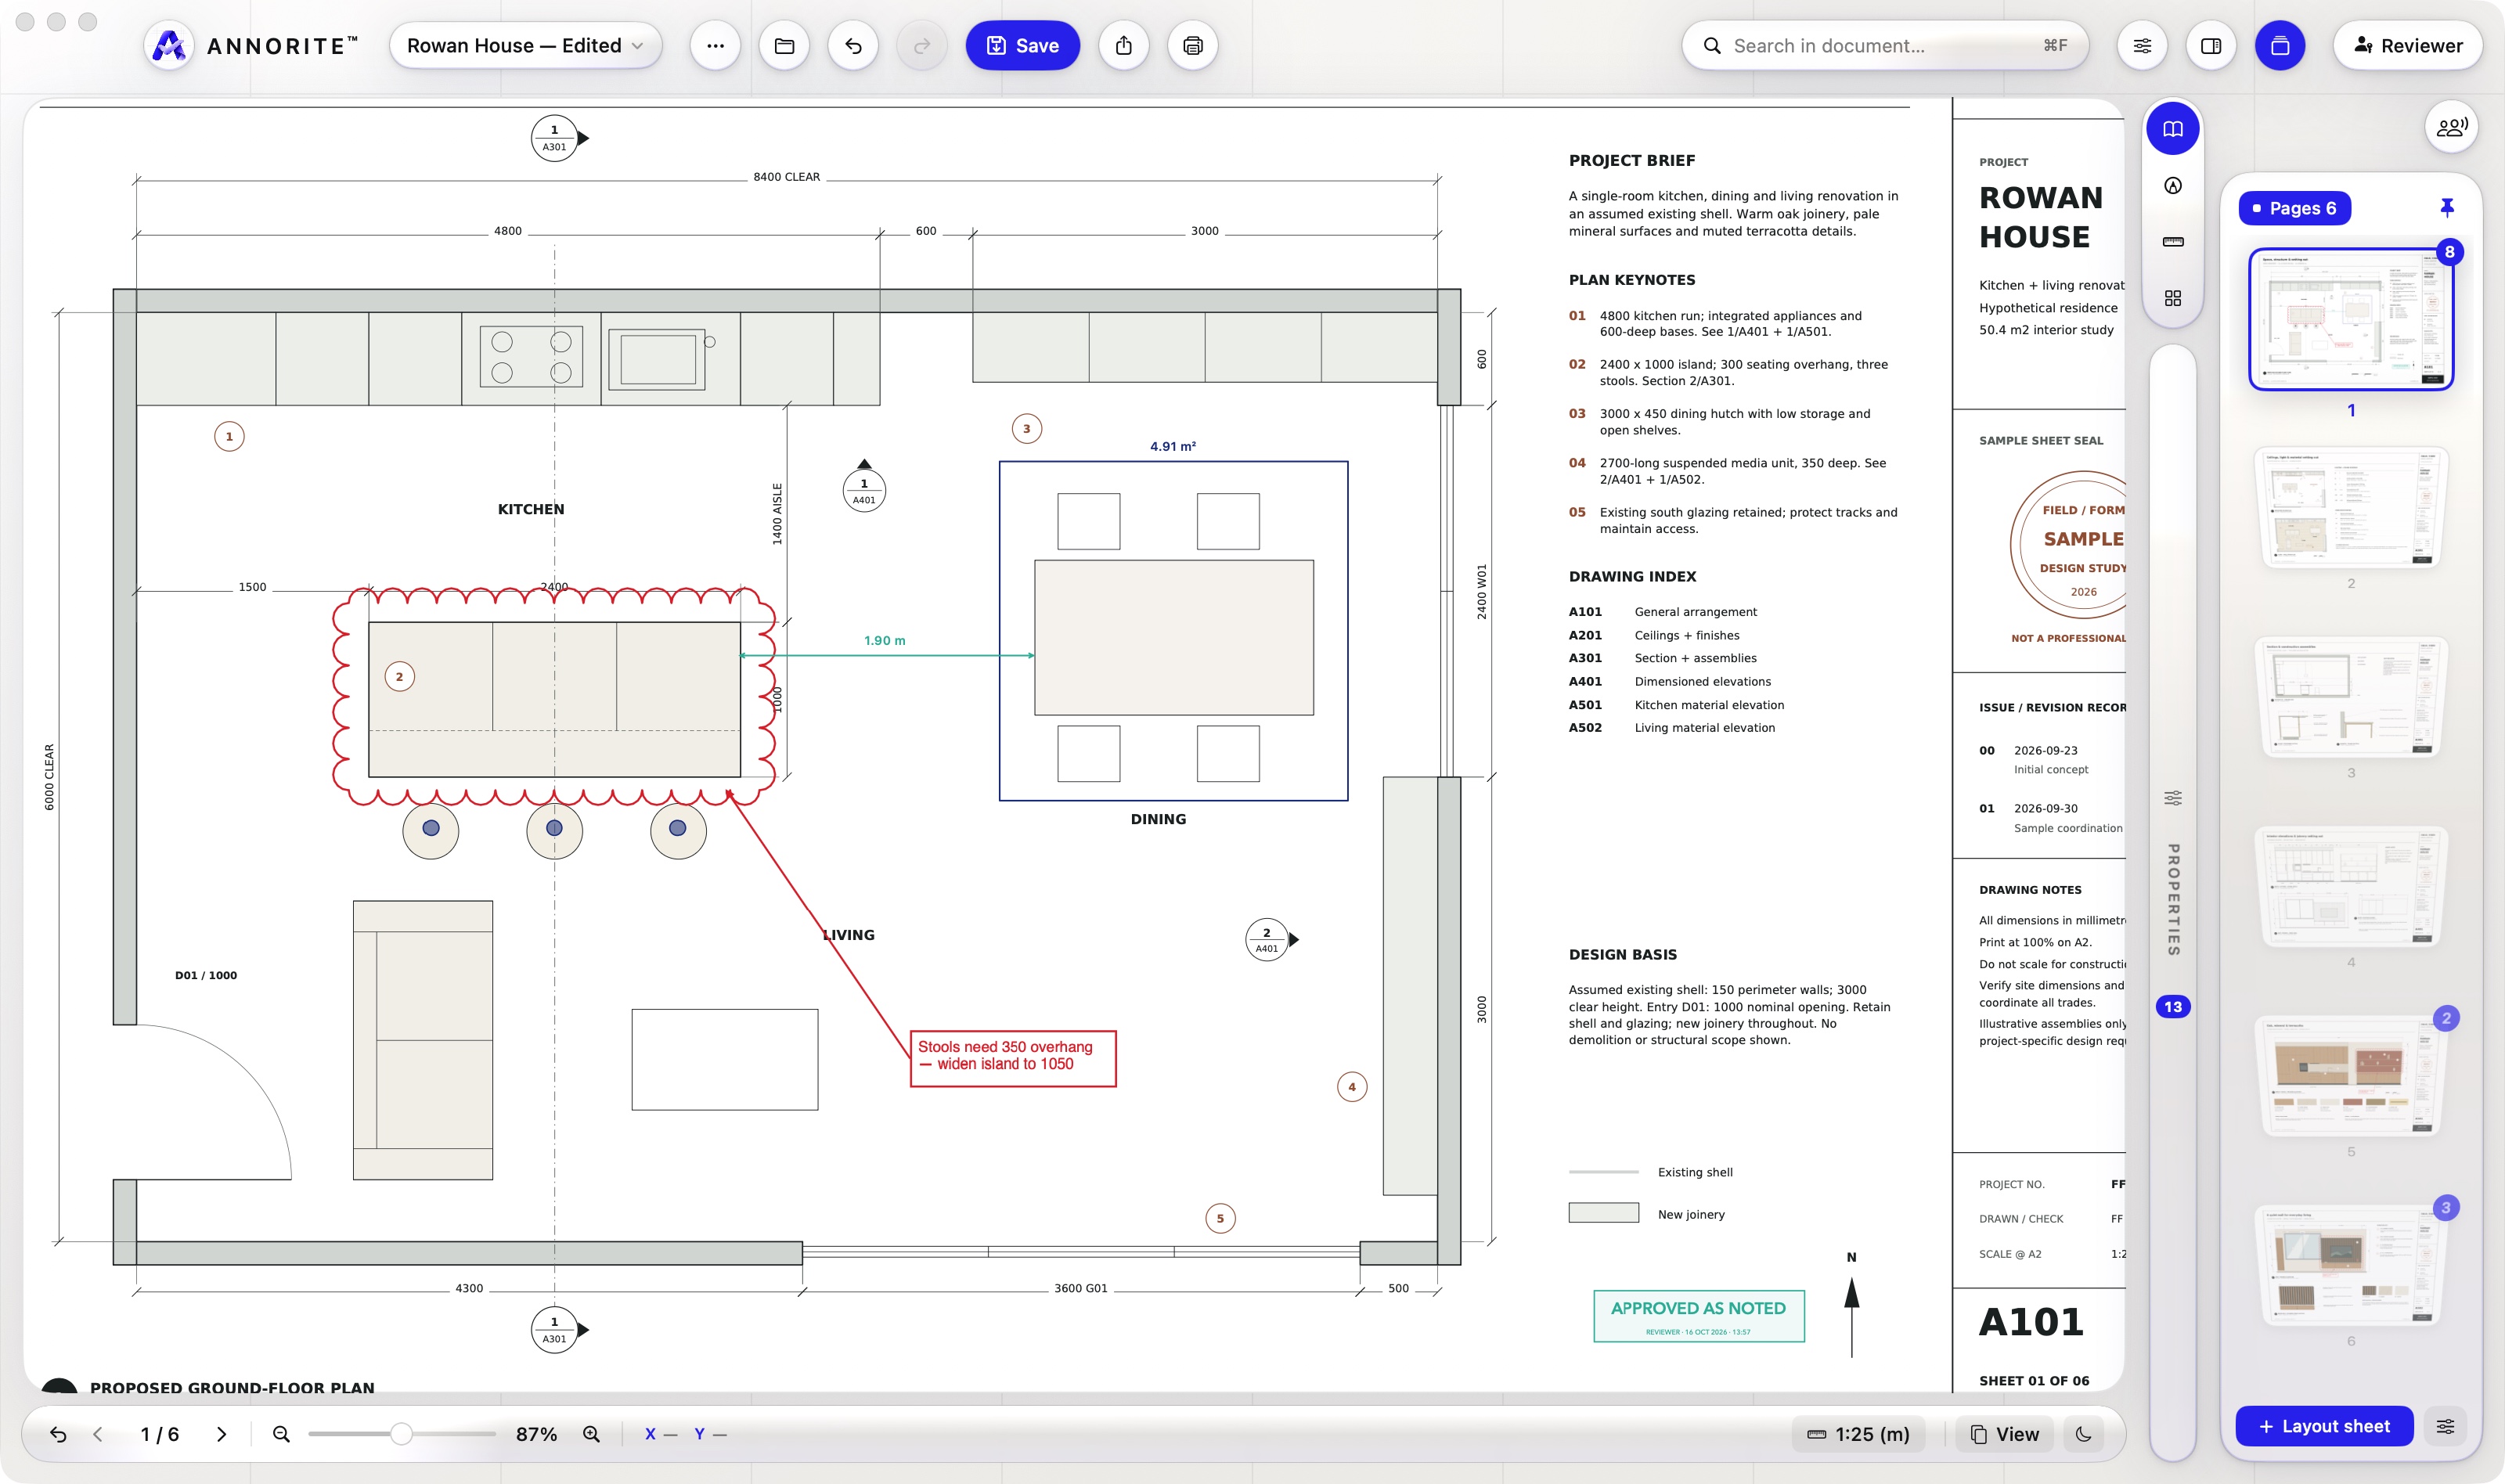
- Page carousel. Rest the pointer here for page thumbnails, or pin it open with ⌥⌘P. + adds a layout sheet.
- Page and zoom. Step through pages, type a page number, or drag the zoom slider (10 % to 800 %). With a markup selected, Delete, Cut, Copy and Paste slide in at the left.
- Ortho, Grid, Osnap. Drafting aids. Ortho keeps lines horizontal or vertical, Grid snaps to a grid in drawing units, Osnap finds endpoints, midpoints, centres and perpendiculars; right-click it to choose which.
- Scale. The scale measurements are read at. Choose a preset or calibrate. Each document remembers its own.
- View and Dark Pages. Continuous, single-page or two-page view, and the moon turns the sheets light-on-dark.
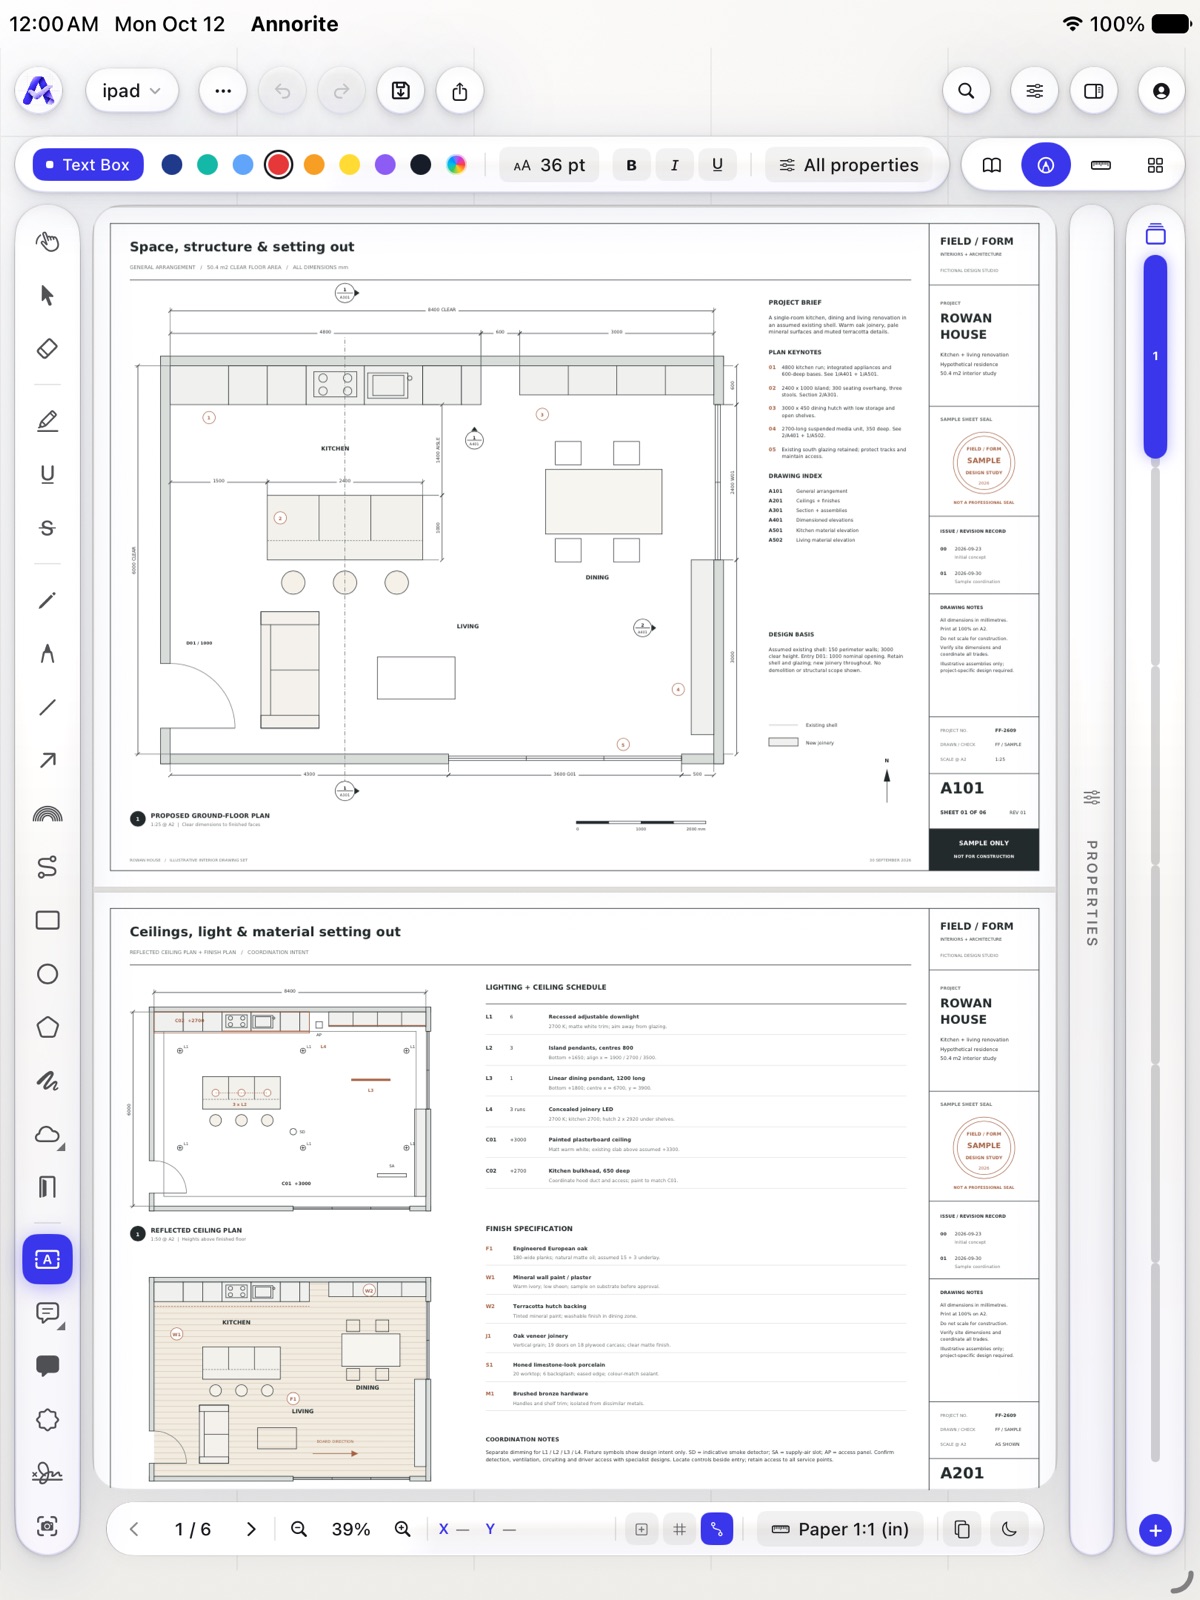
On an iPad the layout is the same, a little tighter: search is a button, and Open and Print are in the ⋯ menu.
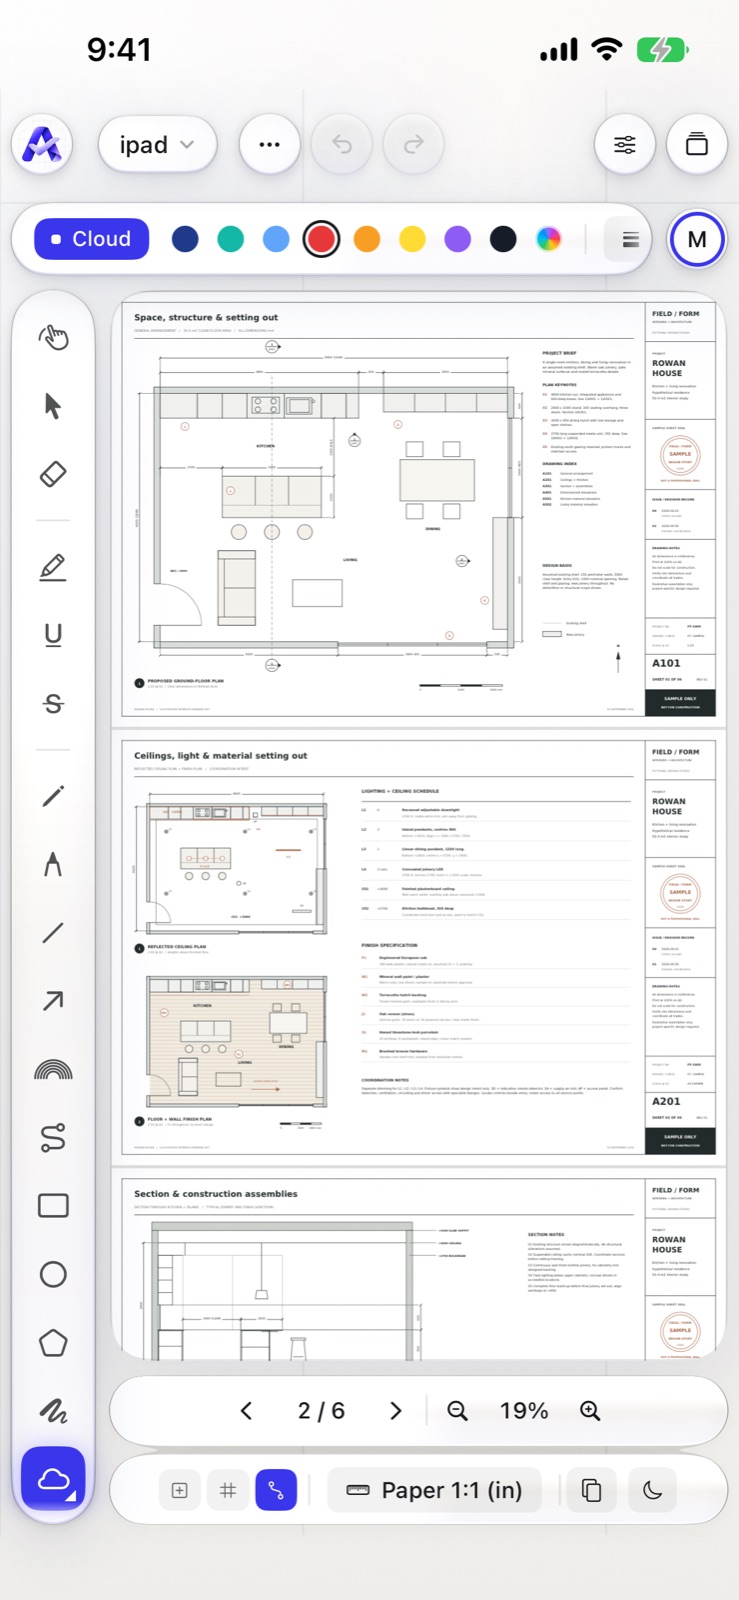
On an iPhone the inspector, the navigator and the pages open as sheets over the drawing, and while a tool is showing its properties the mode tabs fold into the round M button. Turn the phone on its side and the panels dock beside the drawing.
First five minutes
- Open a drawing. Press ⌘O, or drop a PDF anywhere on the window.Tap Open… and choose a PDF from Files. No drawing to hand? Choose Sample Drawing on the start screen.
- Choose a mode. Annotate to mark up, Measure to take dimensions.
- Set the scale from the status line under the sheet before you measure.
- Pick a tool and draw. The strip under the header, or the Properties tab, sets its colour and weight.
- Save. The markups go into the PDF as standard annotations, so it opens anywhere.
The quick start walks through each step.
Modes
Four modes, switched from the tabs at the top right or with ⌘1 to ⌘4.
- Read
- No tools, no strip. The sheet has the room, and nothing can be changed by accident.
- Annotate
- Drawing, text, clouds, stamps and signatures.
- Measure
- Length, area, count, dimensions and angles at the drawing’s scale.
- Organize
- Every page as a thumbnail: reorder, rotate, duplicate, delete and insert.
Annotate
Pick a tool from the rail, then draw on the sheet. A tool stays active until you pick another; press Space to take up the last tool again.One finger draws with the tool; two fingers always move and zoom the sheet.
| Tool | Key | What it does |
|---|---|---|
| Select | V | Click a markup to edit it, drag across several to select them, ⇧-click to add one. |
| Pan | Z | Drag the sheet. Z toggles the hand; V goes back to Select. |
| Eraser | X | Click or drag across markups to remove them. |
| Highlight | H | Drag over text. On drawings whose text is outlined, drag an area instead. |
| Underline | U | Underlines the text you drag over. |
| Strikethrough | K | Strikes through the text you drag over. |
| Pencil | F | Freehand sketching. |
| Pen | P | Freehand with a smoother line. |
| Line | L | Drag for a straight line. Hold ⇧ or turn on Ortho for horizontal and vertical. |
| Arrow | A | A line with an arrowhead. Change either end in Properties. |
| Arc | Click the start, the end, then a point on the arc. | |
| Spline | Click points for a smooth curve; Return finishes. | |
| Rectangle | R | Drag a box. Fill and hatch are in Properties. |
| Ellipse | E | Drag an ellipse. |
| Polygon | O | Click corners; click the first point or press Return to close. |
| Polyline | Y | Click points for an open run of lines; Return finishes. |
| Cloud | C | Drag a revision cloud. Right-click the button for Cloud + Leader. |
| Block | Place a plan symbol (doors, fixtures, furniture) at the drawing’s scale. | |
| Text Box | W | Click and type. Double-click any text later to edit it on the page. |
| Callout | Q | Drag from the detail to where the text should sit, then type. Right-click the button for Revision Callout. |
| Note | T | A note card whose tail points back at the drawing. |
| Stamp | S | Approved, Rejected, For Construction and more, or import your own. |
| Sign | I | Draw or import a signature once, then place it. |
| Snapshot | B | Copy a region of the drawing, with its scale, to paste elsewhere. |
| Redact | Mark an area for removal. Nothing is removed until you apply redactions. |
Text
Double-clickDouble-tap any text box, callout or caption to edit it on the page. Font, size, bold, italic, underline, alignment and drawing symbols (⌀, ±, °, ℄ and others) are in Properties under Text Properties.
Stamps and signatures
Choose the stamp in Properties while the Stamp tool is active. Import Custom Stamp… takes a PNG of your own. A signature is drawn or imported once and kept on your device.
Measure
Measurements are only as good as the scale. Set it first.
Set the scale
- Choose a preset from the scale button on the status line (architectural, engineering and metric scales are listed).
- Or calibrate: pick Calibrate (J), drag along a dimension printed on the drawing, and type its real length.
Each document keeps its own scale. A measurement keeps the scale it was taken at.
| Tool | Key | What it does |
|---|---|---|
| Calibrate | J | Drag along a dimension you know and type its real length. The scale is set from it. |
| Length | M | Drag between two points. |
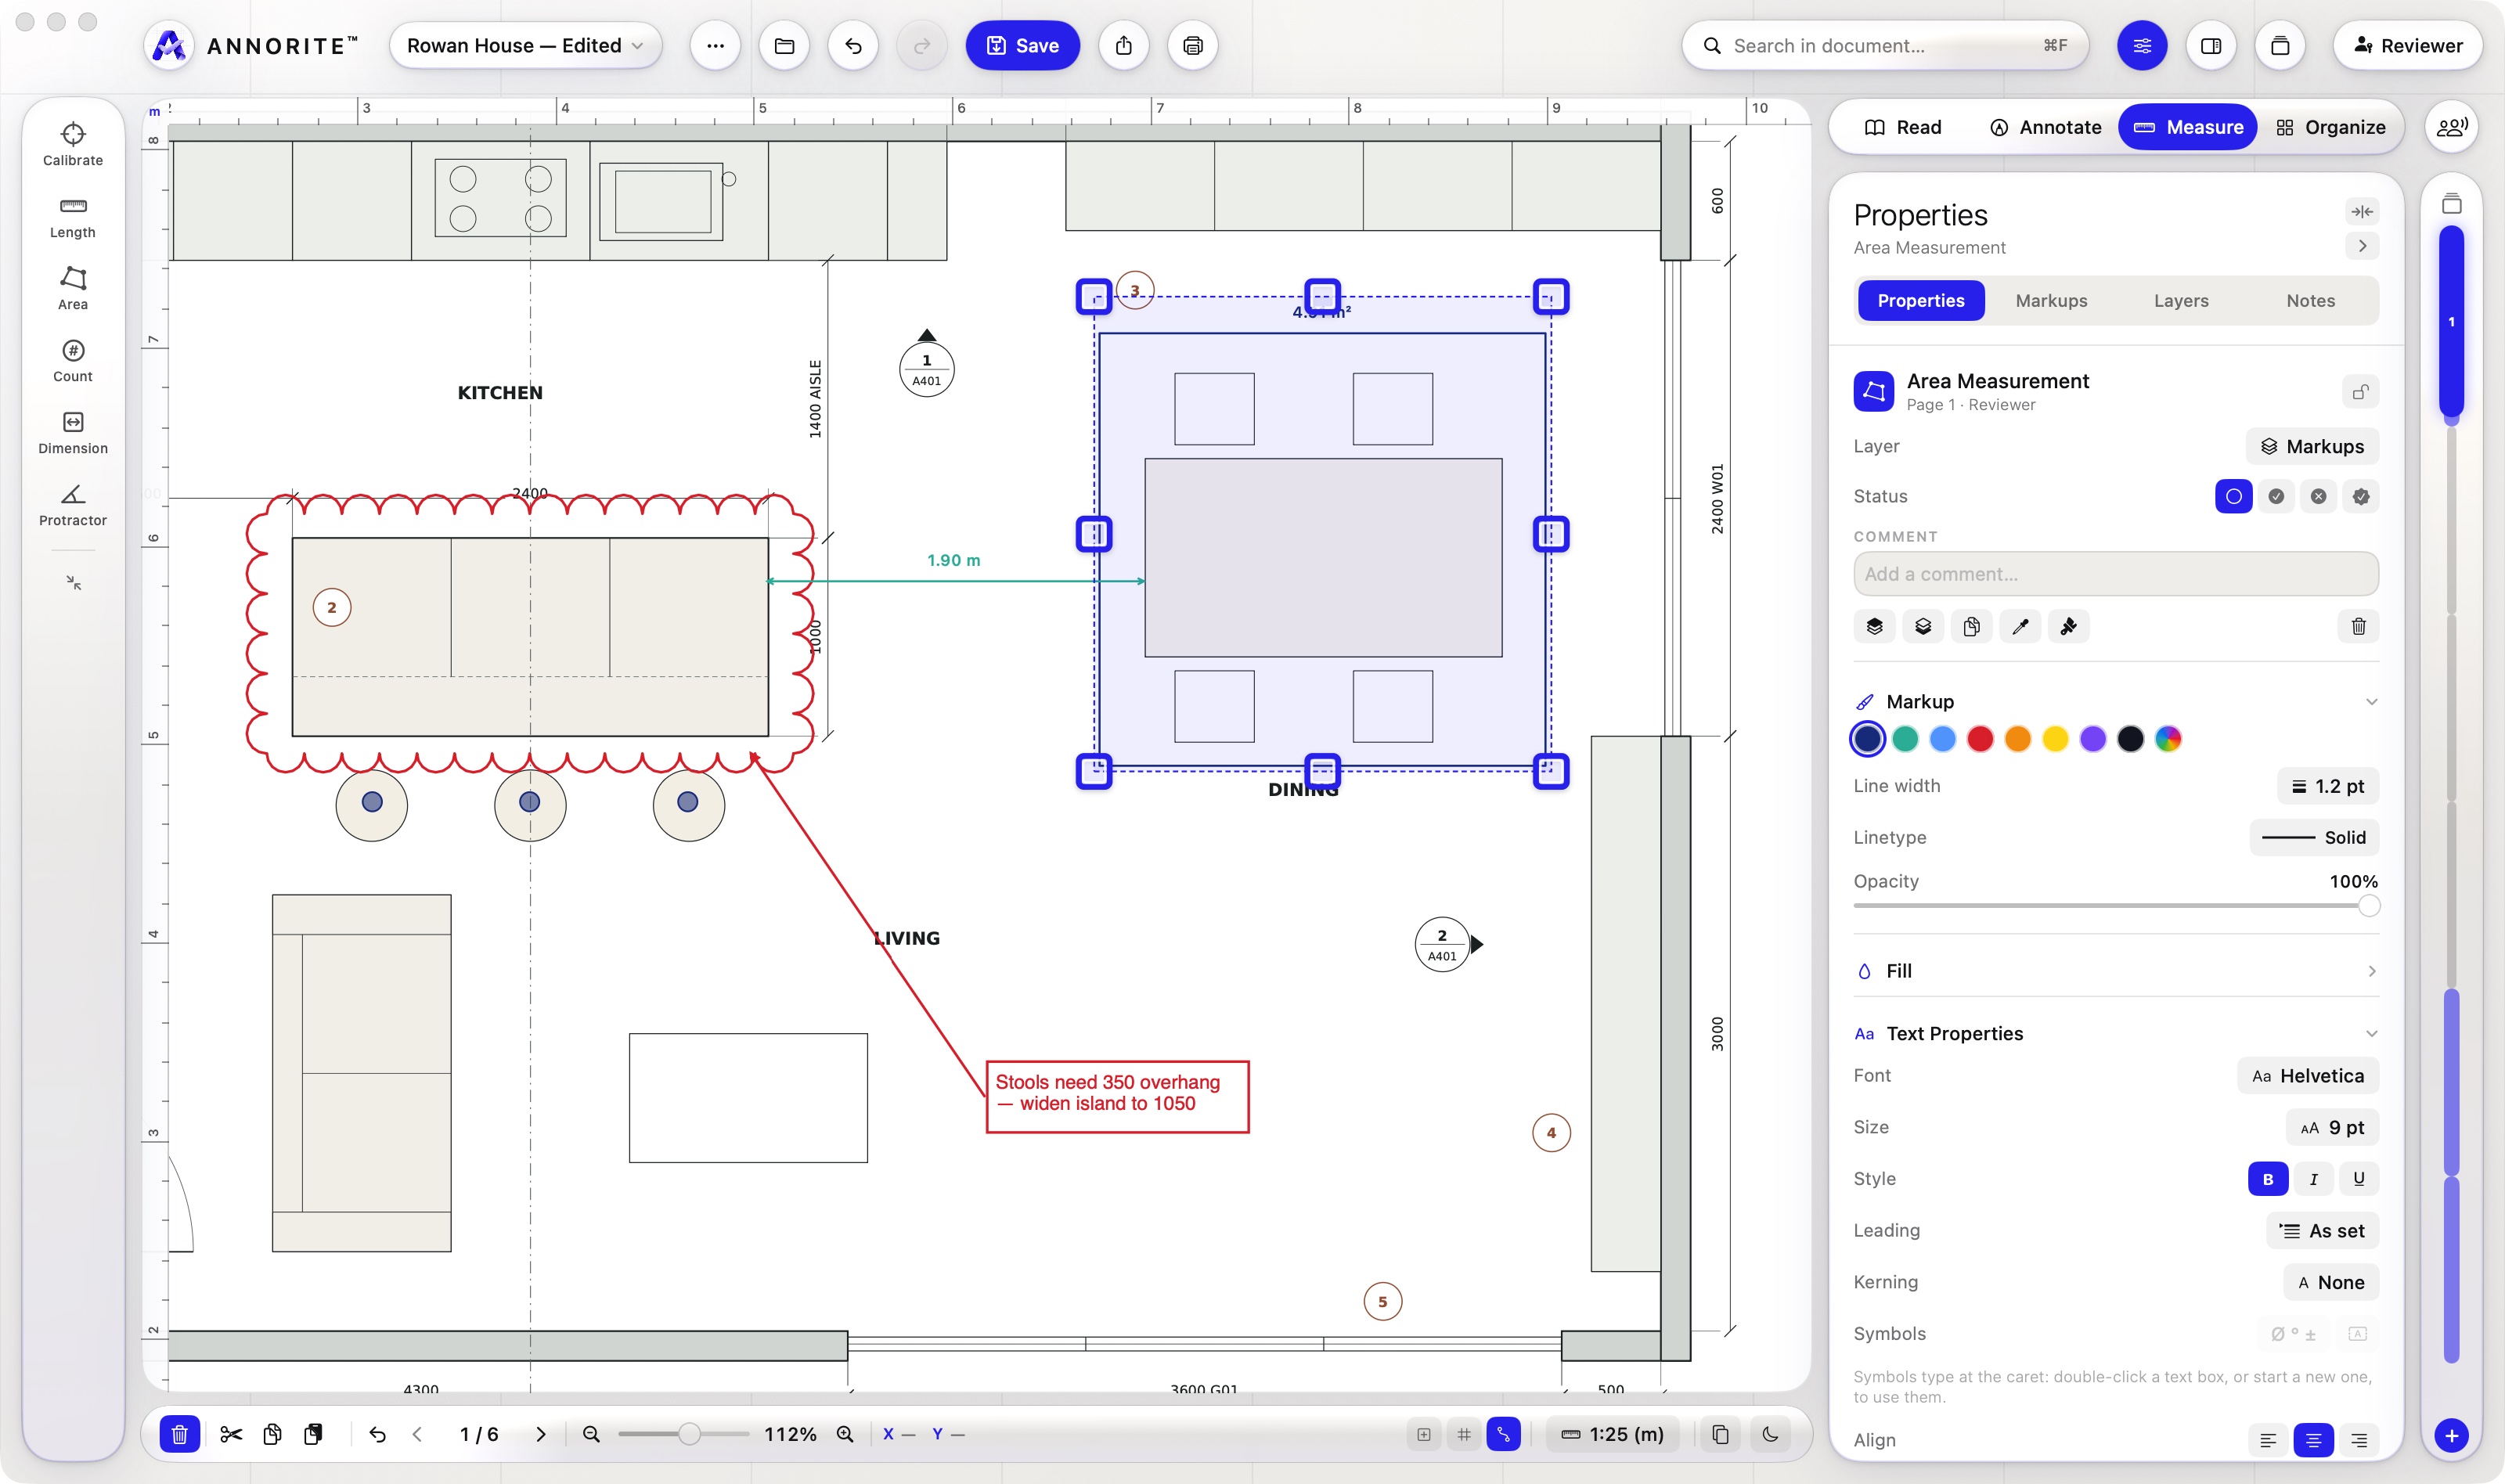
| Area | G | Click around the outline. Reads area and perimeter; type a depth in Properties for volume. |
| Count | N | Click each item. The markups list totals them. |
| Dimension | D | A dimension line whose label you can move or retype. |
| Protractor | Click the first arm, the vertex and the second arm. |
Perimeter and volume
Select an area. Properties ▸ Dimension shows its perimeter. Type a depth there and the volume is worked out from it. All three appear in the markups list and the review summary.
Drafting aids
Ortho holds lines to horizontal and vertical. Grid snaps to a grid in drawing units. Osnap snaps to the endpoints, midpoints and centres of other markups, and to the foot of a perpendicular from where a line began. All three are on the status line; right-click OSNAP to choose End, Mid, Perp and Centre.
Always check critical dimensions against the project documents. A measurement depends on the drawing and on the scale you set.
Properties and styles
With a markup selected, Properties changes that markup. With nothing selected, it sets up the next markup the current tool draws.
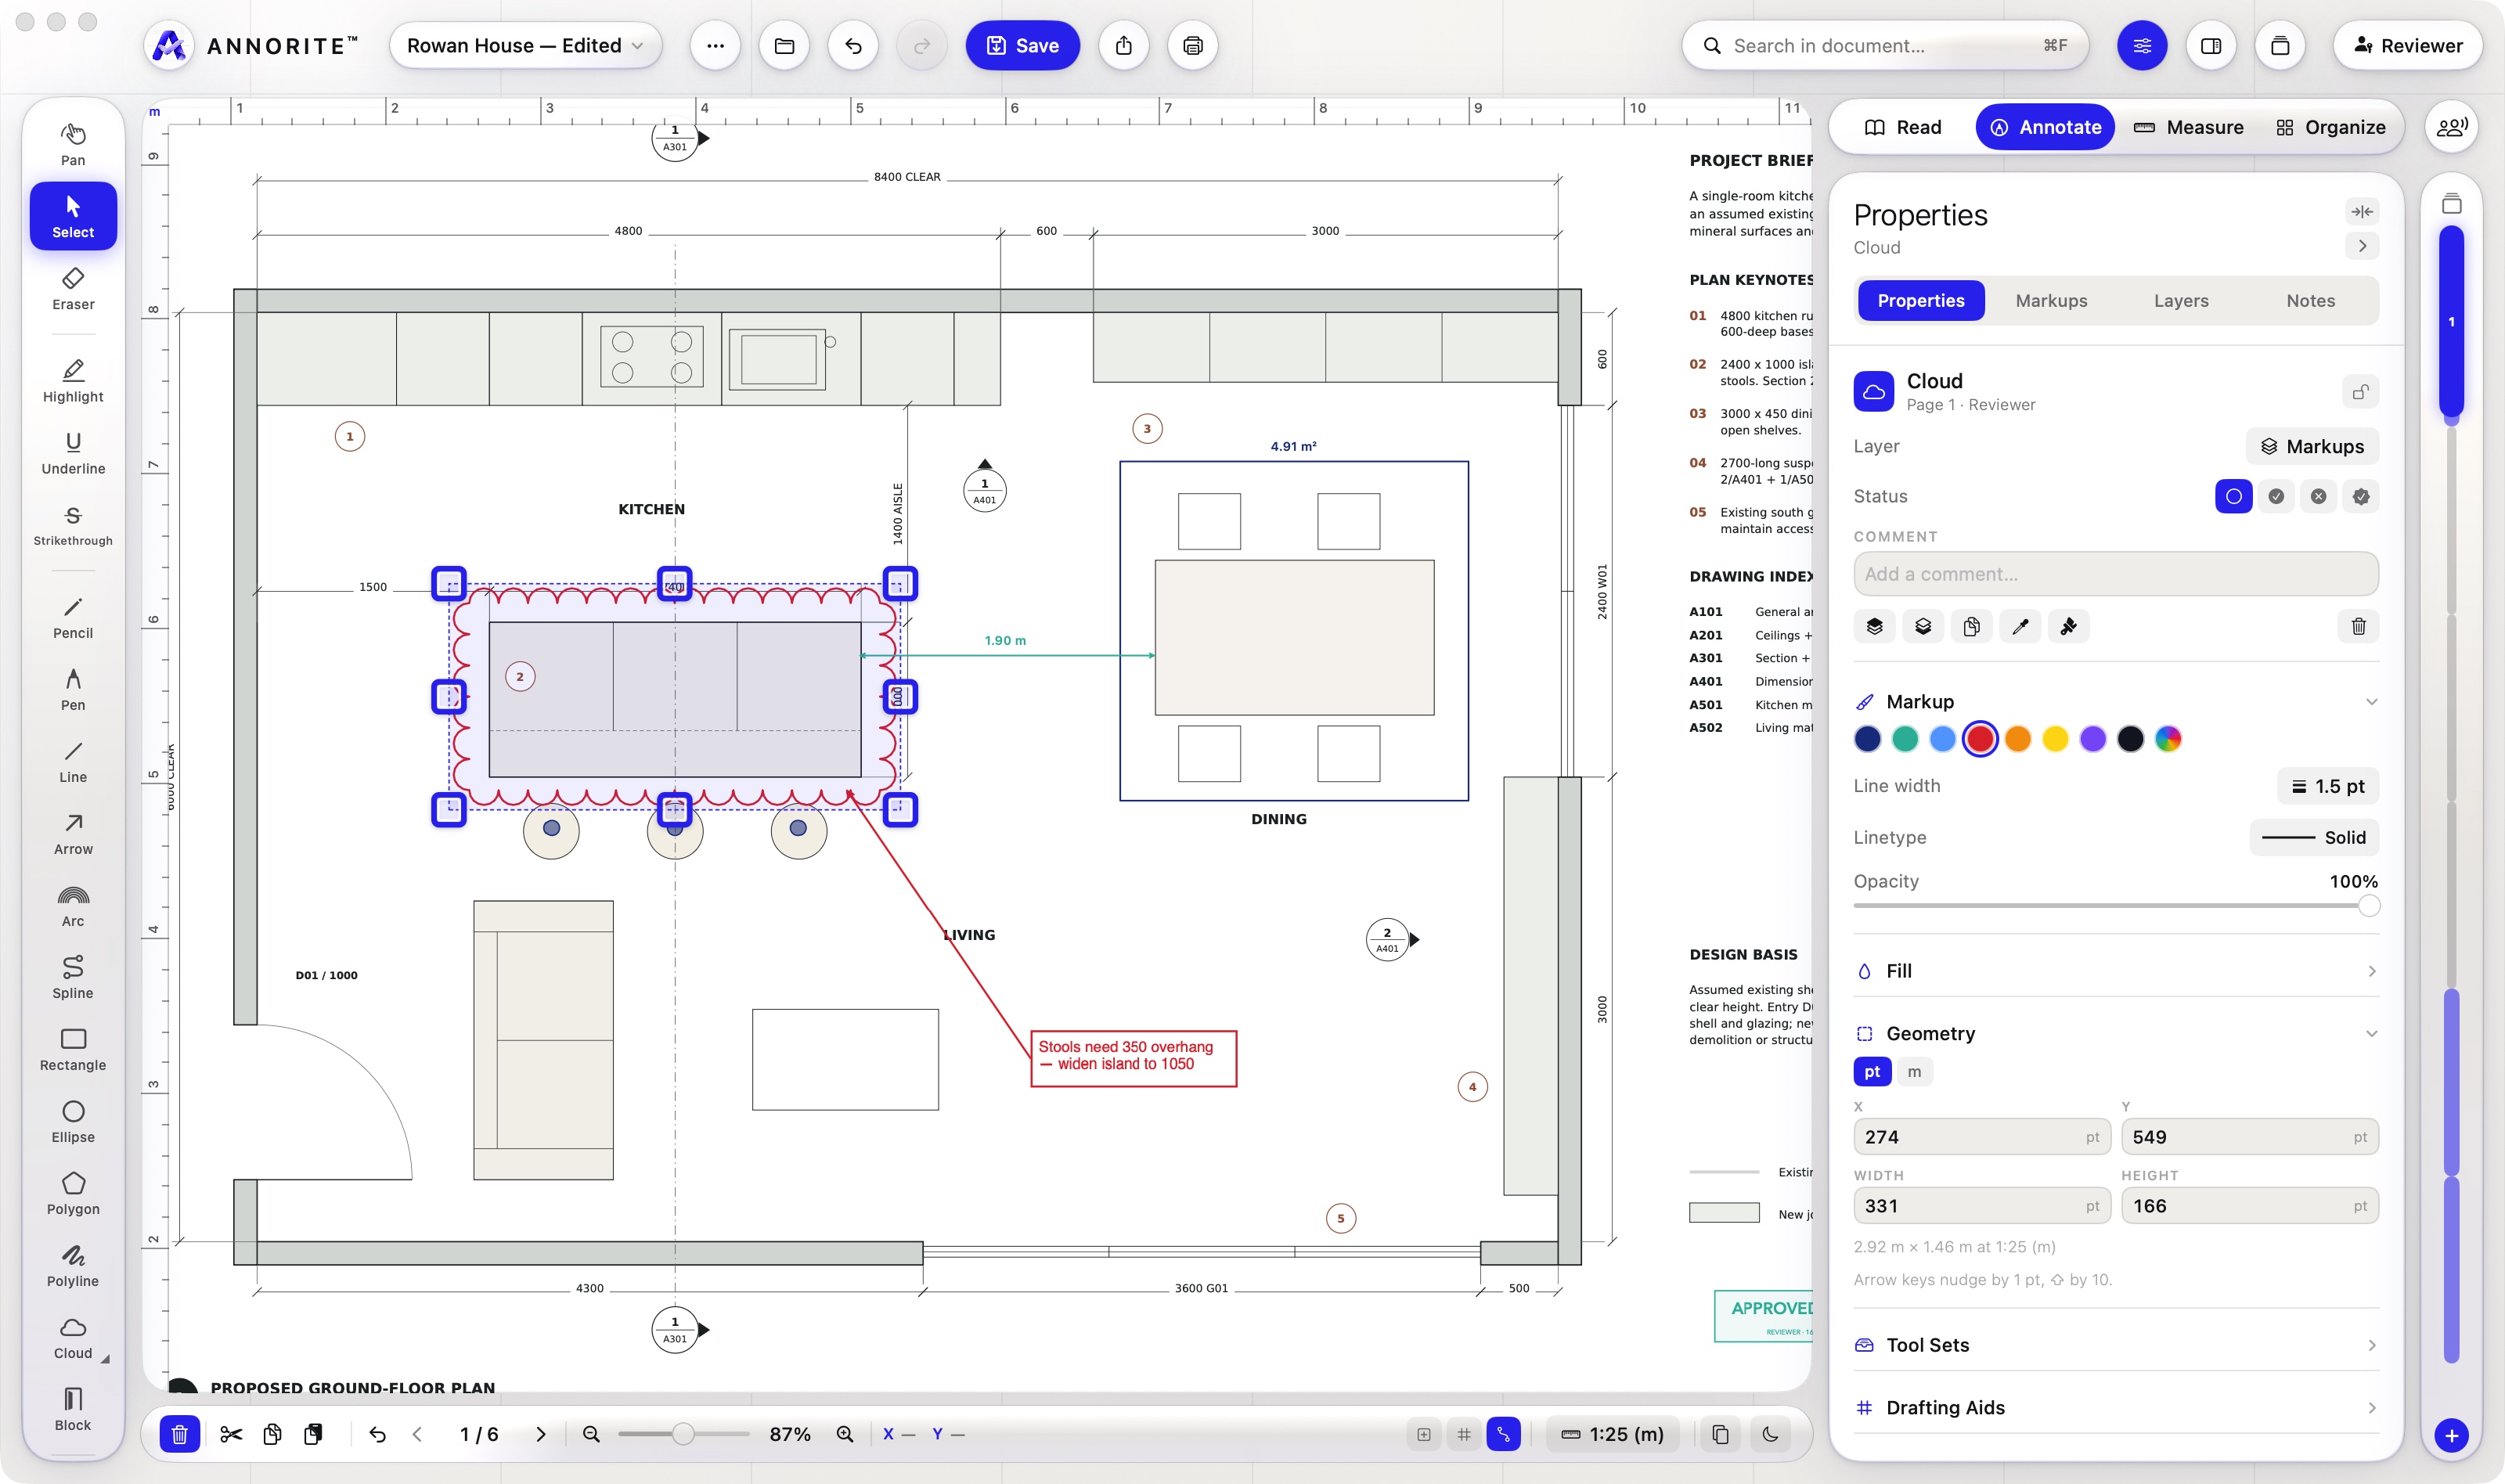
- Colour. Eight swatches, plus the rainbow bubble for any colour (CMYK, for print).
- Line. Width from 0.25 pt to 12 pt, thirteen linetypes, opacity, and an arrowhead for each end.
- Fill. A tint, or a hatch: diagonal, crosshatch, horizontal, vertical or grid, with spacing and angle.
- Each tool remembers its own style. Change the cloud’s colour and the next cloud uses it; the highlighter stays yellow.
- Match styles. Copy Properties and Paste Properties carry a style from one markup to others. Match Selection to First applies the first selected markup’s style to the rest.
The strip under the header carries the properties you reach for most, so the inspector can stay closed.
Select and arrange
- Select. Click a markup; ⇧-click to add another; drag across empty sheet to select everything the box touches.Tap a markup; drag across empty sheet to select everything the box touches; press and hold a markup for its menu.
- Select by type. The checklist button beside the Markups search field selects every cloud, every length, and so on, on the page.
- Move and resize. Drag the markup, or a grip. Arrow keys nudge by 1 pt, with ⇧ by 10. Exact position, size, length and bearing can be typed in Properties.
- Arrange. Bring forward, send back, align, distribute, rotate, flip, group and lock: in the Arrange menu and on a right-click: press and hold the markup.
- Locked objects. A locked markup can’t be moved or deleted. Right-clickPress and hold the sheet for Unlock All and a list of what is locked.
Markups list and review
The Markups tab lists every markup in the document with its page, measurement, comment, author and status. Click a row to go to that markup.
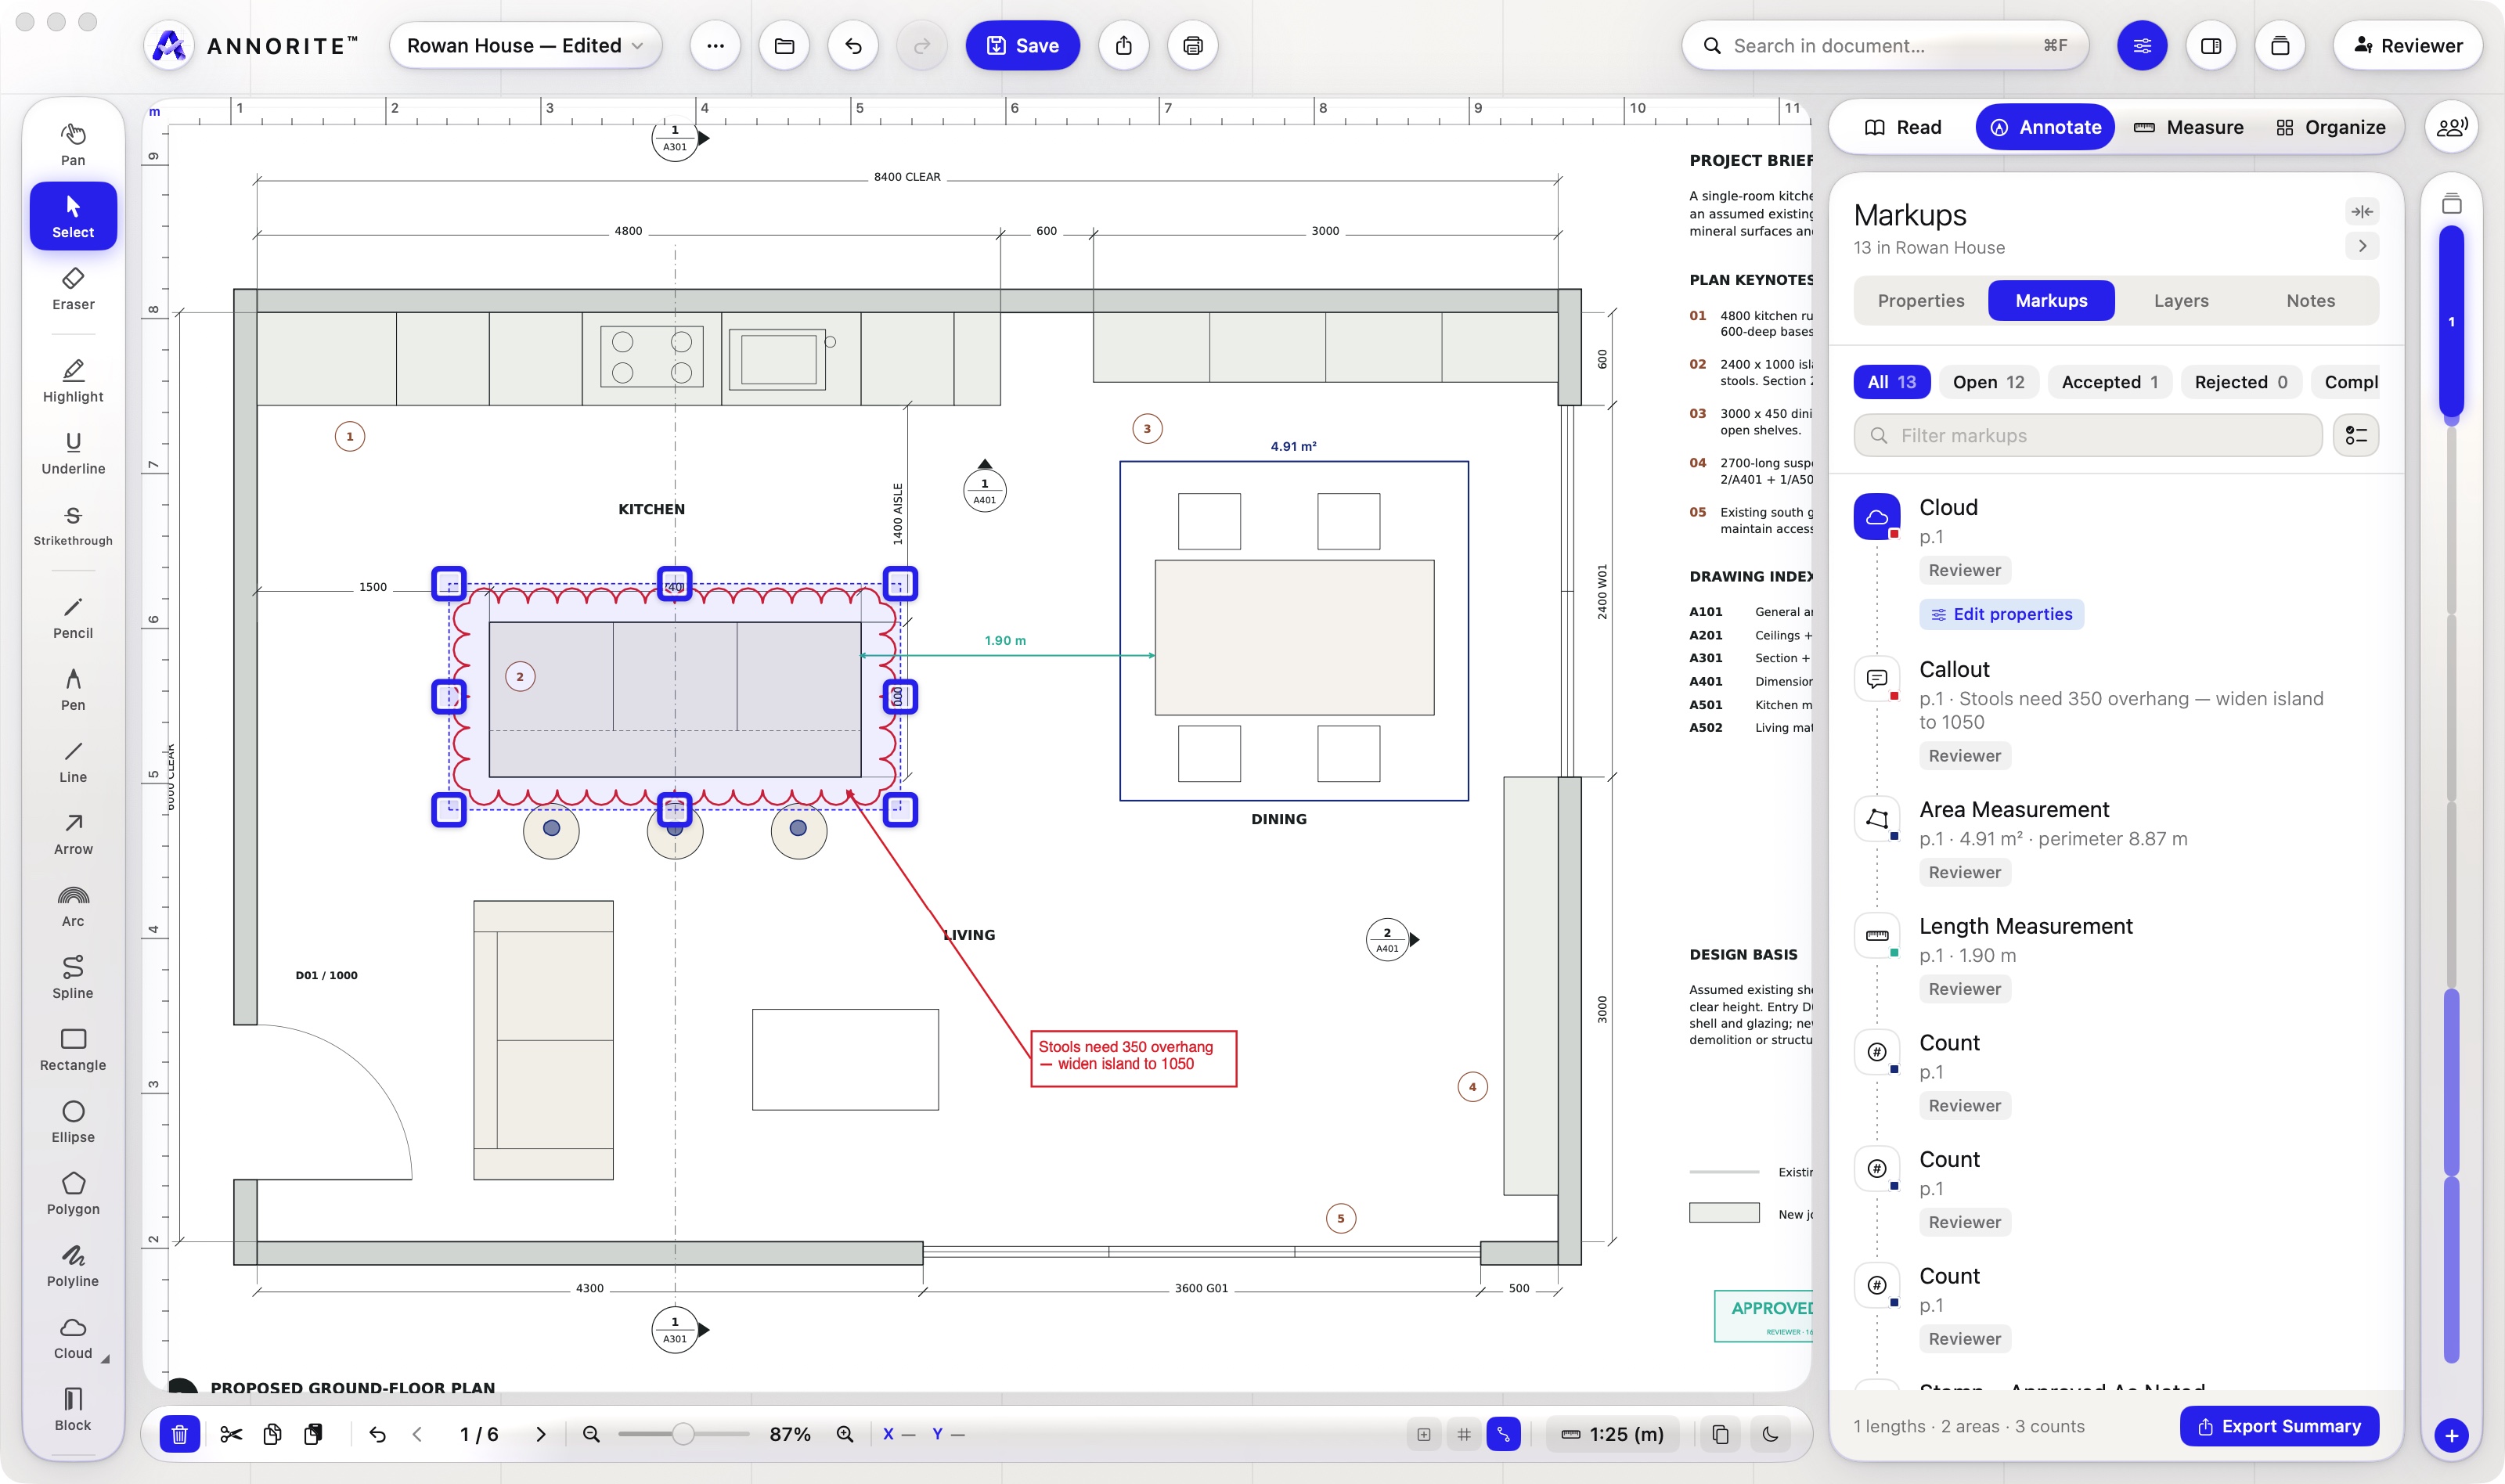
- Status. Open, Accepted, Rejected or Completed, set in Properties.
- Filter. By status, or by typing in the filter field.
- Review summary. Export Summary writes a PDF report with a picture of each markup, its comment and status, or a CSV. Your logo goes at the top if you add one in Settings ▸ Markups.
- Remove author names. ⋯ ▸ Markups ▸ Remove Author Names… before a file leaves the office.
Layers
Markups can be sorted onto named layers. Hide a layer to get it out of the way; lock one to protect it.
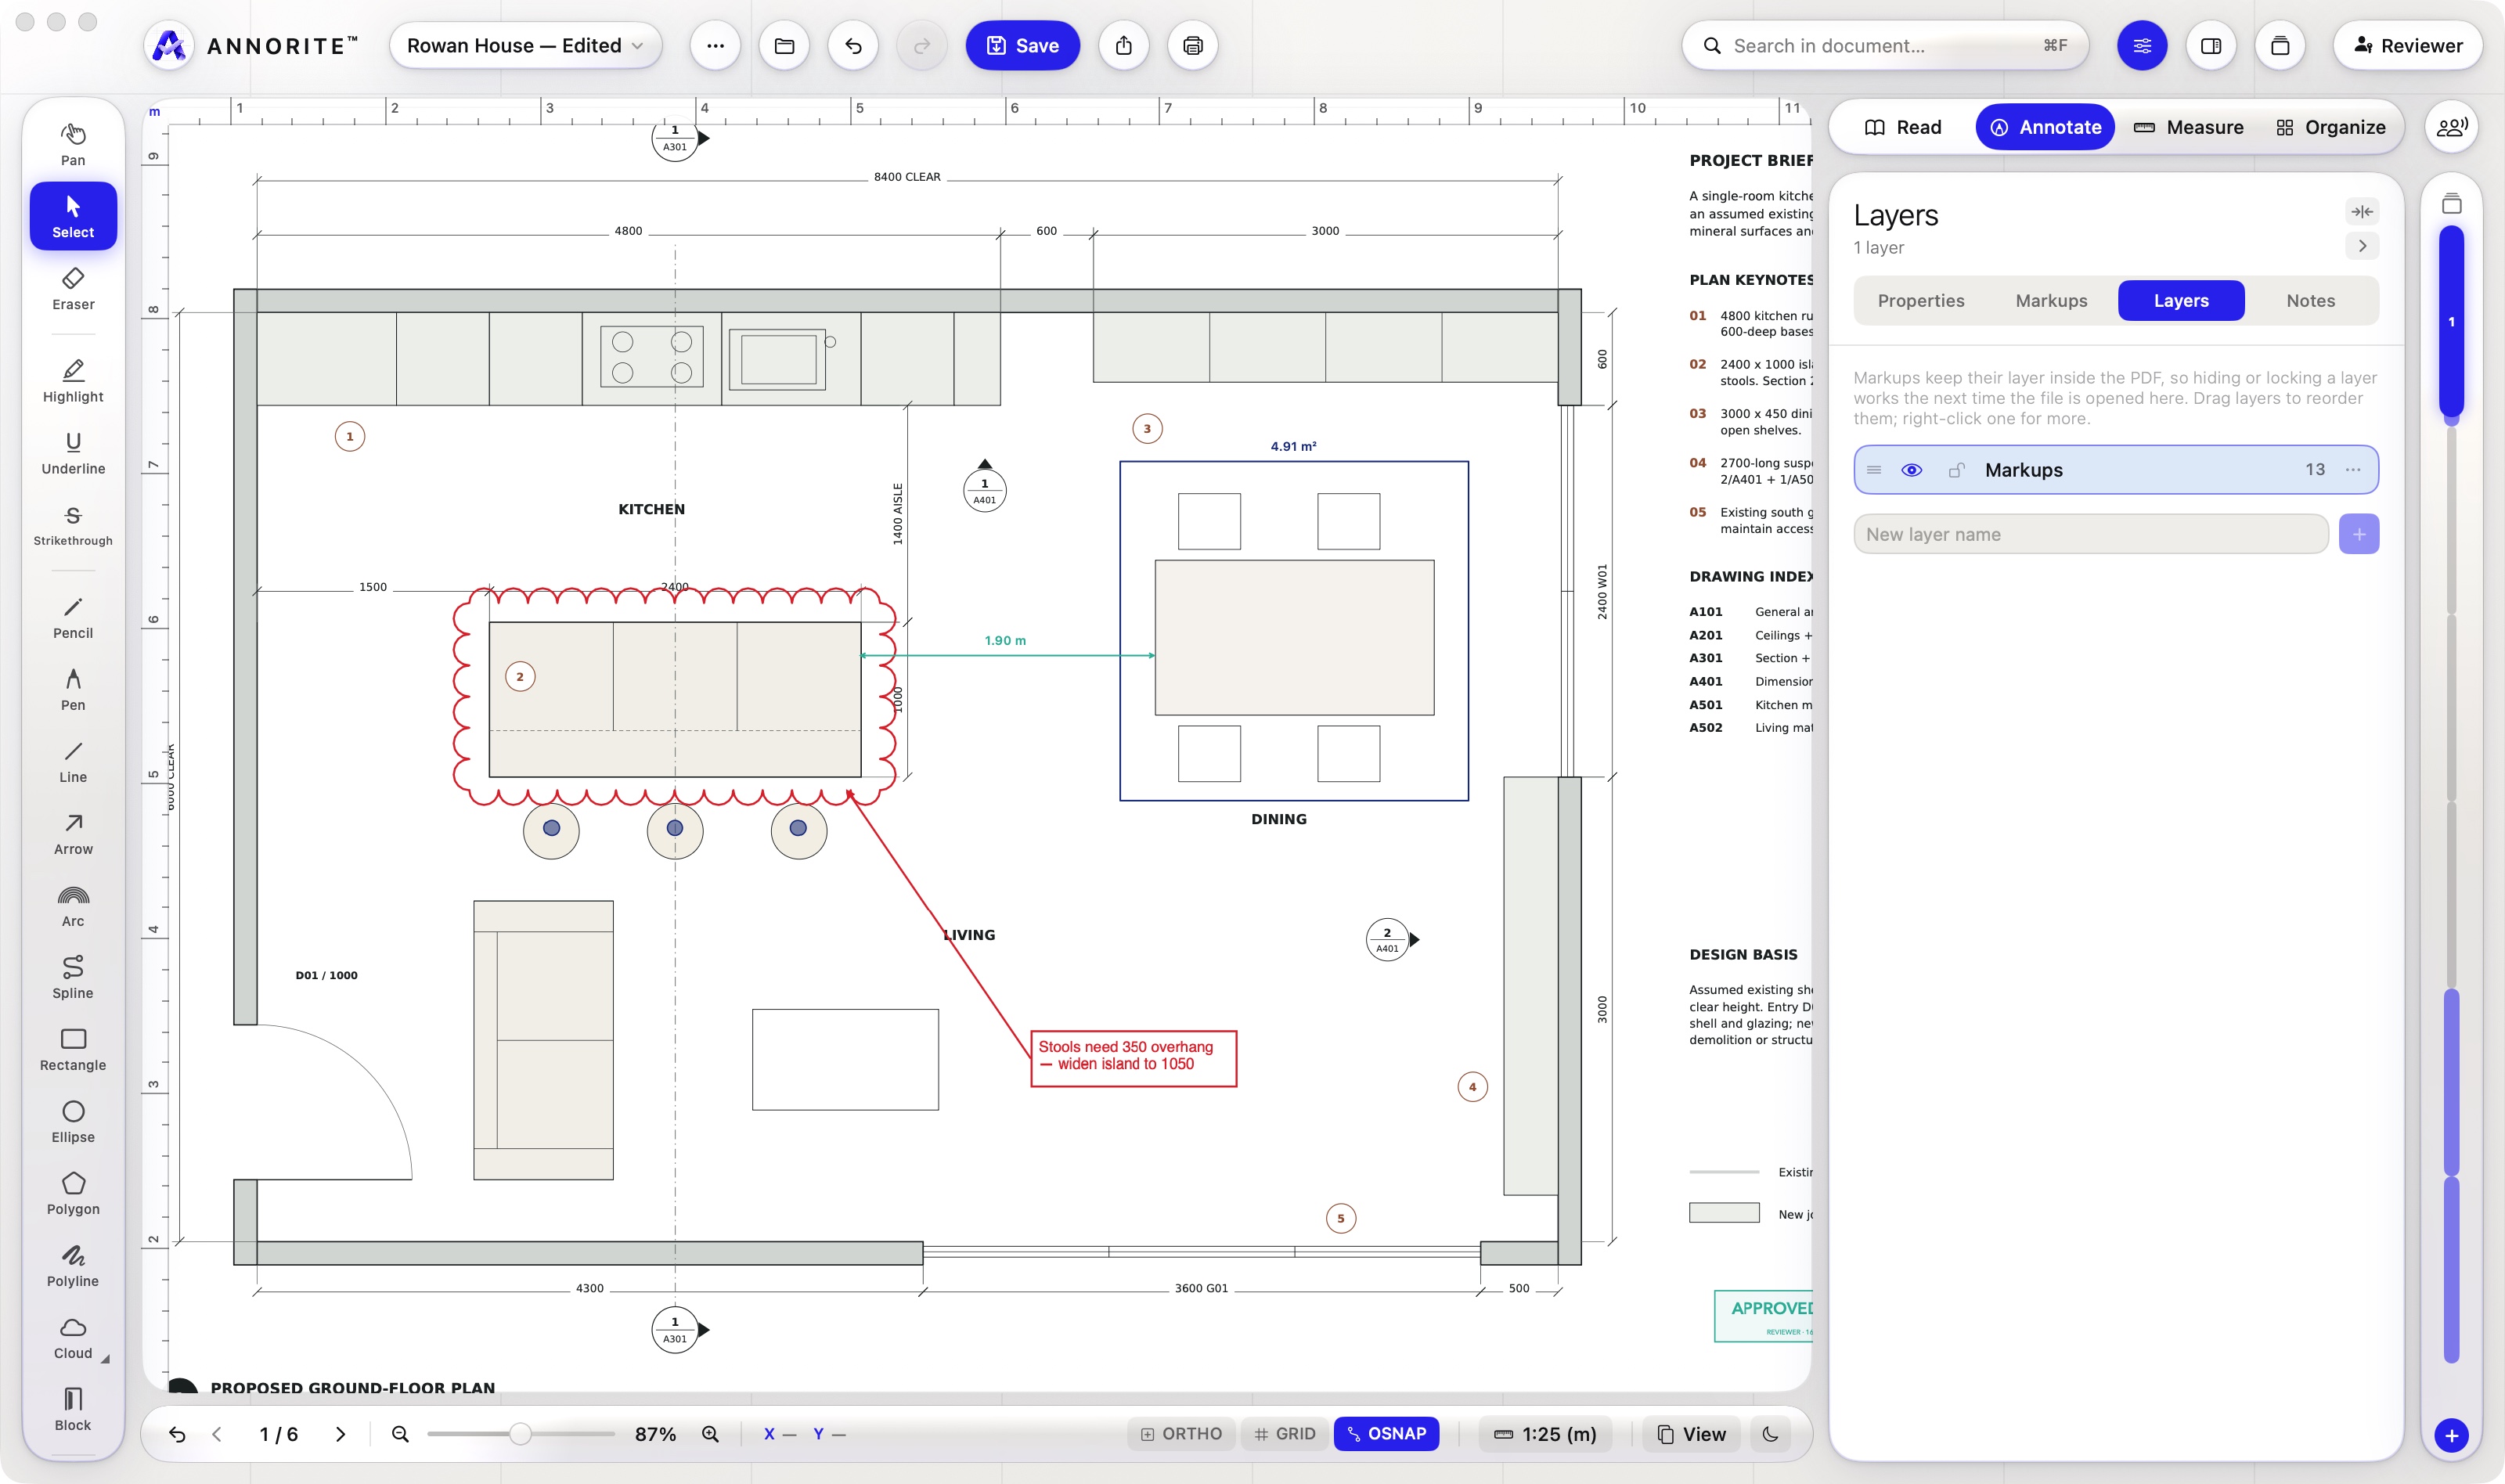
New markups go on the active layer. To move a markup, select it and choose its layer in Properties. A layer’s menu can also set colour, linetype and weight for everything on it.
Notes
Notes are your own jottings beside a document: questions for the consultant, things to check on site. They stay on your device with that document and are not written into the PDF.
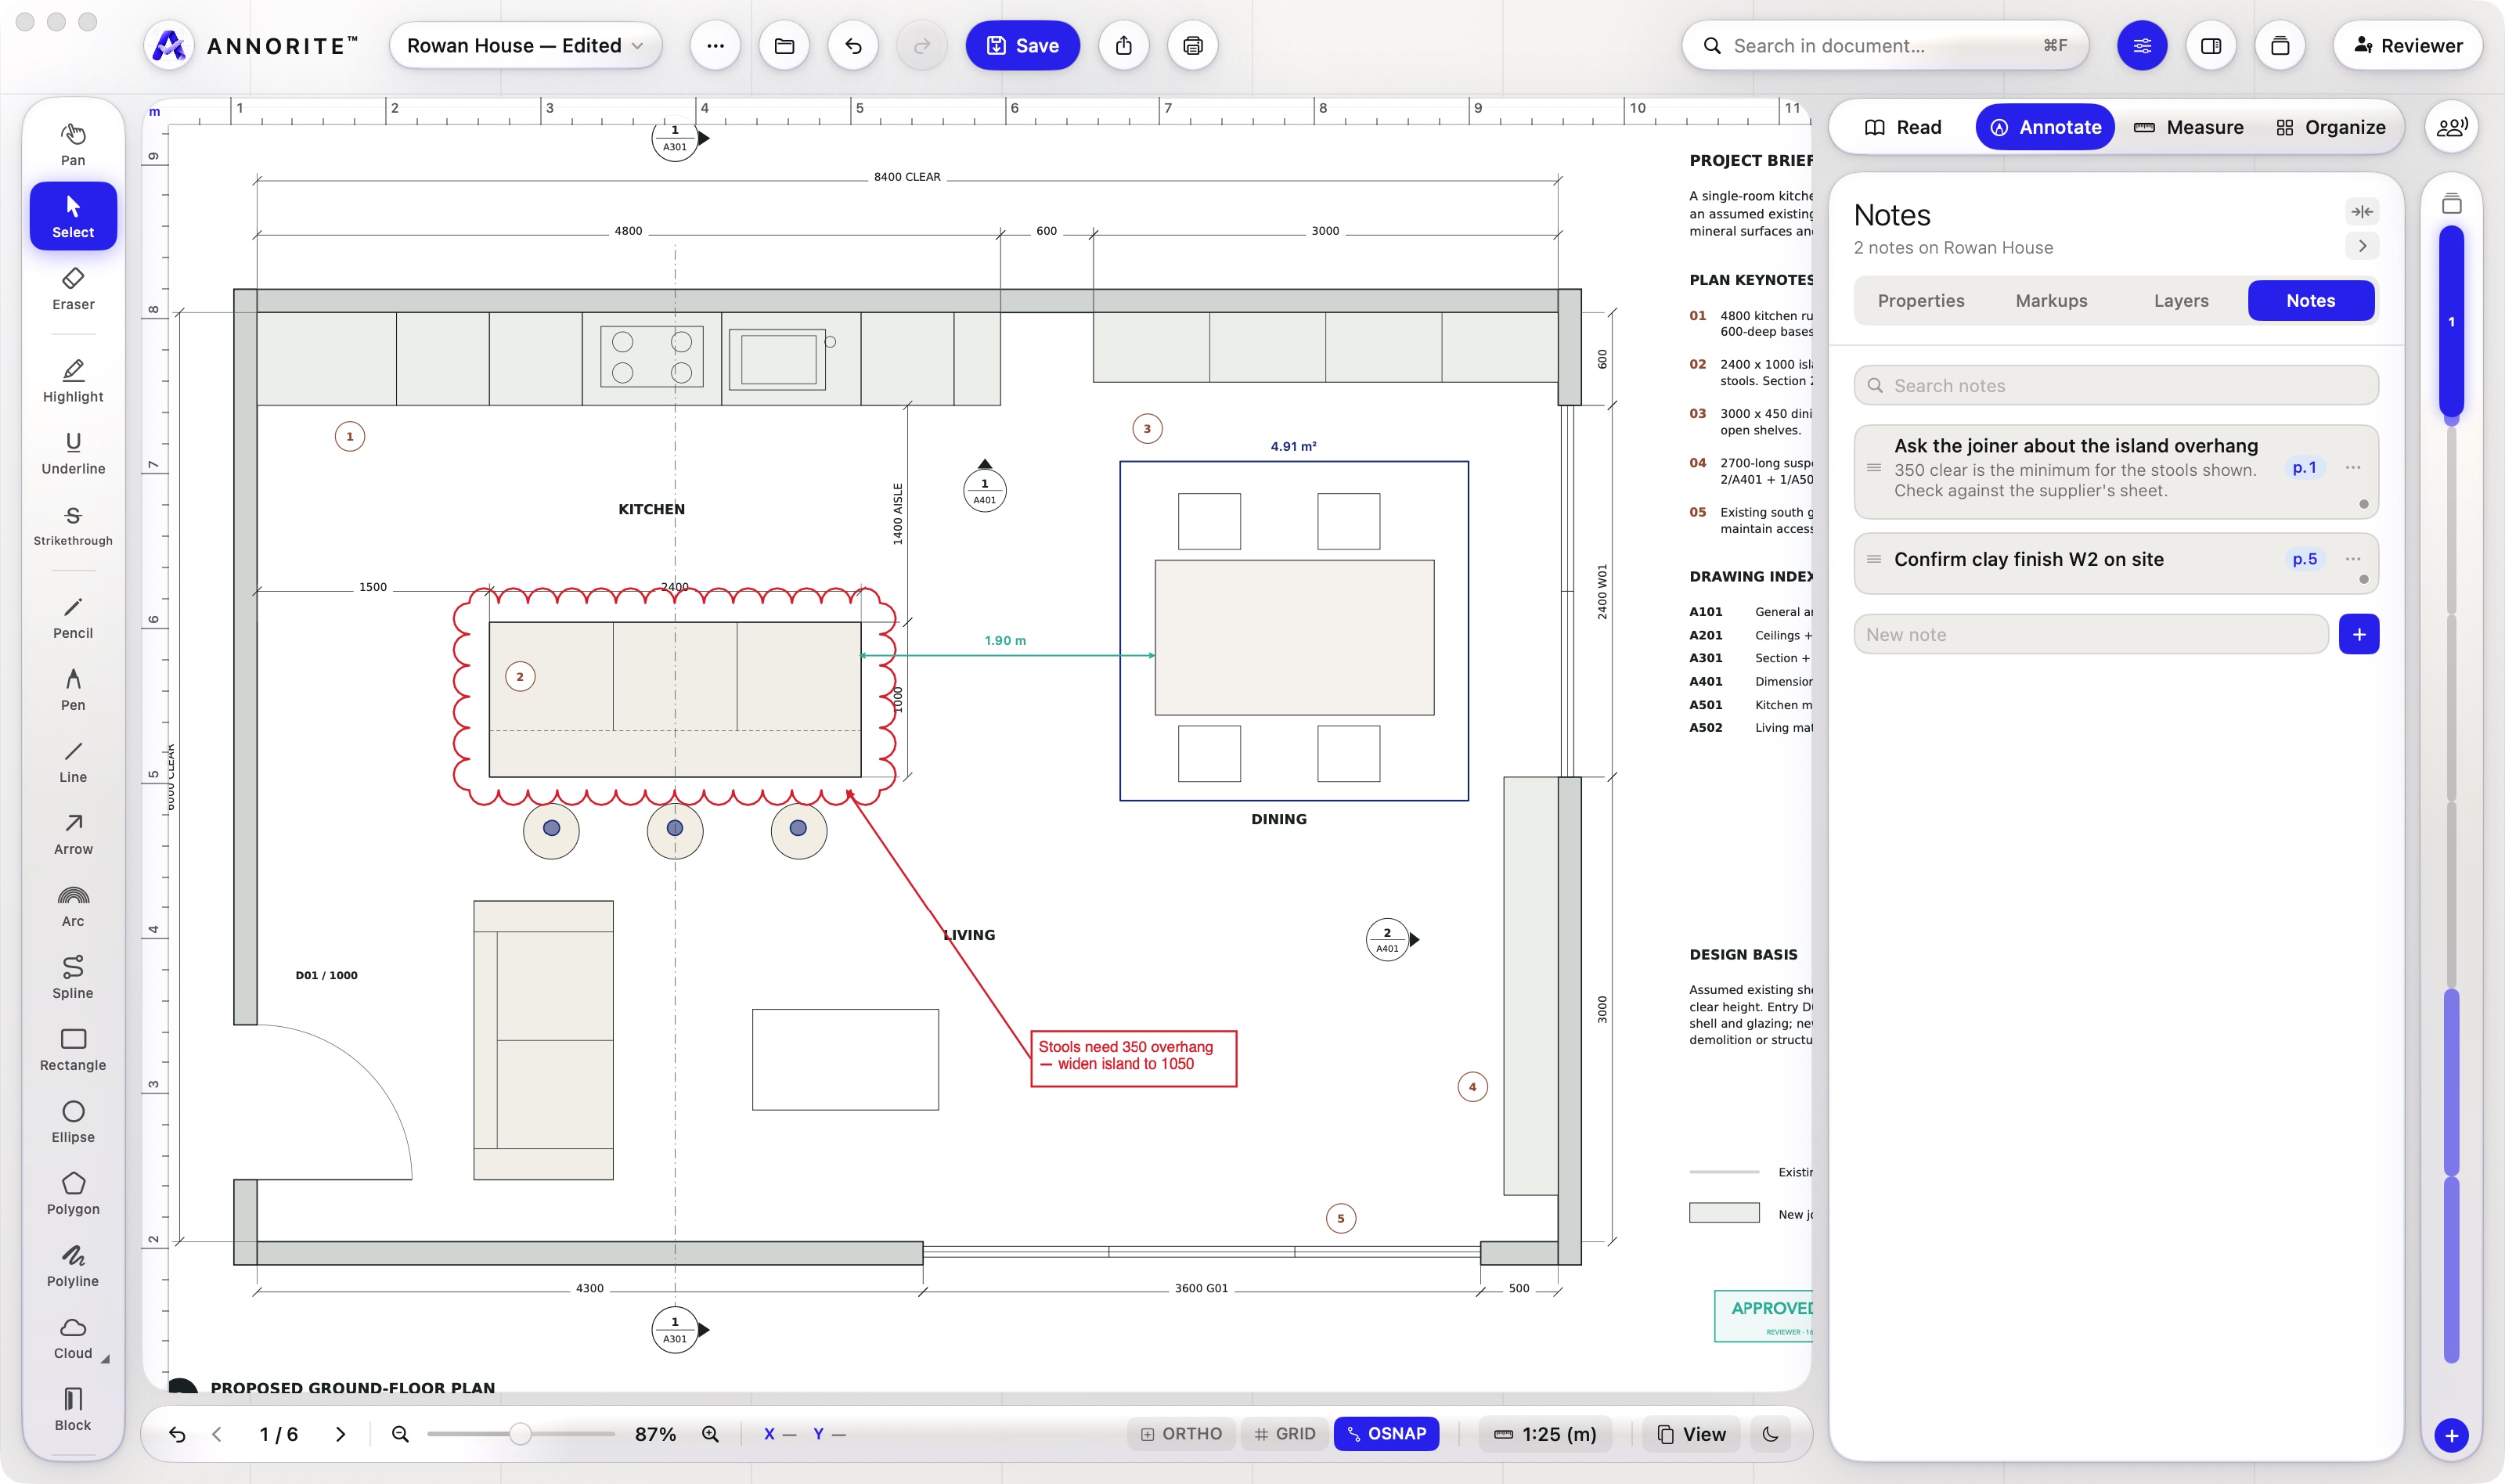
Type in New note and press Return. Click a note to open and edit it; drag to reorder. The dot at a note’s corner says who wrote it. In a live session, notes are shared and take their author’s colour.
Pages and sheets
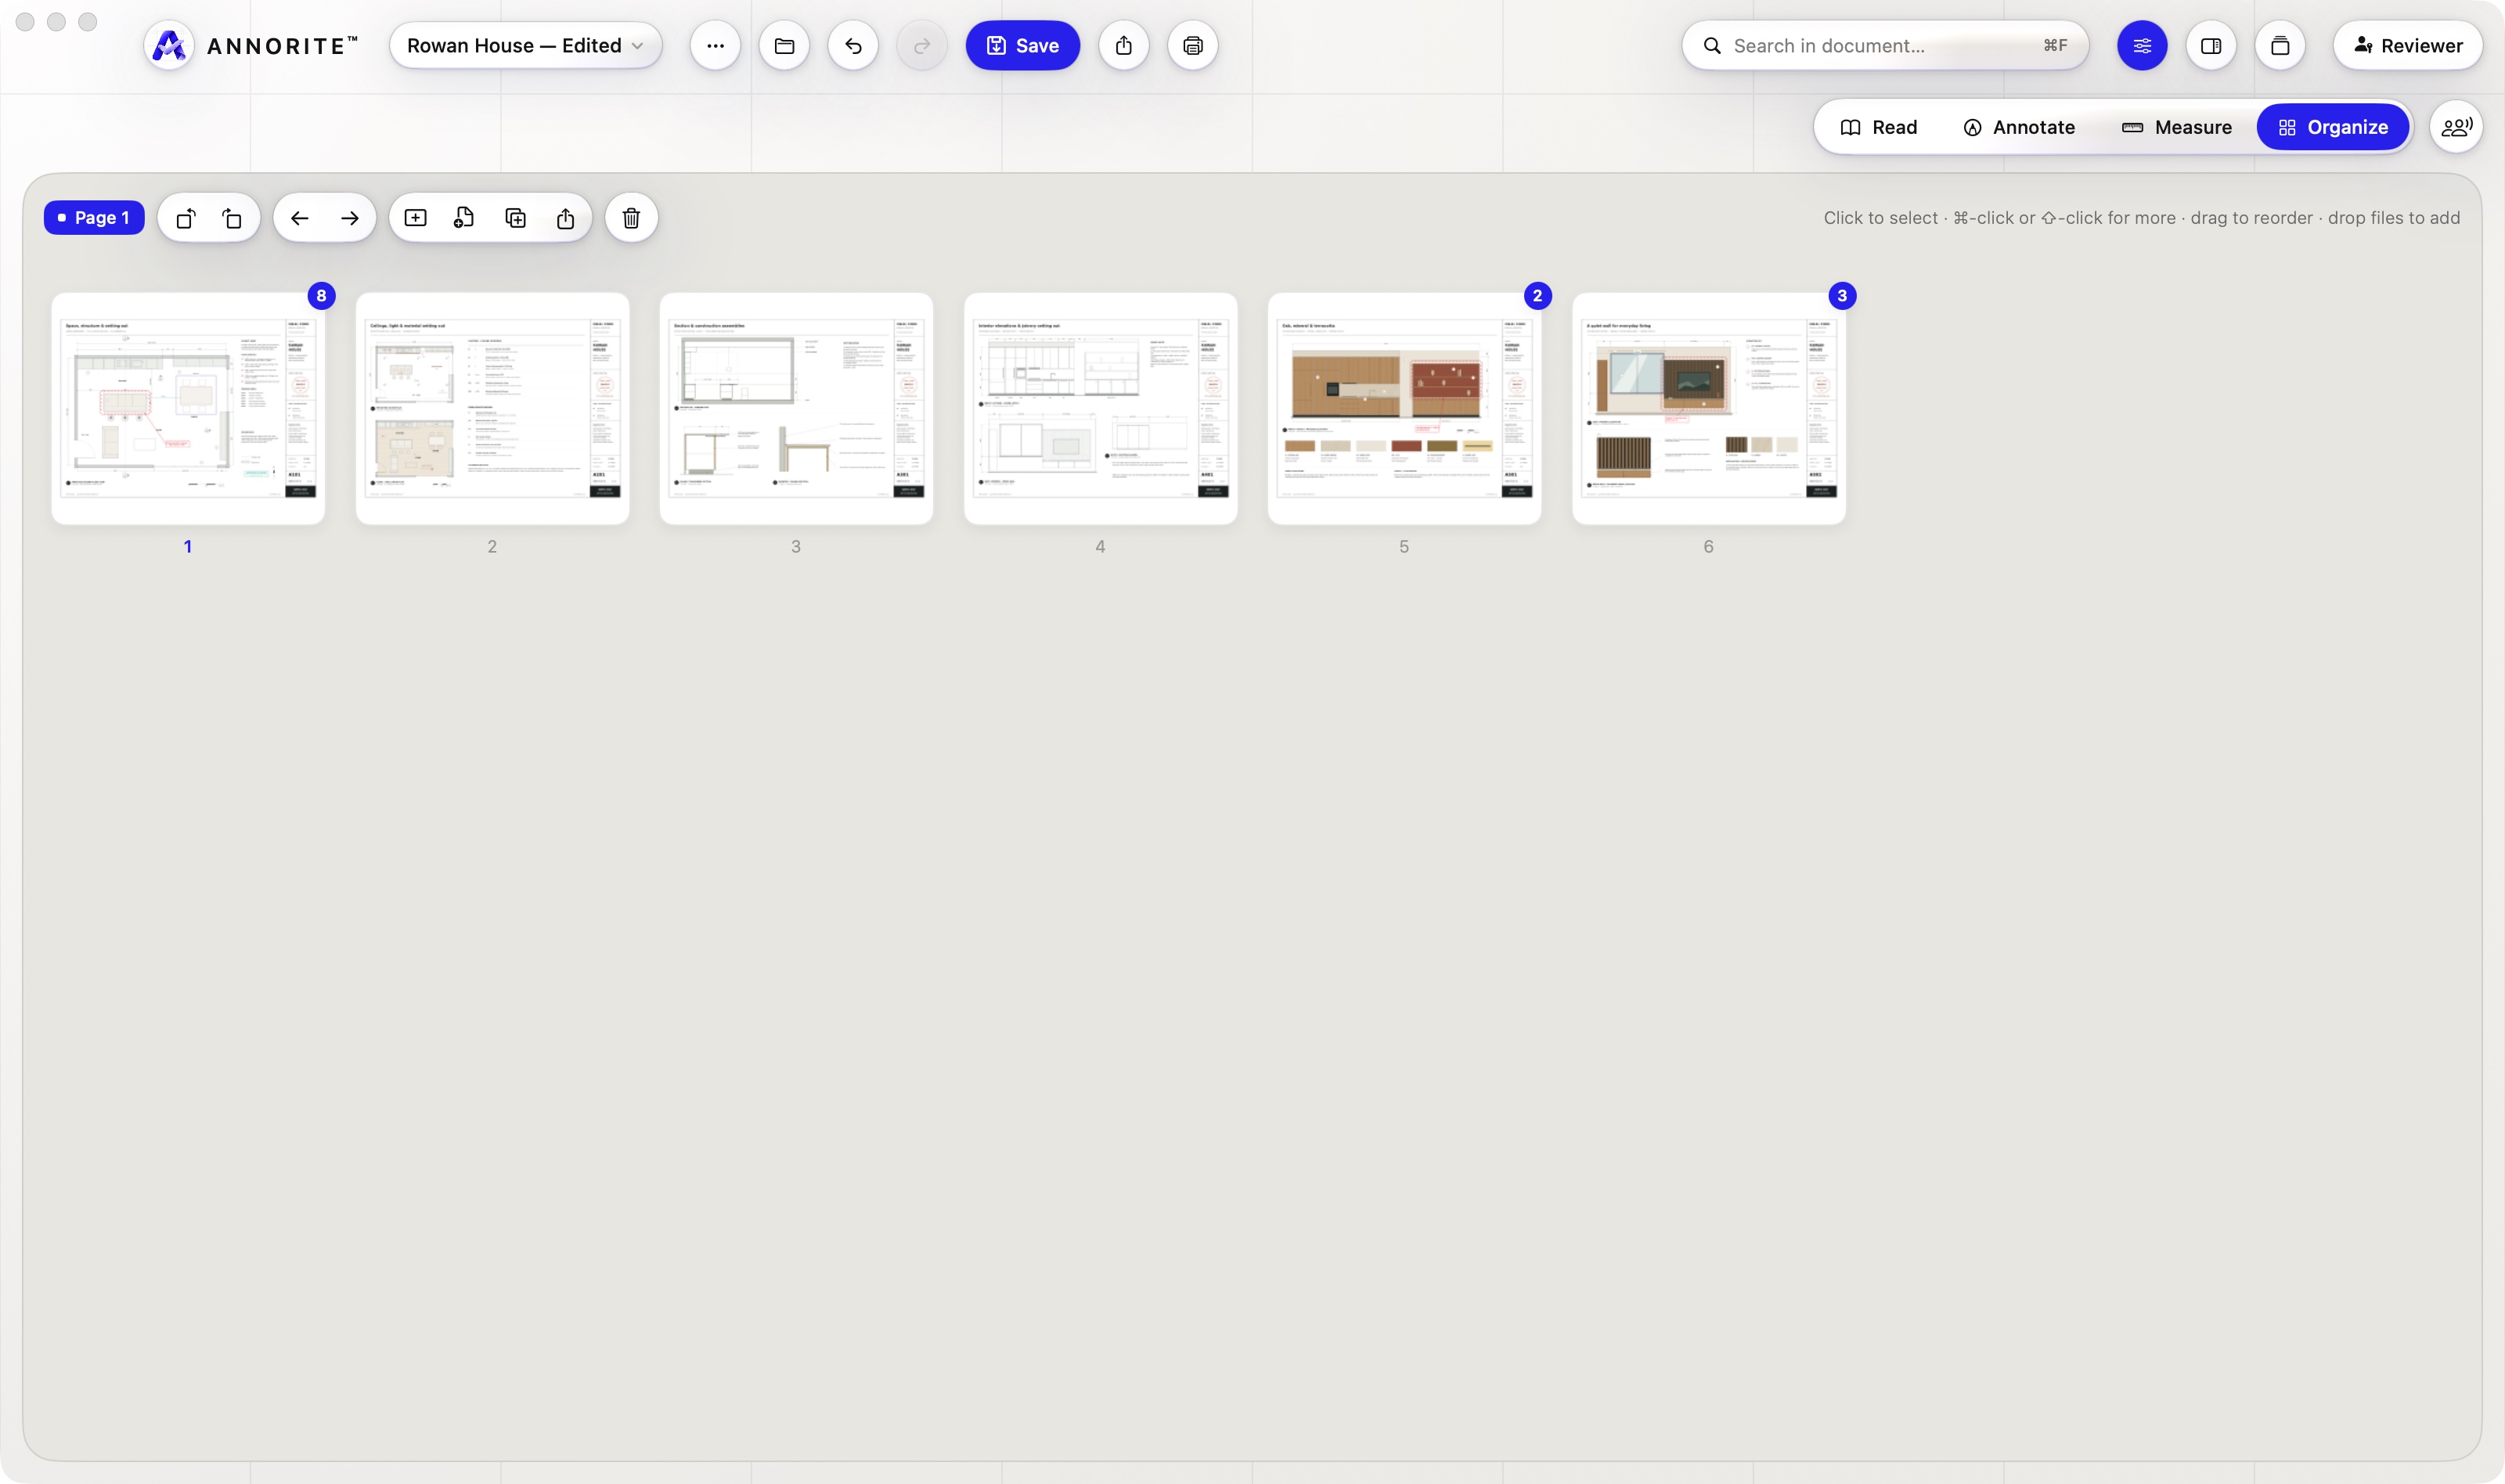
- Organize. Drag pages to reorder. Right-clickPress and hold a page to rotate, duplicate, delete or move it.
- Insert. ⋯ ▸ Insert adds pages from another PDF, a picture or a DXF, or a blank layout sheet.
- Page numbers, headers and footers. ⋯ ▸ Insert ▸ Page Numbers… or Header & Footer… writes text at up to six places round every sheet, with /#page of /#pages, /#file and /#date filled in. Applying again replaces them; Remove takes them all off.
- Scan. ⋯ ▸ Insert ▸ Scan with Camera… photographs a page and places it on the sheet.
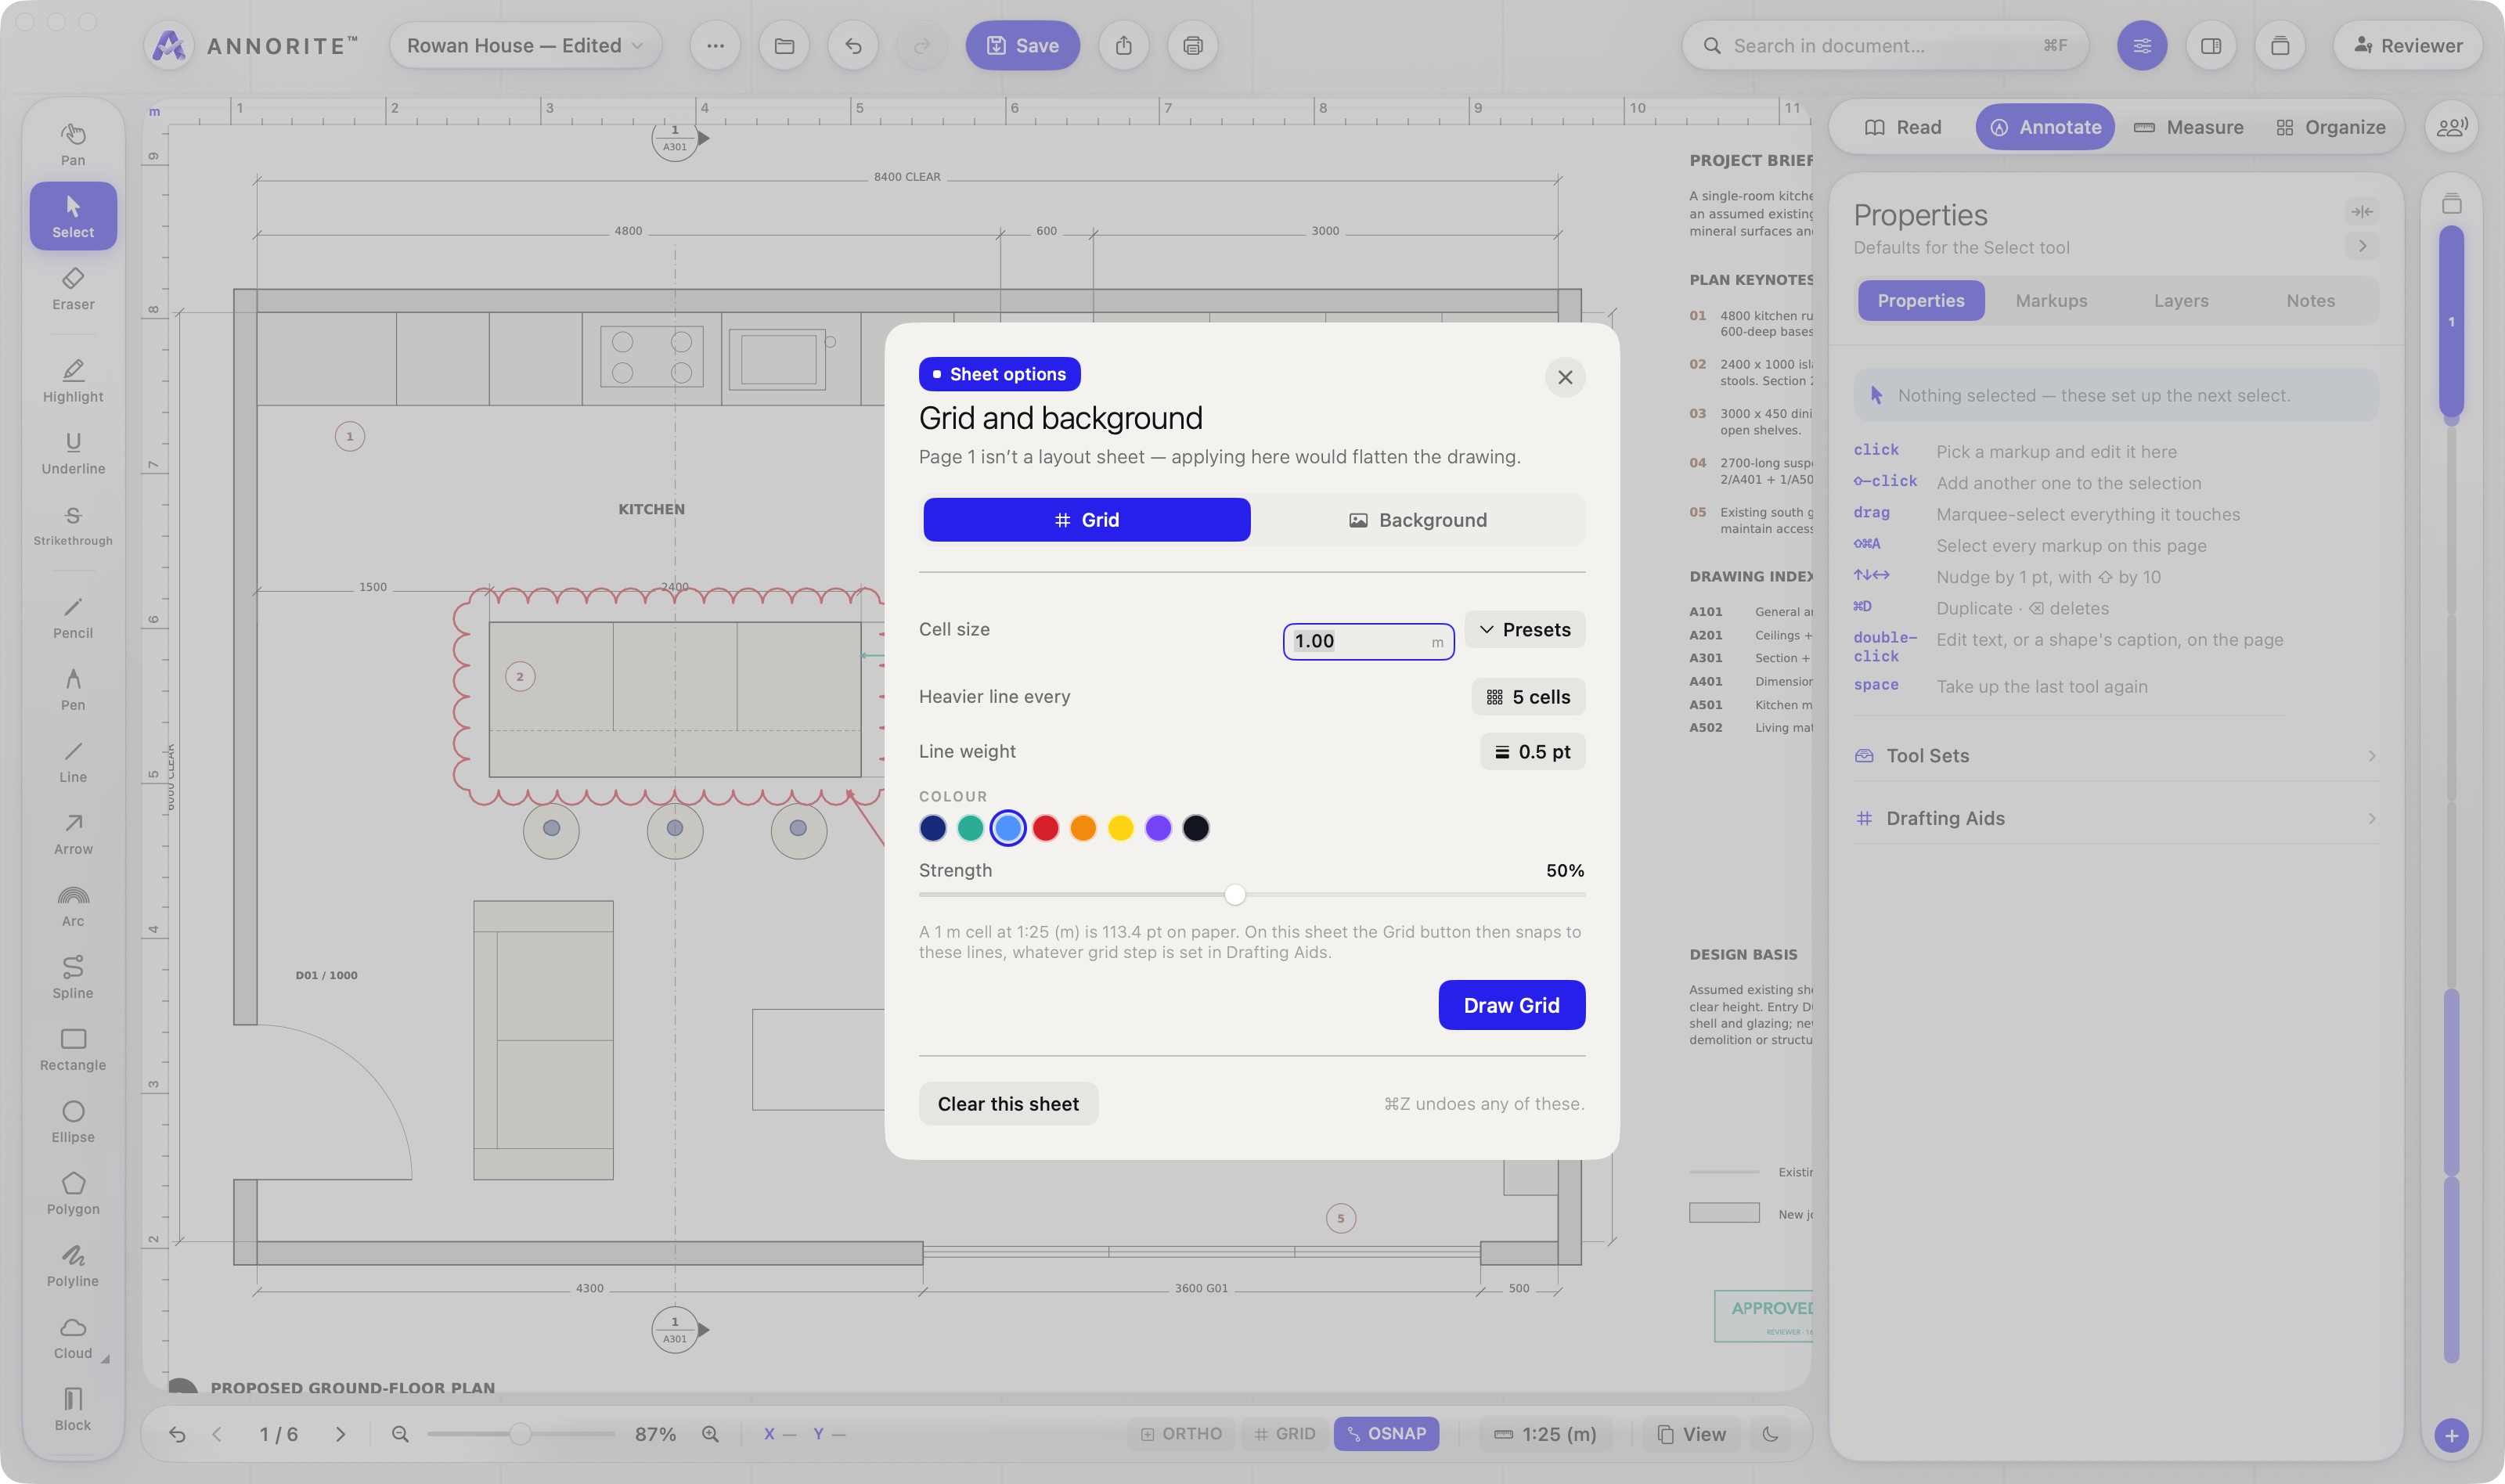
- Layout sheets. A blank sheet the size of the others, for gathering snapshots, pictures and markups. Sheet Options adds a grid in drawing units or a background image.
- Snapshots. The Snapshot tool copies a region of a drawing with its scale. Paste it on any sheet as a picture you can move, resize and adjust.
- Carry markups across pages. Paste in Place, Paste on Next Page and Paste on Pages… repeat a selection at the same spot on other sheets.
Compare and trace
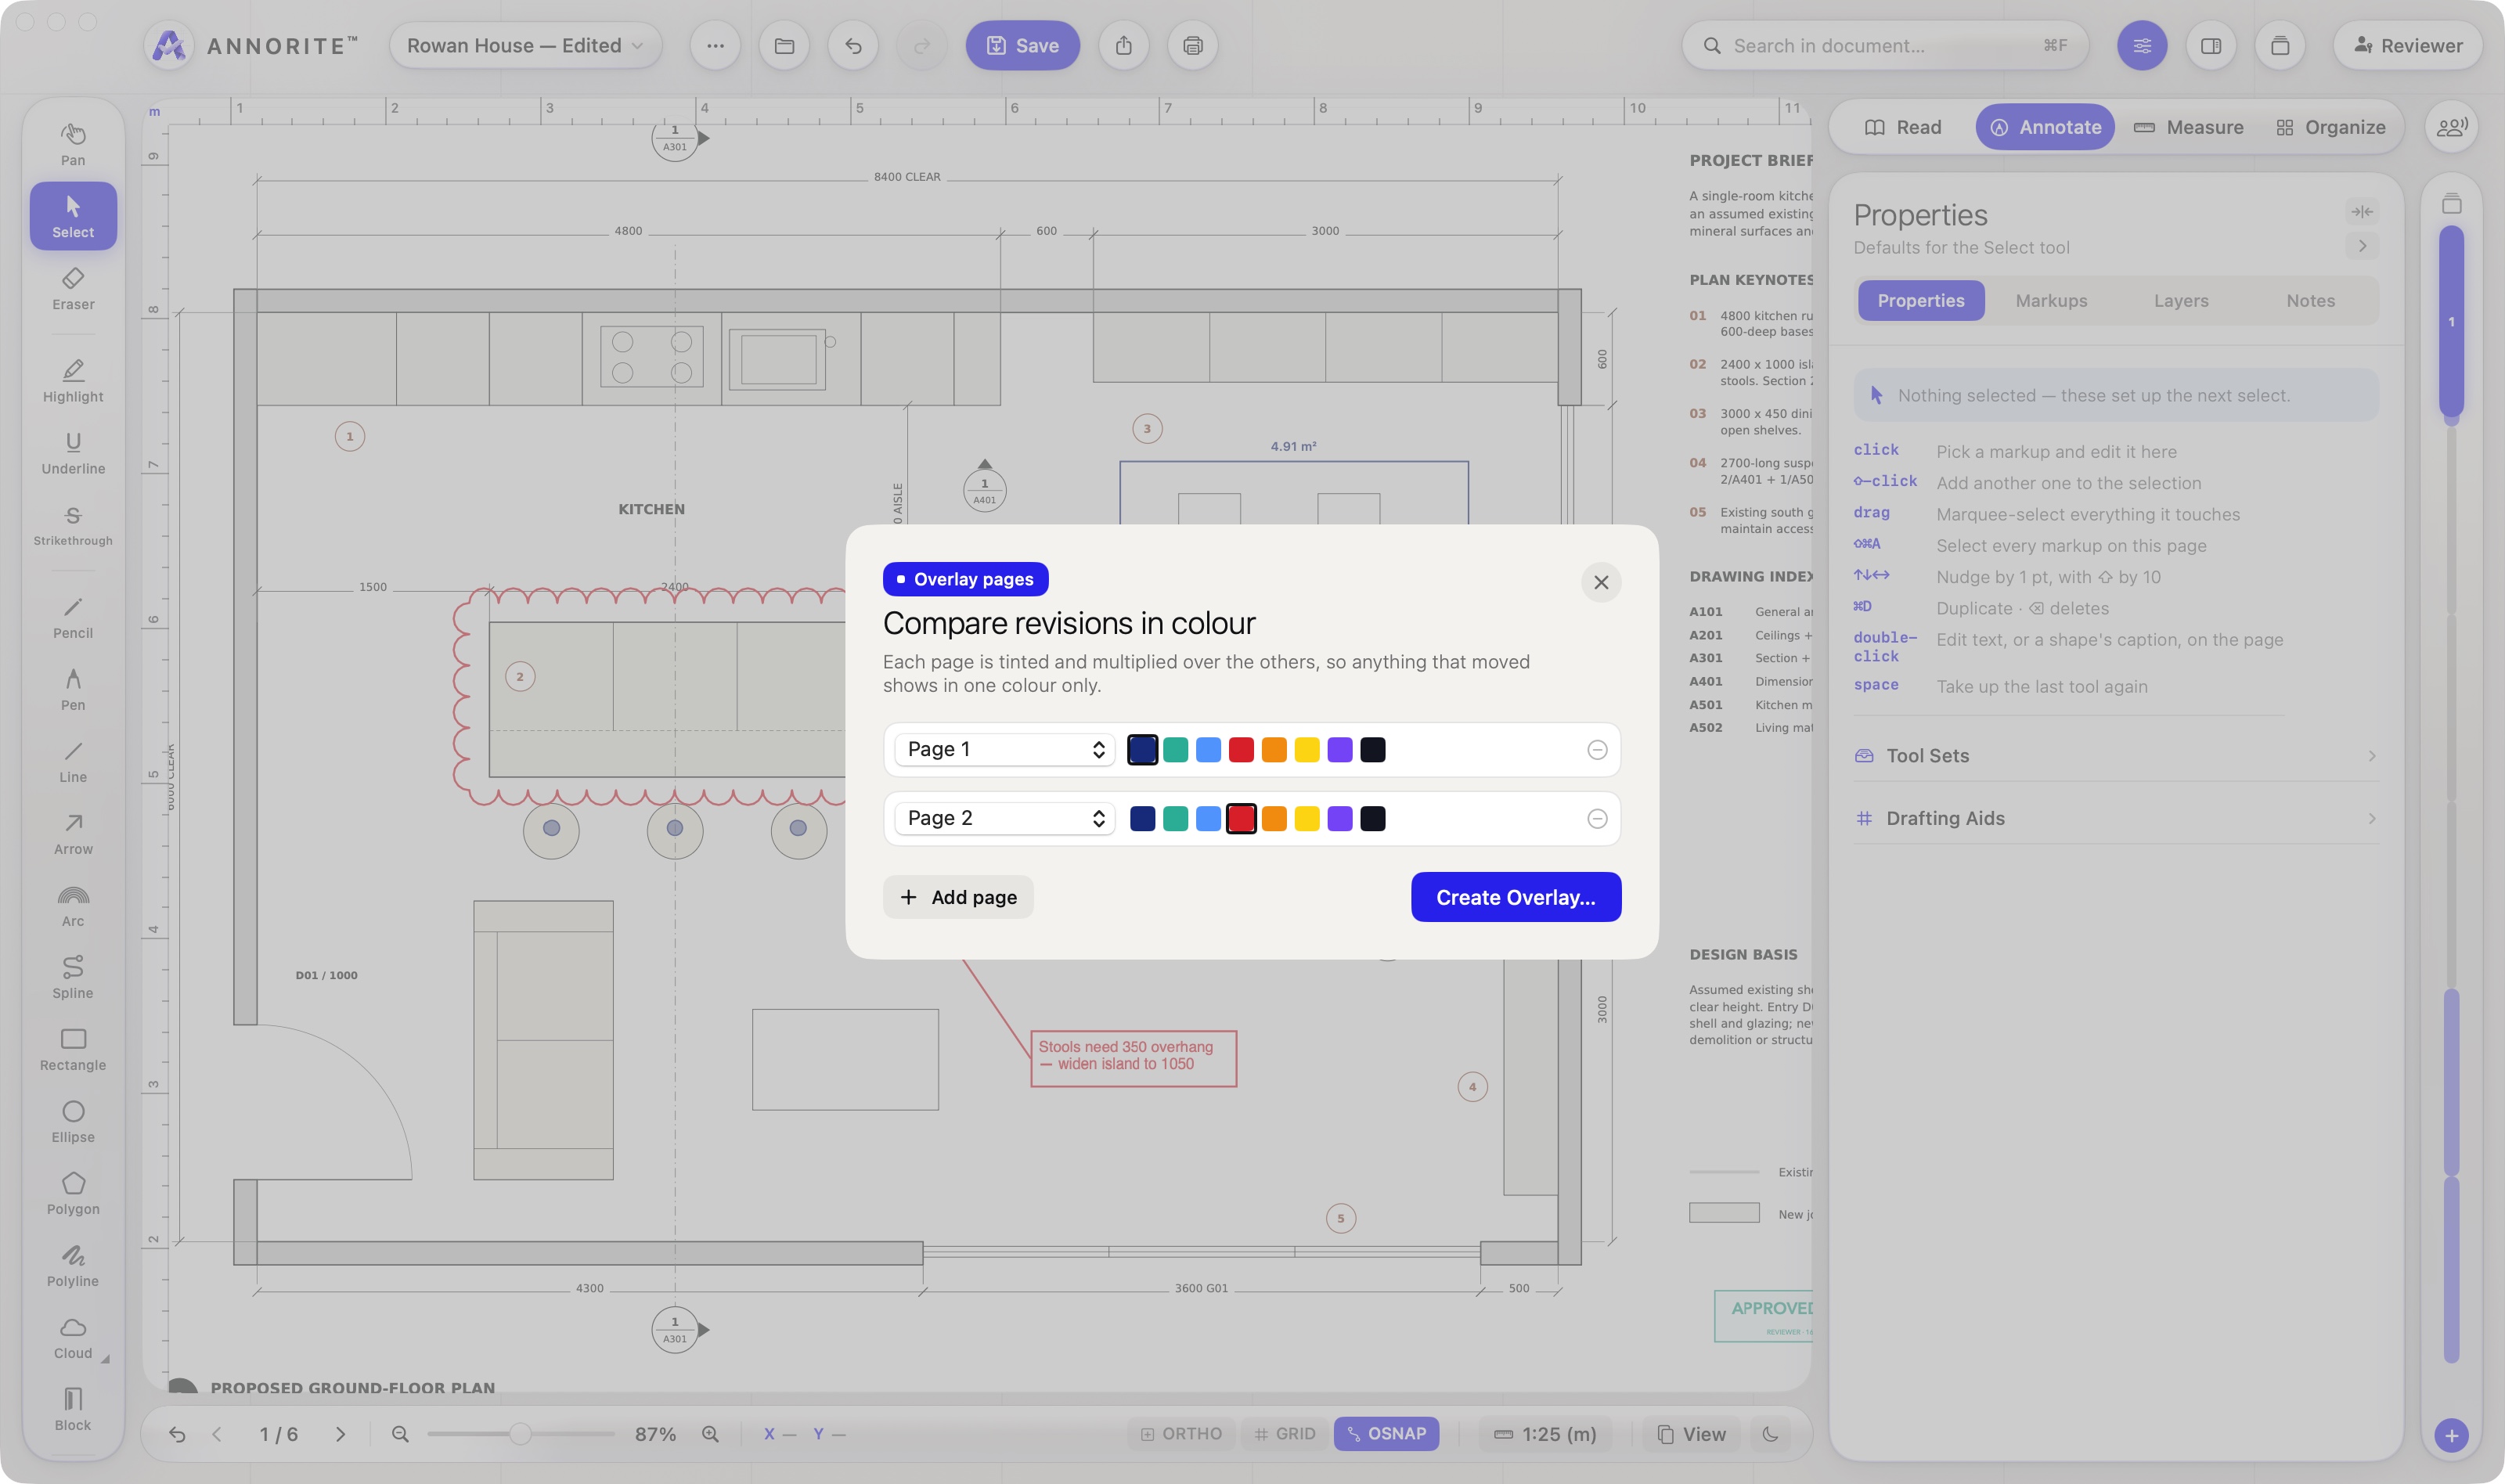
- Overlay Pages
- Lays two to four pages over each other, each in its own colour, so differences in the linework show. ⋯ ▸ Overlay Pages…
- Trace Files
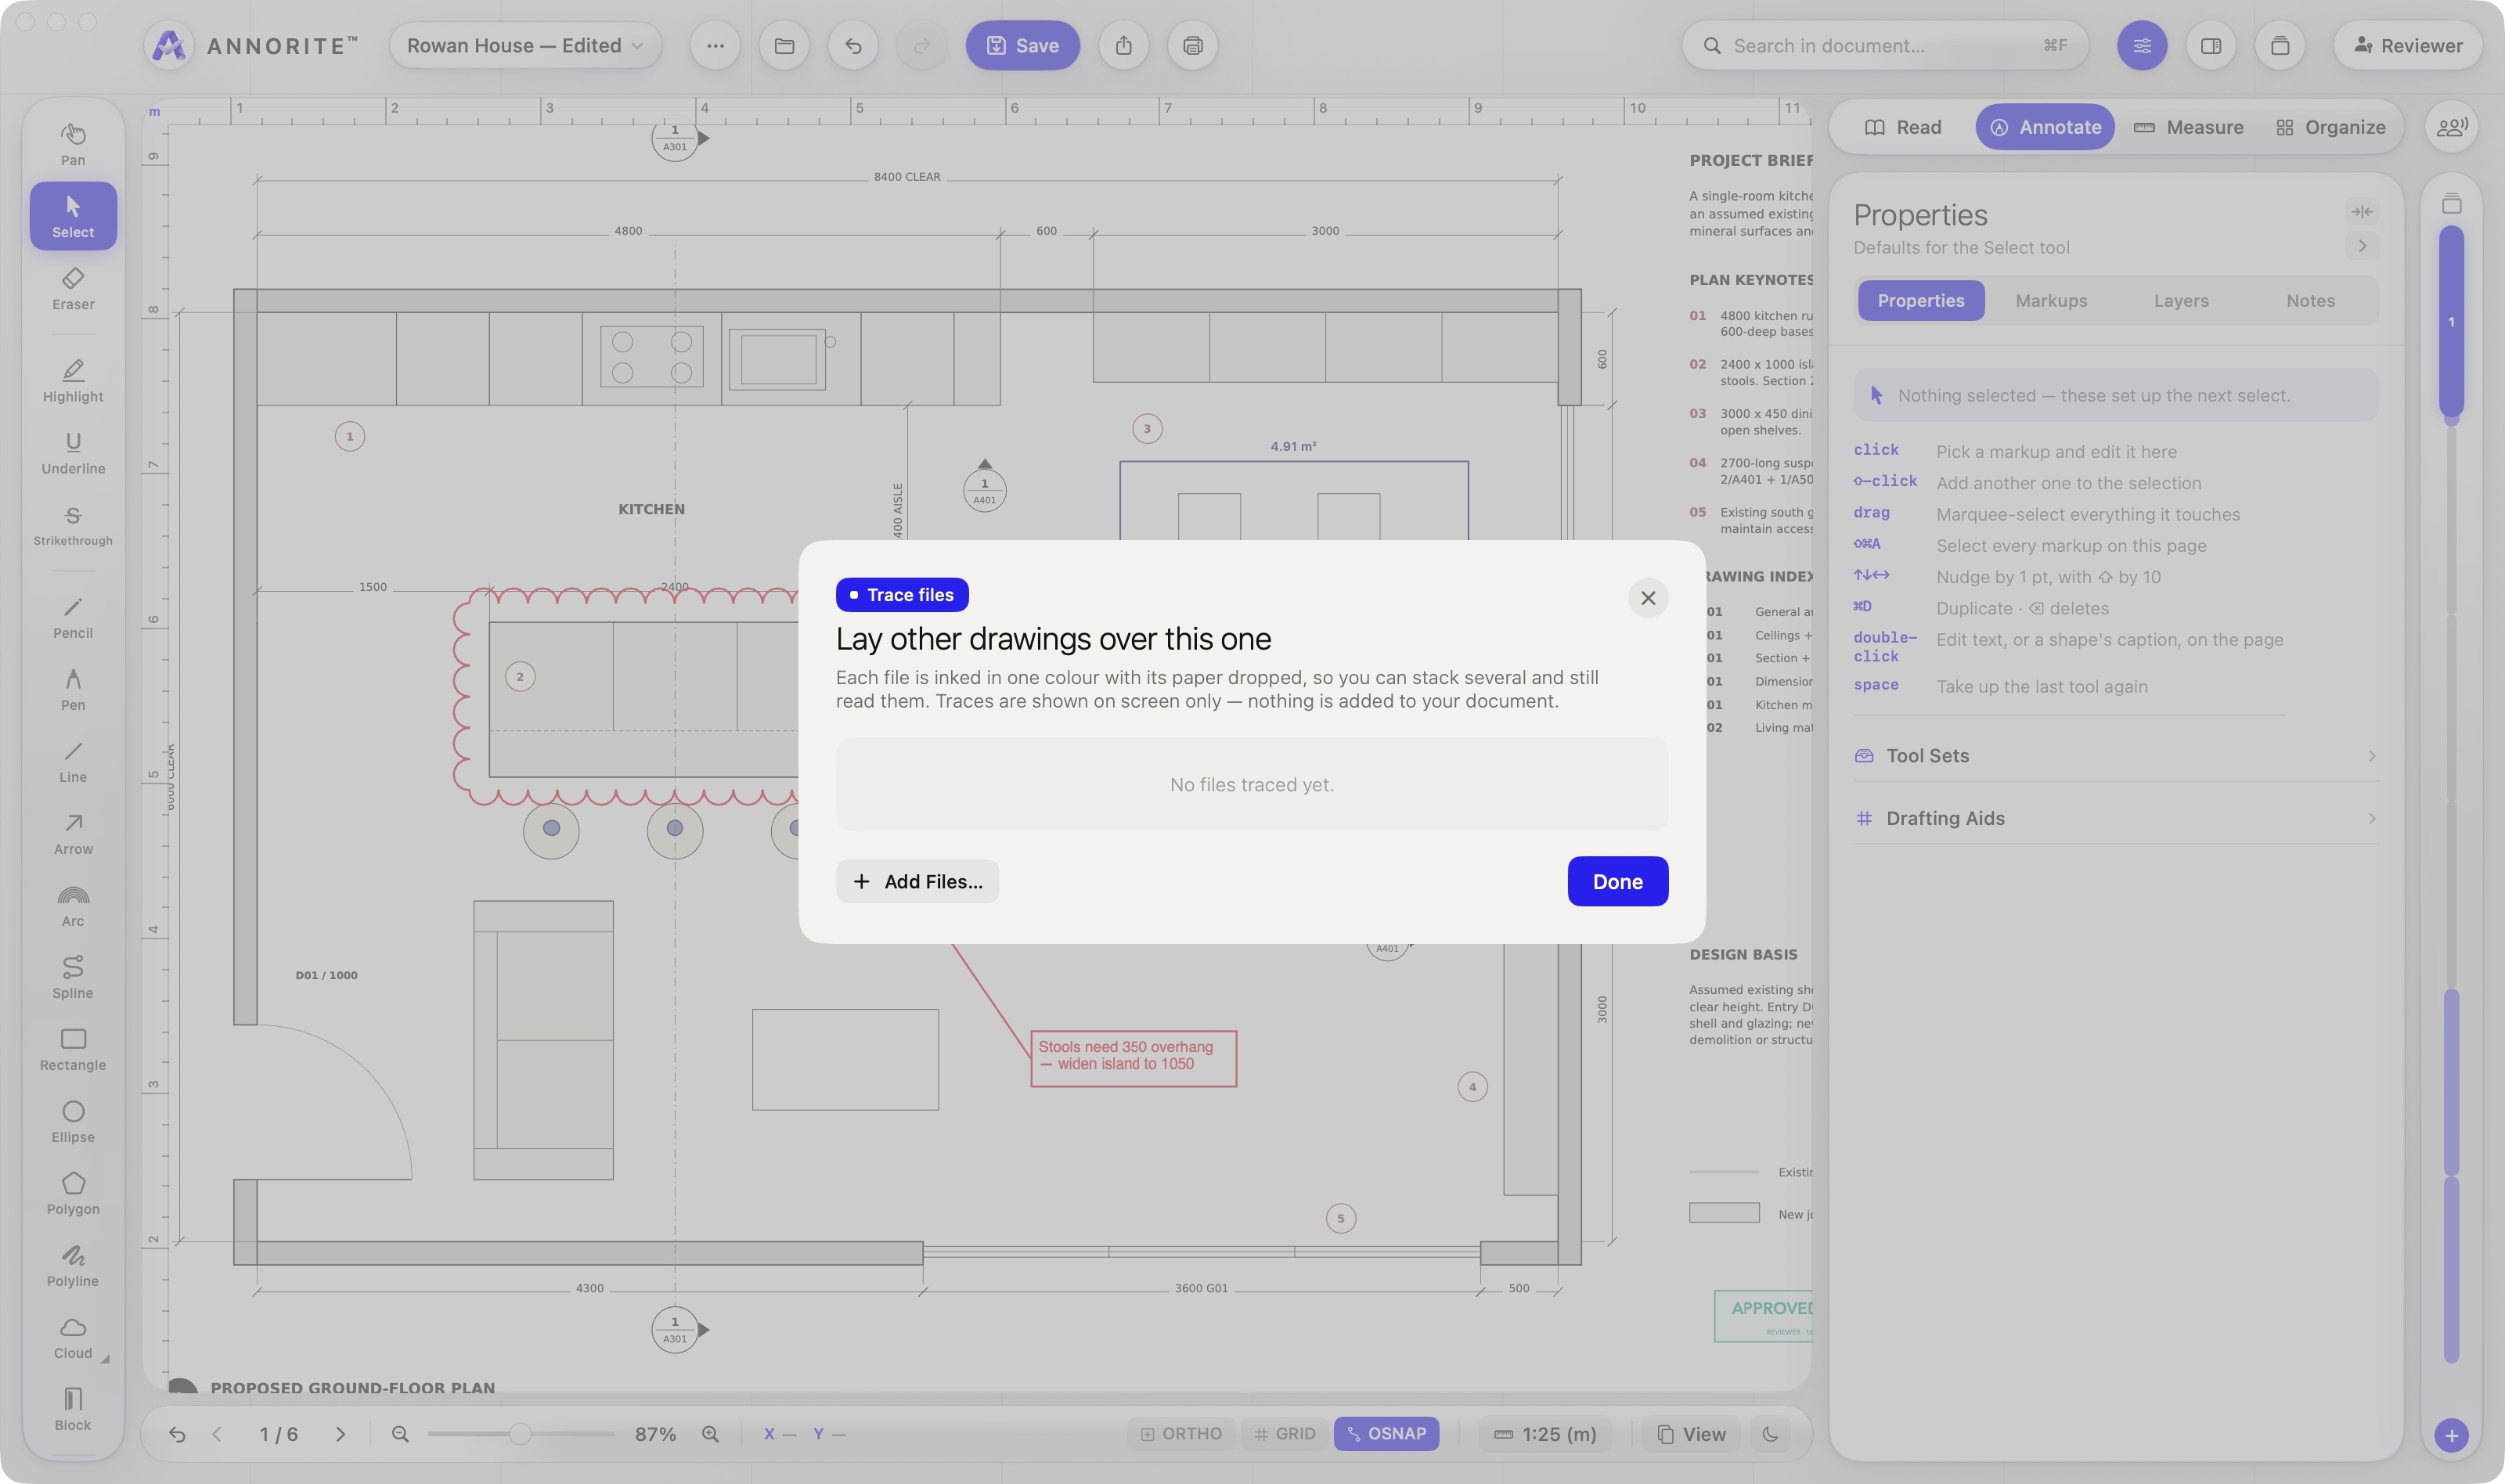
- Lays other drawings over the current sheet as a reference, each with its own colour, opacity and visibility. ⋯ ▸ Trace Files…
Files, export and sharing
- Open. PDFs and pictures; drop files or a folder on the window. File ▸ New ▸ Blank Page starts on an empty sheet in a standard size or your own; New from Clipboard starts from a copied picture or PDF, at its own size. DWG and ASCII DXF drawings become vector sheets, model space and each layout.
- Tabs. Each open document has a tab with its own page, zoom, scale, layers and undo history.
- Save. Markups are standard PDF annotations. Other PDF readers show them.
- History. File ▸ History lists the versions kept of the document — one at every save, and one every ten minutes while there are unsaved changes — with the date, who saved it and on which device. Open a version as a copy, or restore it; restoring keeps what was there first. Versions stay on your device.
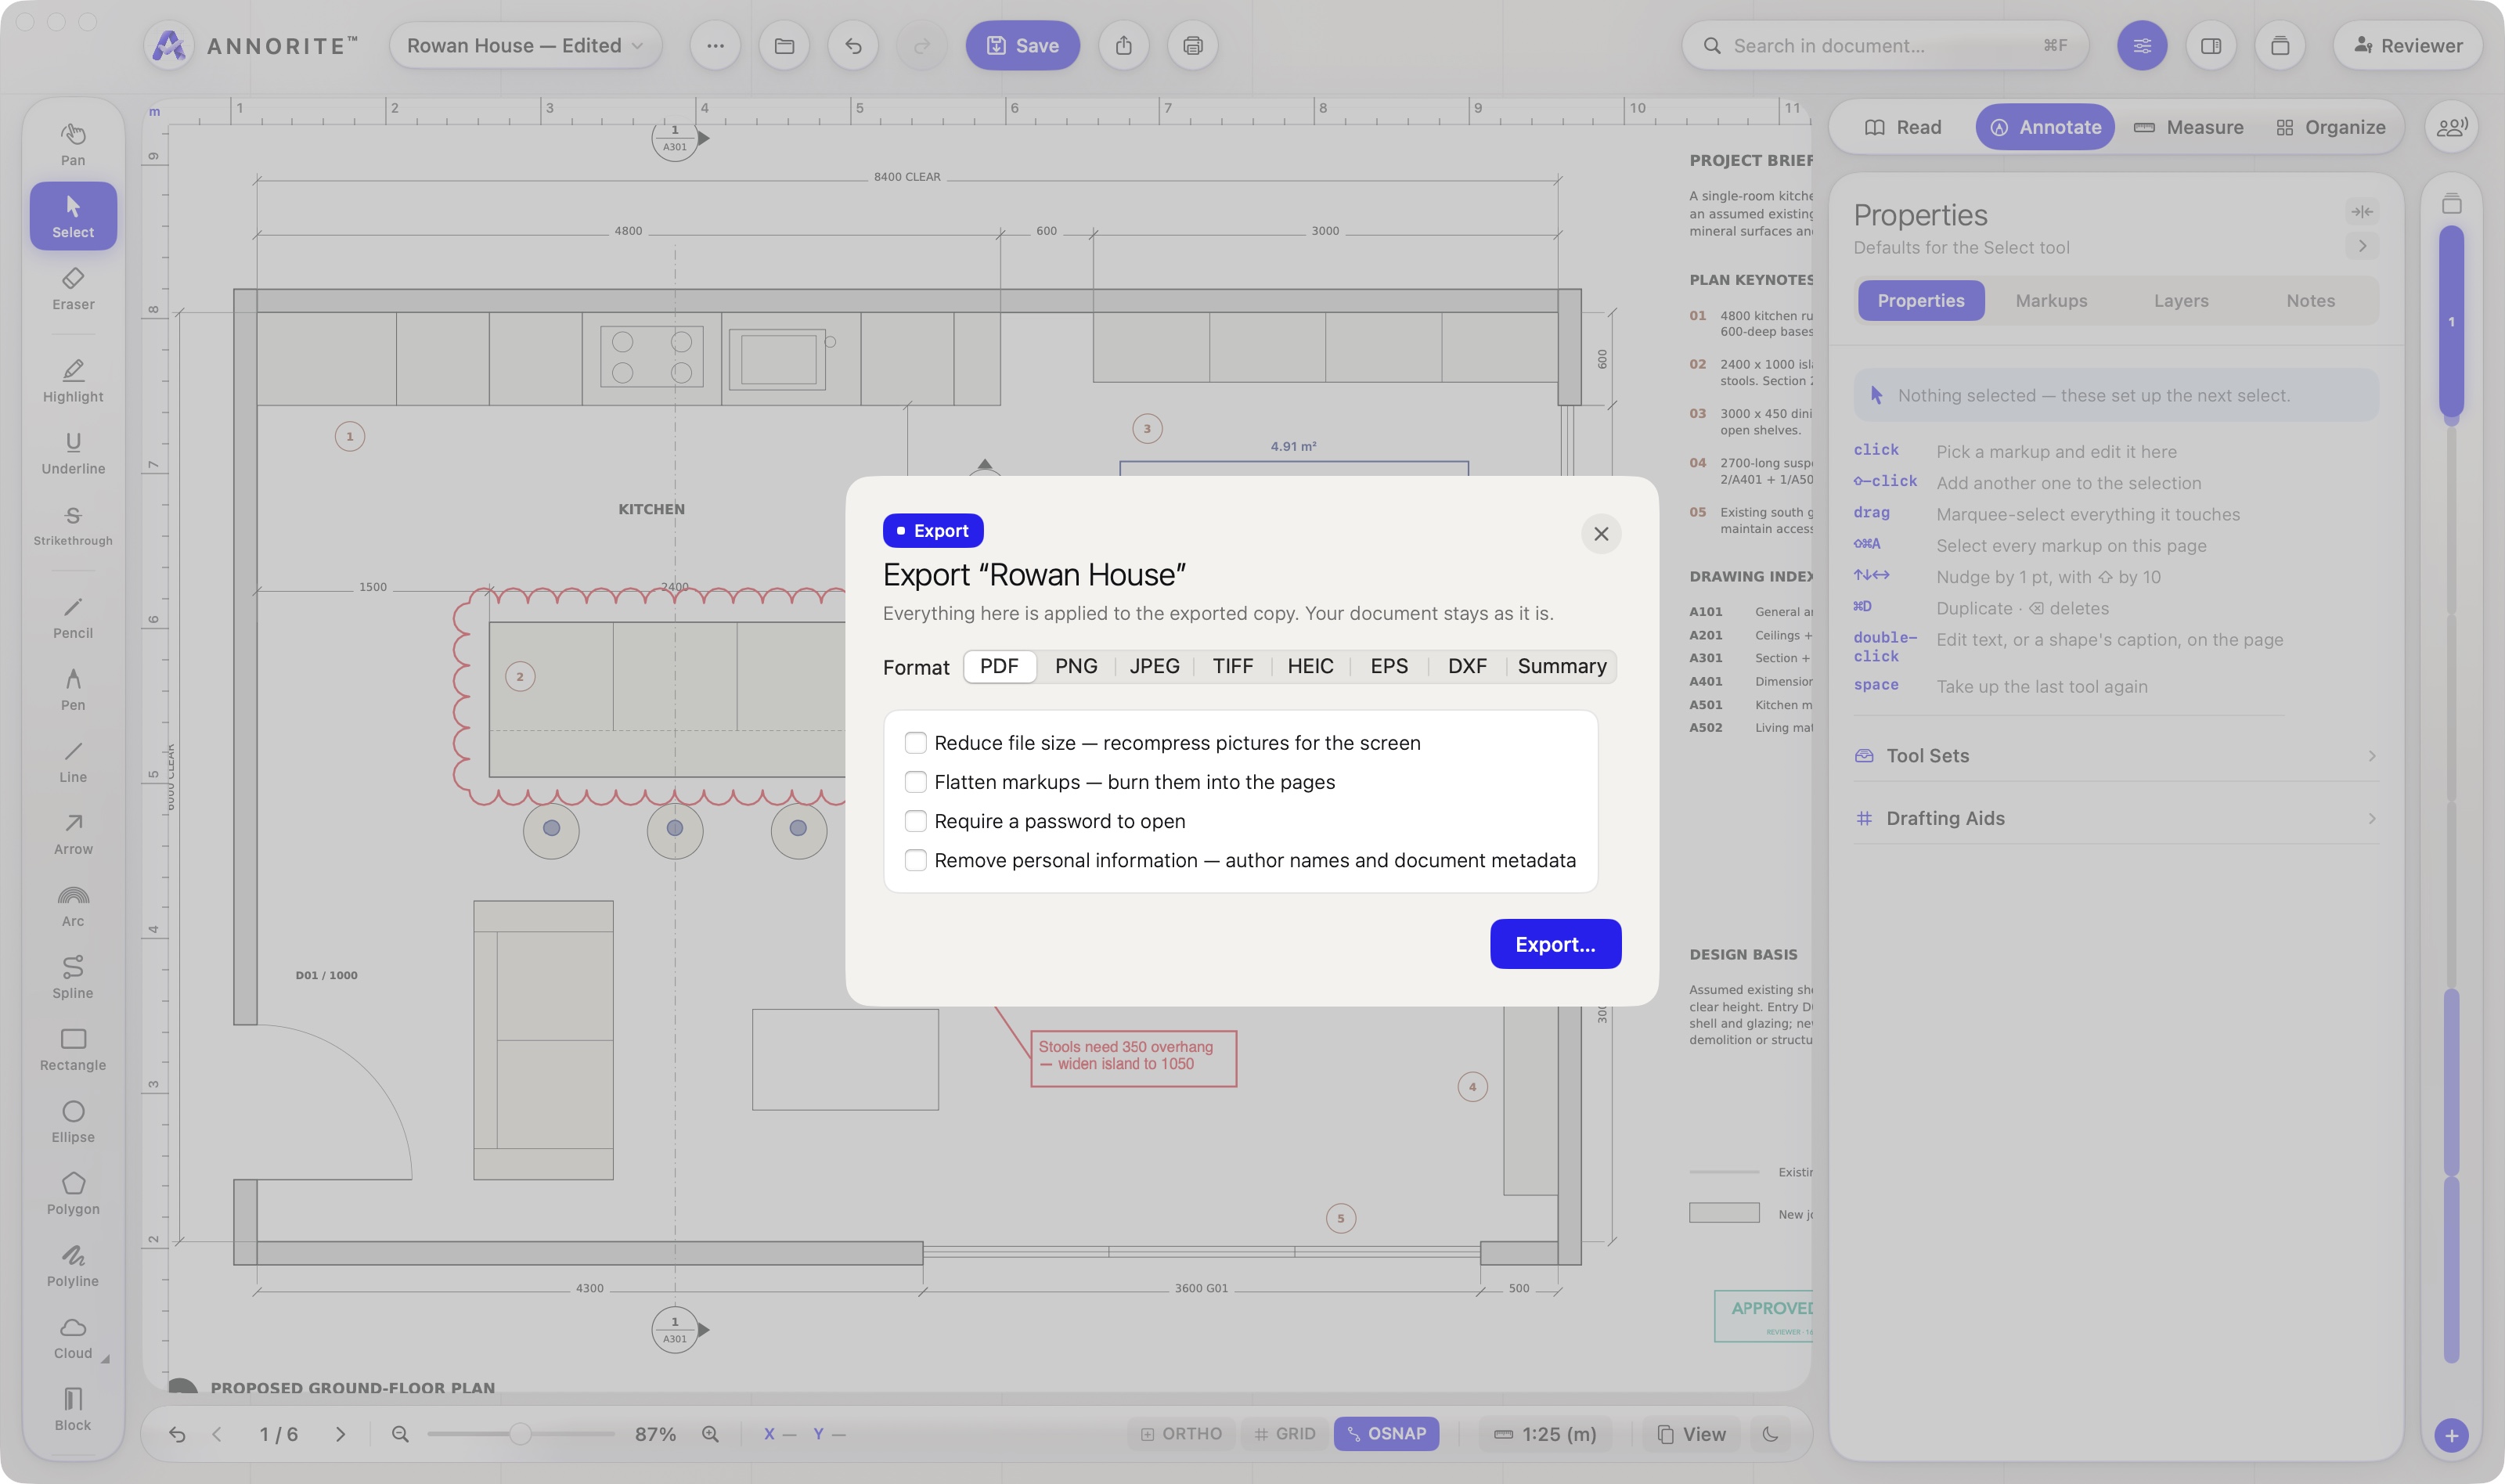
- Export. PDF, PNG, JPEG, TIFF or HEIC, the current page or all pages. Options to flatten markups, reduce size and add a password. Markups can also go out as DXF.
- Share. The editable PDF, or a flattened copy nobody can alter.
- Flatten. ⋯ ▸ Flatten Markups… burns the markups into the pages.
- Redact. Mark areas with the Redact tool, then ⋯ ▸ Markups ▸ Apply Redactions…. Affected pages become images, so what was under the mark is gone, and so is that page’s searchable text.
Protected PDFs
If a PDF’s owner doesn’t allow changes, Annorite never alters the original. Your markups go into a separate layer file beside it, and opening either one brings back both. Save a Marked-Up Copy… makes a single file where the document allows it.
Working together
Send your markups as a file
- Collaboration⋯ ▸ Collaboration ▸ Export Markups for Merging… (or Share Markups…). This writes a small file with your markups and not the drawing.
- Send it by AirDrop, Mail or Messages.
- The other person opens their copy of the same drawing and chooses Collaboration⋯ ▸ Collaboration ▸ Merge Markups from File….
New markups are added. Where both copies changed the same markup, the later change is kept. A markup deleted on one copy is not deleted on the other. One Undo reverses the whole merge.
Live sessions
People in the same room mark up one drawing at once. Devices connect to each other directly; nothing goes through a server, and the link is encrypted. On the Mac it all starts from the Collaboration button beside the mode tabs (or the Collaboration menu); on iPad and iPhone, from ⋯ ▸ Collaboration.
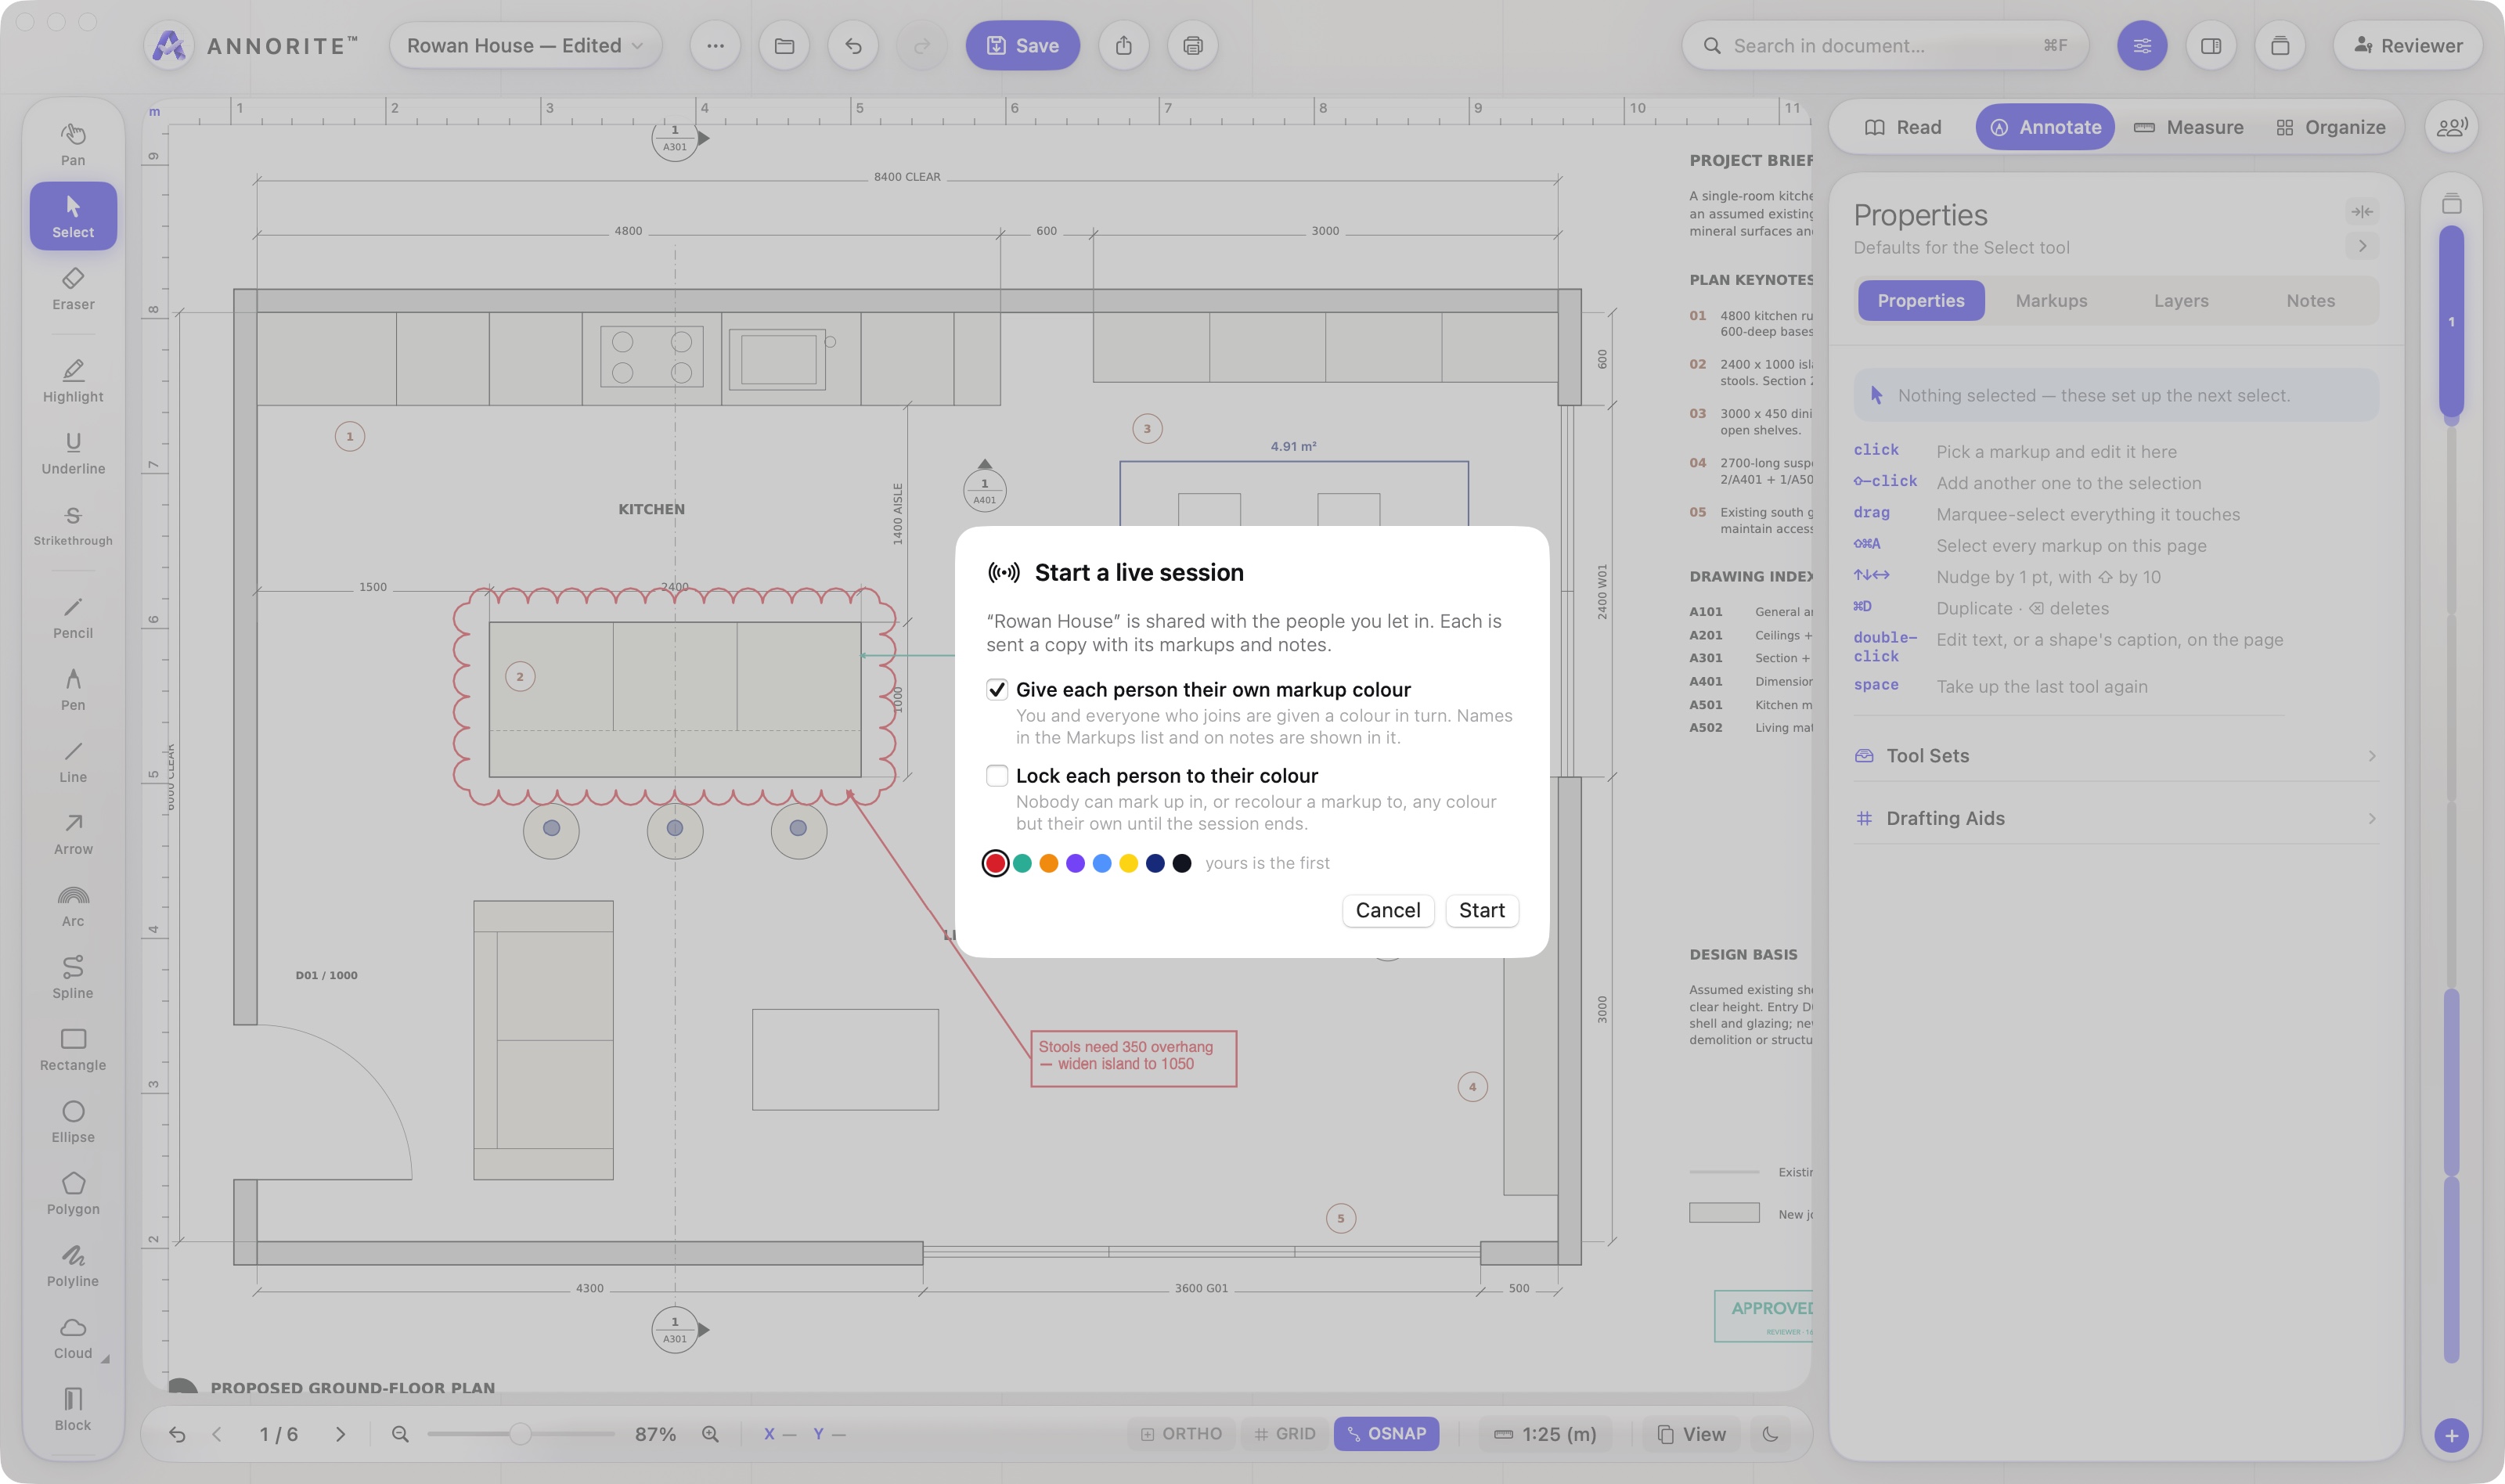
- Host. Open the drawing and choose Collaboration ▸ Start Live Session…. Decide whether each person gets their own markup colour, and whether they are locked to it, then Start.
- Join. On another device tap Join on the start screen, or choose Collaboration ▸ Join Nearby Session…, and pick the session.
- Allow. The host approves each person. They are sent a copy of the drawing with its markups and notes.
- Markups and notes appear on every device a moment after they are made. If two people change the same markup at once, the later change wins.
- On the Mac the Collaboration button turns indigo and shows how many are connected; click it to see who. On iPad and iPhone an indigo banner shows each device joining; on iPhone it folds into a badge on the bottom bar, and the session also shows on the Lock Screen.
- The screen stays on during a session. Locking a device or switching apps drops it from the session; everyone keeps their copy.
- Adding or removing pages ends the session. A protected PDF can’t be hosted.
- When it ends, Save to keep your copy.
The first time, your device asks for permission to find devices on the local network.
Finding your way
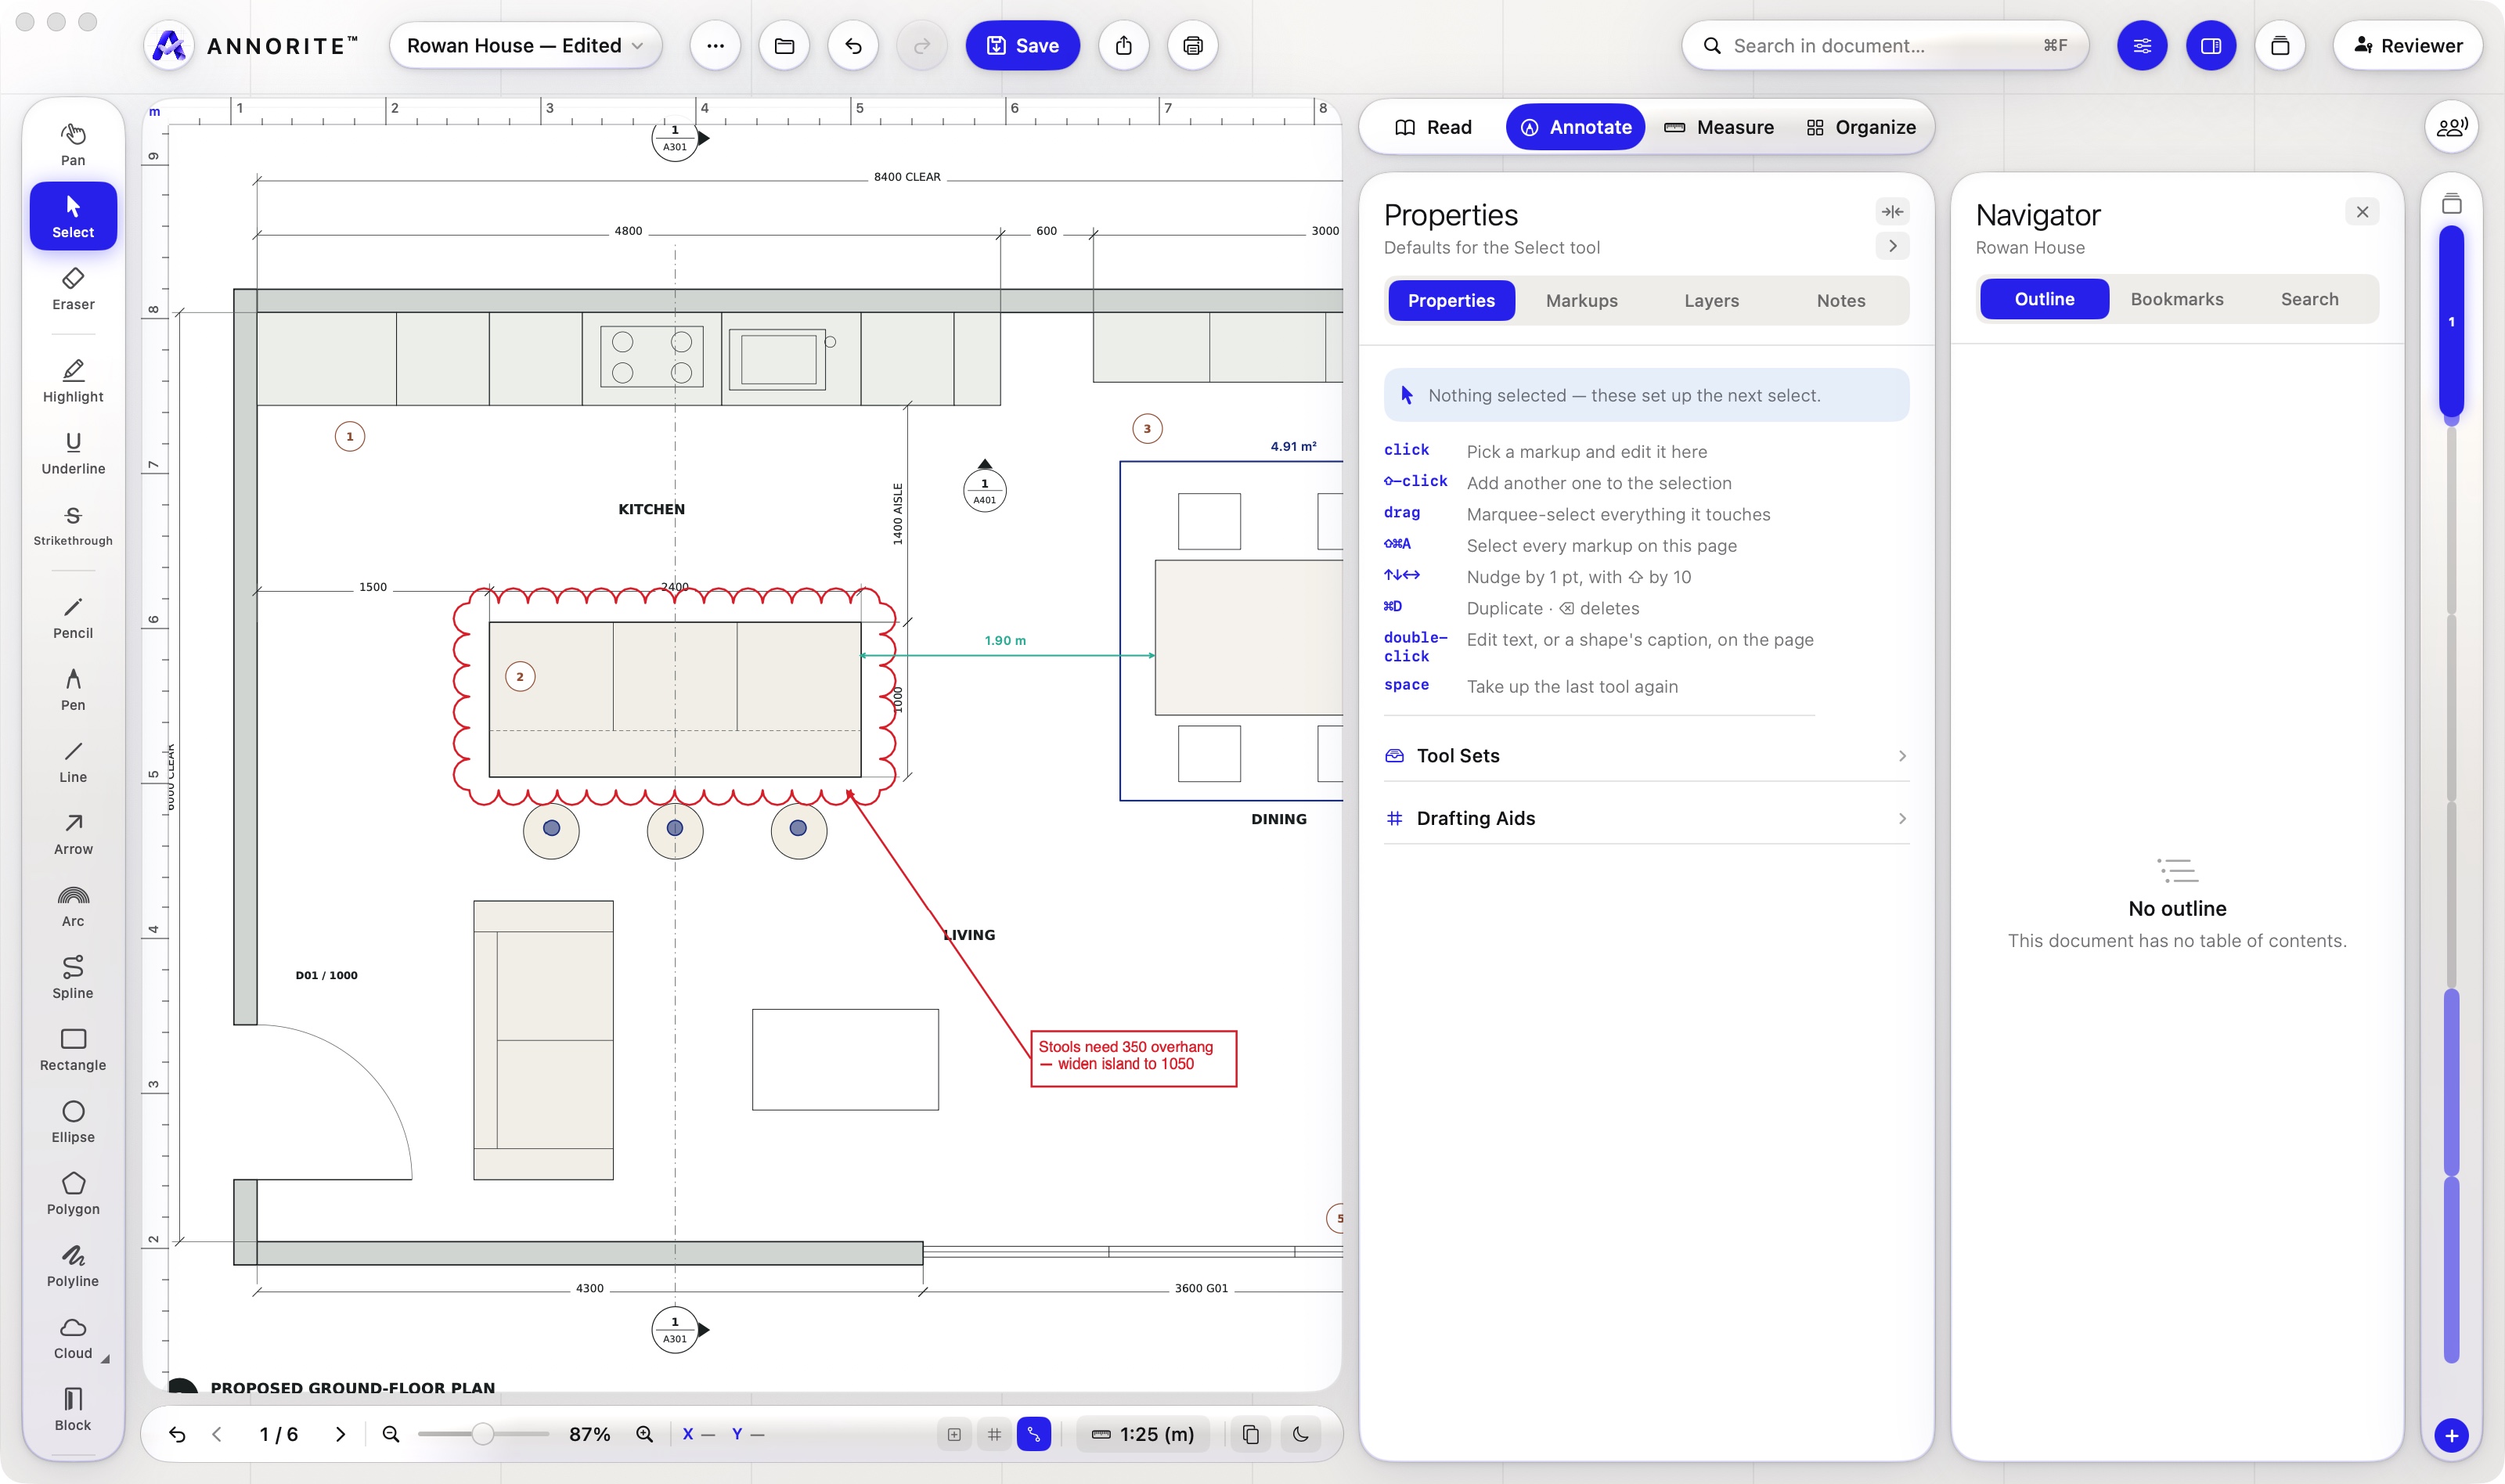
- Outline. The PDF’s own table of contents, if it has one.
- Bookmarks. Your own, kept with the document on your device. ⌘D adds one for the current page.
- Search. Finds text in the drawing and lists each hit with its page.
- Back and Forward retrace your steps after a jump.
- Magnifier. ⌥⌘M puts a glass lens beside the pointer, at twice the size; - and = take it from 2× to 5×. It shows the interface as well as the drawing. Esc or ⌥⌘M again puts it away.
- Crosshair. \ on the drawing swaps the arrow for a crosshair running from ruler to ruler, with a pick box where the lines cross; \ again puts it away. Its colour is in Settings ▸ Appearance.
Commands and macros
Commands and macros are on the Mac.
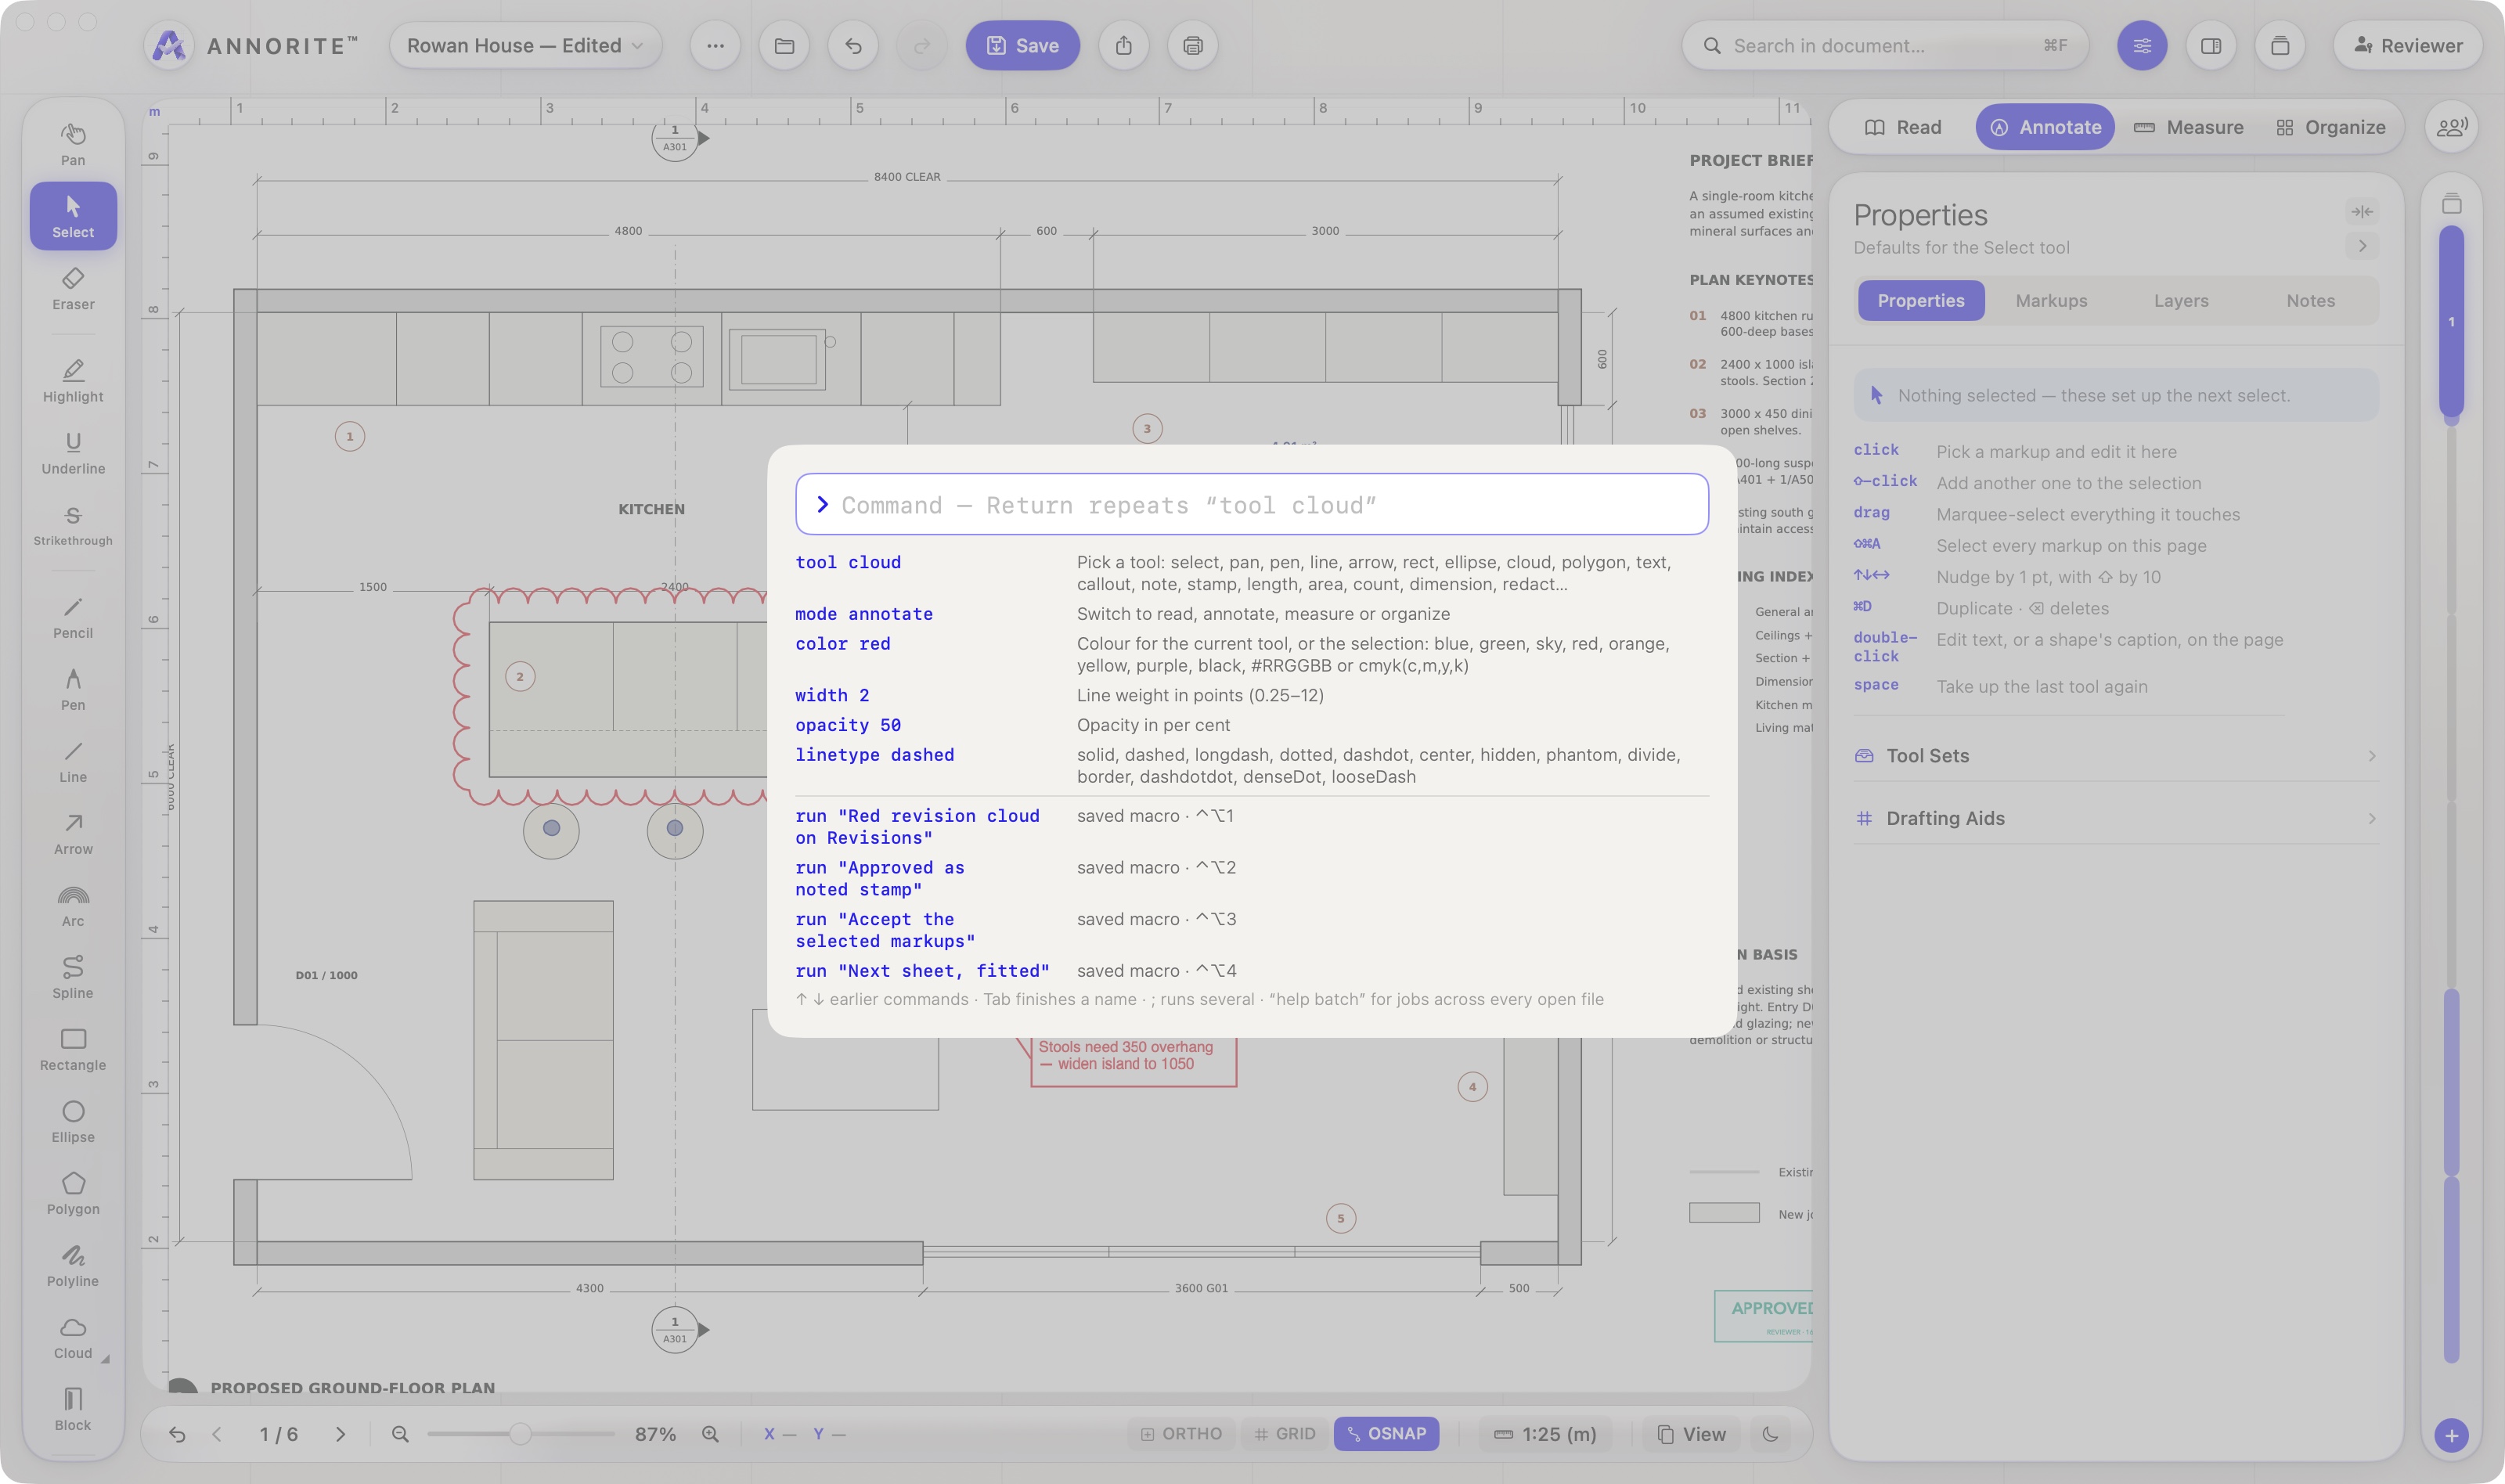
⌘K opens a command line. Type a command and press Return: tool cloud, color red, width 2, linetype dashed, mode measure. A macro is a saved sequence of commands with a name and, if you like, a keyboard shortcut: Macros ▸ Edit Macros….
iPad and iPhone
| Gesture | What it does |
|---|---|
| One finger | Uses the current tool: draws, selects, drags a grip. With the Pan tool it moves the sheet. |
| Two fingers | Always moves and zooms the sheet, whatever the tool. |
| Two-finger tap | Undo. |
| Three-finger tap | Redo. |
| Press and hold a markup | Its menu: copy, arrange, align, rotate, group, lock, style. |
| Double-tap text | Edit it on the page. |
| Apple Pencil | Always draws; it never scrolls. |
- On an iPhone the inspector, navigator and pages are sheets. Settings, Find, Share and Account are in the ⋯ menu.
- With a keyboard attached, the Mac’s shortcuts work.
- Freehand ink drawn on iPad or iPhone may not show in other PDF readers until the file has been opened and saved in Annorite for Mac.
Keyboard shortcuts
| Menu | Command | Keys |
|---|---|---|
| File | Open | ⌘O |
| File | New from Clipboard | ⌘N |
| File | History | ⌥⌘Y |
| File | Save | ⌘S |
| File | Save As | ⇧⌘S |
| File | Save All | ⌥⌘S |
| File | Close Tab | ⌘W |
| File | Reopen Closed Tab | ⇧⌘T |
| File | Export PDF or Images | ⇧⌘E |
| File | Export Review Summary | ⌥⌘E |
| File | ⌘P | |
| Edit | Undo / Redo | ⌘Z / ⇧⌘Z |
| Edit | Duplicate | ⌘D |
| Edit | Paste in Place | ⇧⌘V |
| Edit | Paste on Next Page | ⌃⌘V |
| Edit | Copy / Paste Properties | ⌥⌘C / ⌥⌘V |
| Edit | Select All Markups on This Page | ⇧⌘A |
| Edit | Select by Type | ⌥⌘A |
| Edit | Deselect | ⌘. |
| Edit | Nudge the selection | Arrow keys (⇧ for 10 pt) |
| Edit | Repeat the last tool | Space |
| Arrange | Bring Forward / Send Backward | ⌘] / ⌘[ |
| Arrange | Bring to Front / Send to Back | ⇧⌘] / ⇧⌘[ |
| Arrange | Group / Ungroup | ⌘G / ⌥⇧⌘G |
| View | Read, Annotate, Measure, Organize | ⌘1 – ⌘4 |
| View | Find | ⌘F |
| View | Add or Remove Bookmark | ⌘D |
| View | Fit Page / Fit Width | ⌘0 / ⌘9 |
| View | Zoom In / Out | ⌘= / ⌘- |
| View | Previous / Next Page | ⌥⌘↑ / ⌥⌘↓ |
| View | Go to Page | ⌥⌘G |
| View | Back / Forward | ⌥⌘← / ⌥⌘→ |
| View | Next / Previous Tab | ⌃Tab / ⌃⇧Tab |
| View | Show or Hide Inspector | ⌥⌘I |
| View | Condense Side Panel | ⌥⌘J |
| View | Inspector: Properties, Markups, Layers, Notes | ⌥⌘1 – ⌥⌘4 |
| View | Navigator | ⌥⌘N |
| View | Pin Pages Open | ⌥⌘P |
| View | Tool Labels | ⌥⌘T |
| View | Fill Screen | ⌥⌘F |
| View | Rulers | ⌘R |
| View | Ortho / Grid Snap / Object Snap | ⇧⌘L / ⇧⌘G / ⇧⌘O |
| View | Magnifier | ⌥⌘M |
| View | Magnifier: less / more | - / = |
| View | Crosshair | \ |
| Document | Add Layout Sheet | ⇧⌘N |
| Document | Rotate Page Left / Right | ⌥⌘L / ⌥⌘R |
| Document | Trace Files | ⌃⌘T |
| Macros | Command | ⌘K |
| Macros | Repeat Last Command | ⇧⌘K |
| Macros | Edit Macros | ⌥⌘K |
| Tools | Select | V |
| Tools | Pan | Z |
| Tools | Eraser | X |
| Tools | Highlight | H |
| Tools | Underline | U |
| Tools | Strikethrough | K |
| Tools | Pencil | F |
| Tools | Pen | P |
| Tools | Line | L |
| Tools | Arrow | A |
| Tools | Rectangle | R |
| Tools | Ellipse | E |
| Tools | Polygon | O |
| Tools | Polyline | Y |
| Tools | Cloud | C |
| Tools | Text Box | W |
| Tools | Callout | Q |
| Tools | Note | T |
| Tools | Stamp | S |
| Tools | Sign | I |
| Tools | Snapshot | B |
| Tools | Calibrate | J |
| Tools | Length | M |
| Tools | Area | G |
| Tools | Count | N |
| Tools | Dimension | D |
Tool keys are single letters, pressed with nothing else held down.
Settings and themes
Annorite ▸ Settings… (⌘,), or click the Annorite mark.Tap the Annorite mark, or ⋯ ▸ Settings… on an iPhone.
- Appearance
- Day, Dawn, Night or Dusk, and the size of selection grips.
- Markups
- Your author name, the default text size, whether a tool returns to Select after each markup, and the review summary logo.
- Annorite Labs
- Features still being tried: highlighting changed form fields.
- Account
- Your plan.
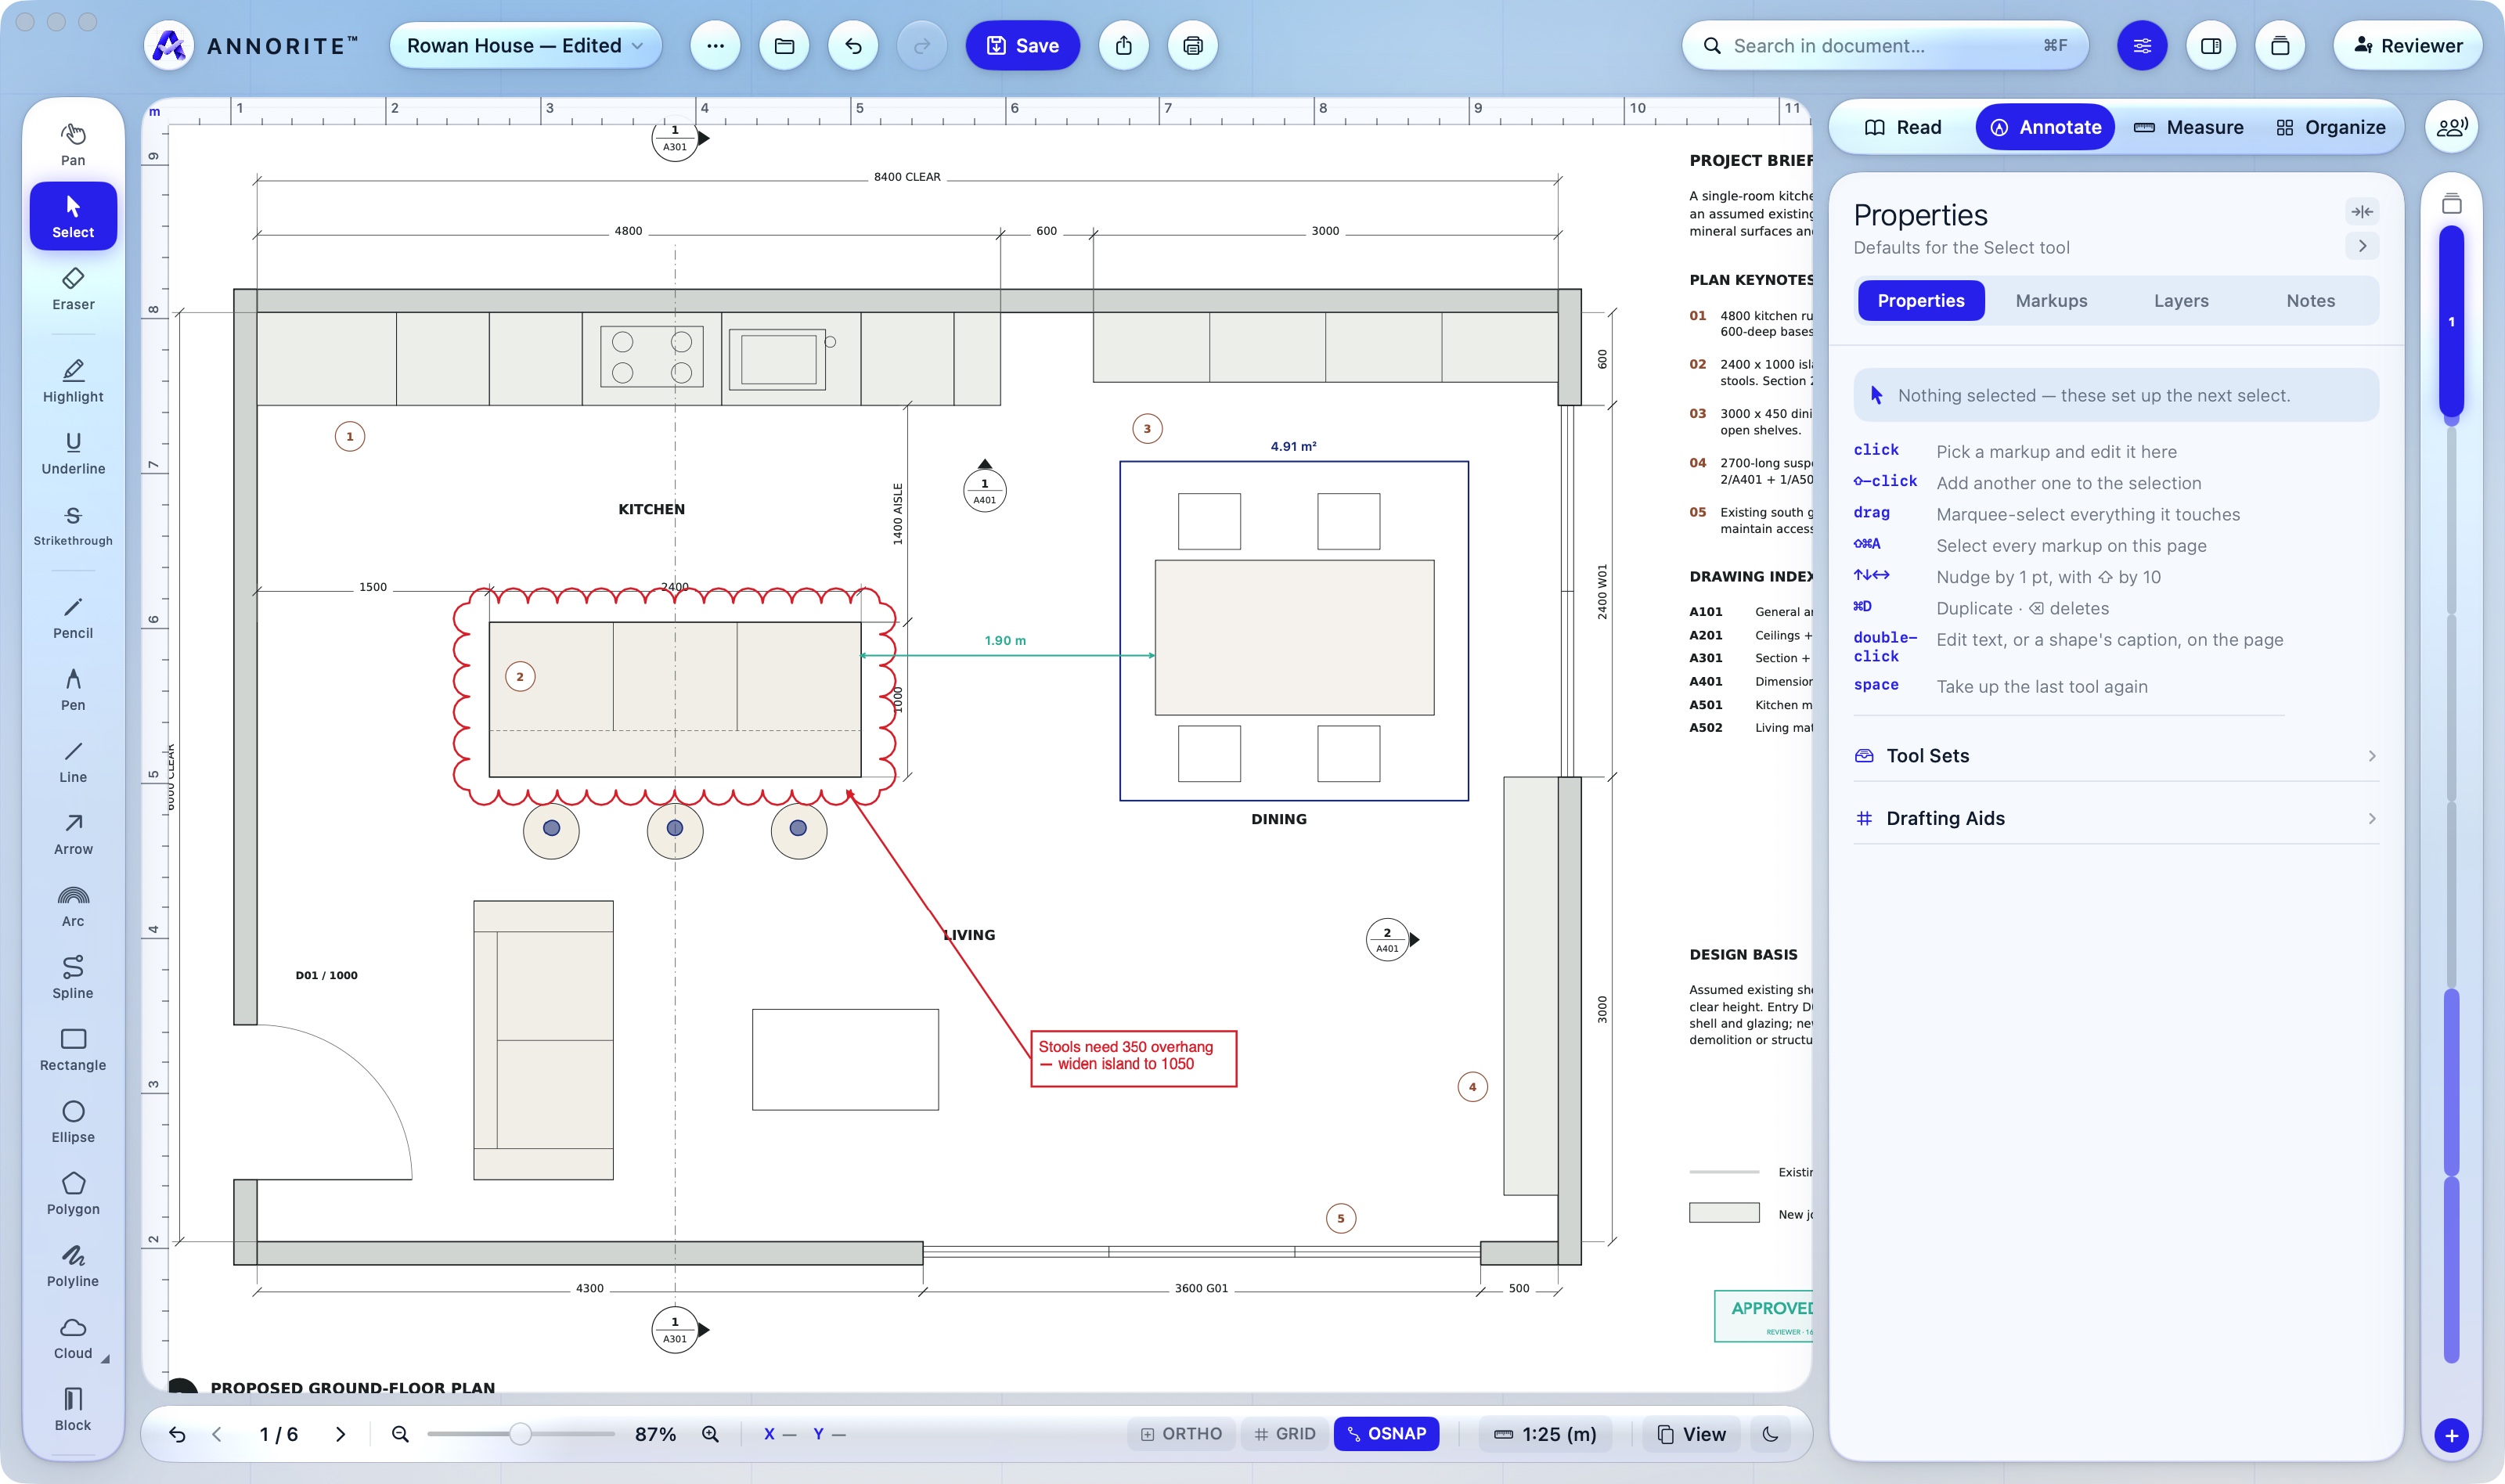
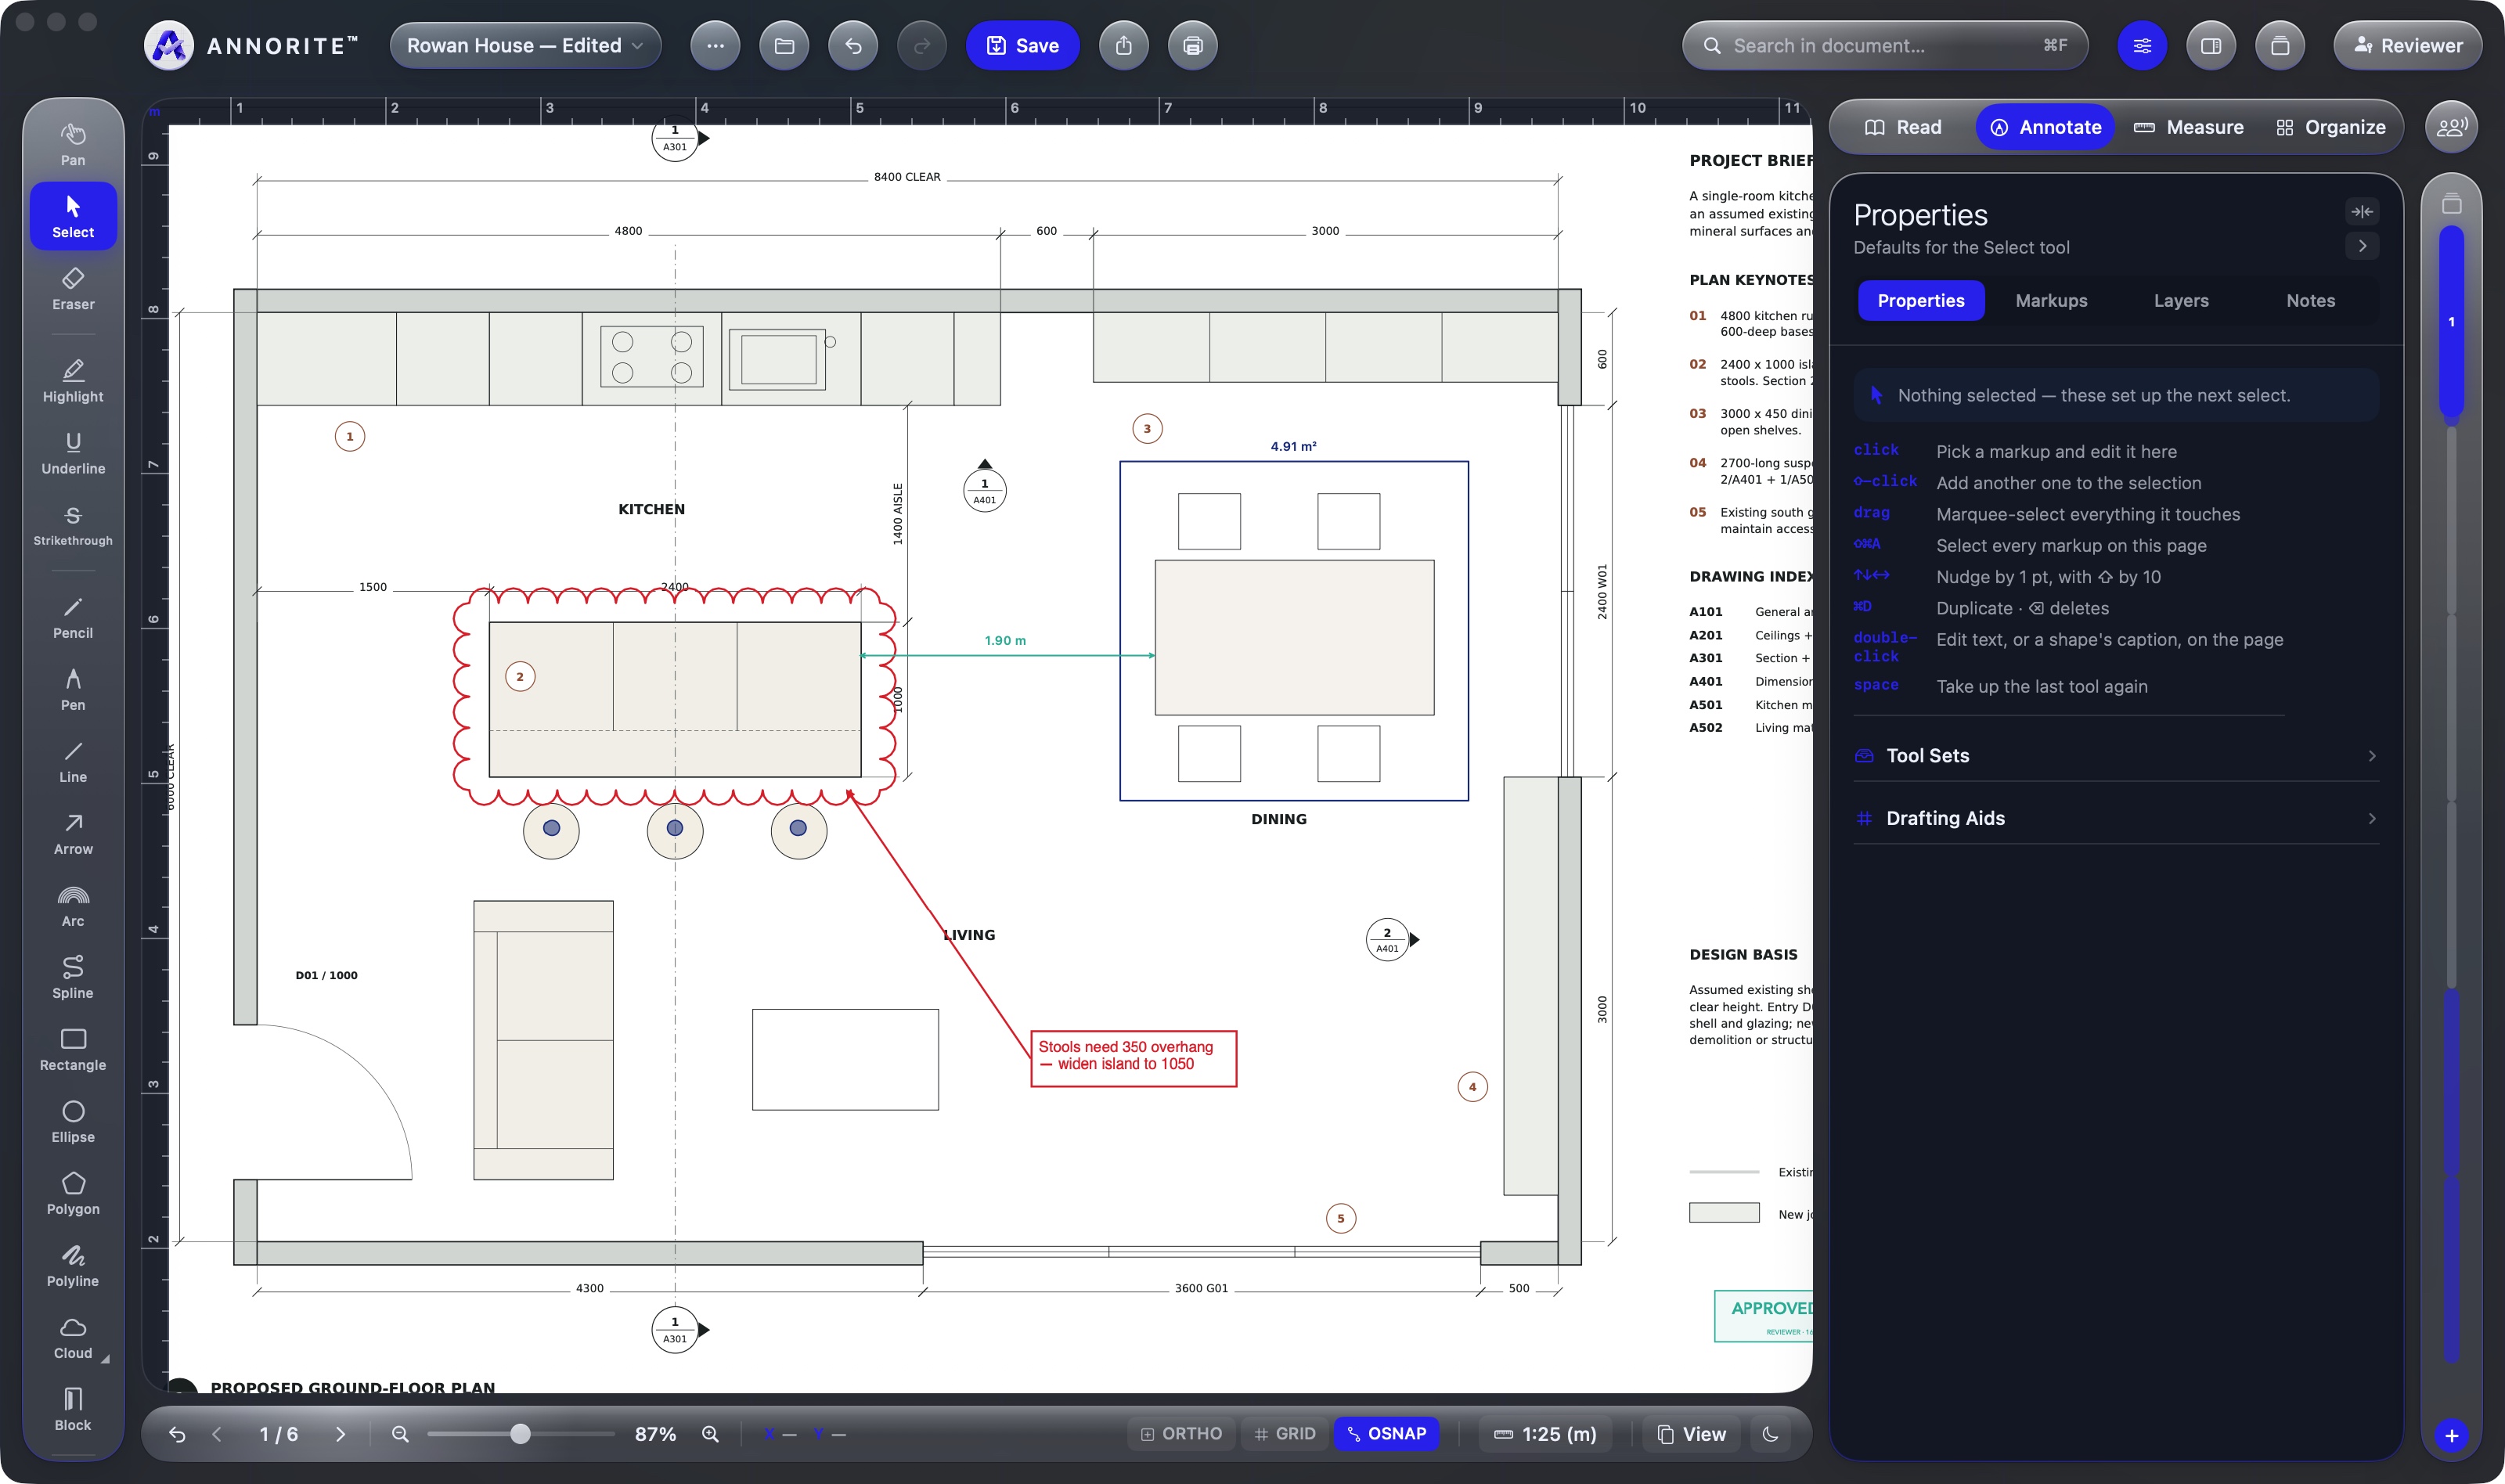
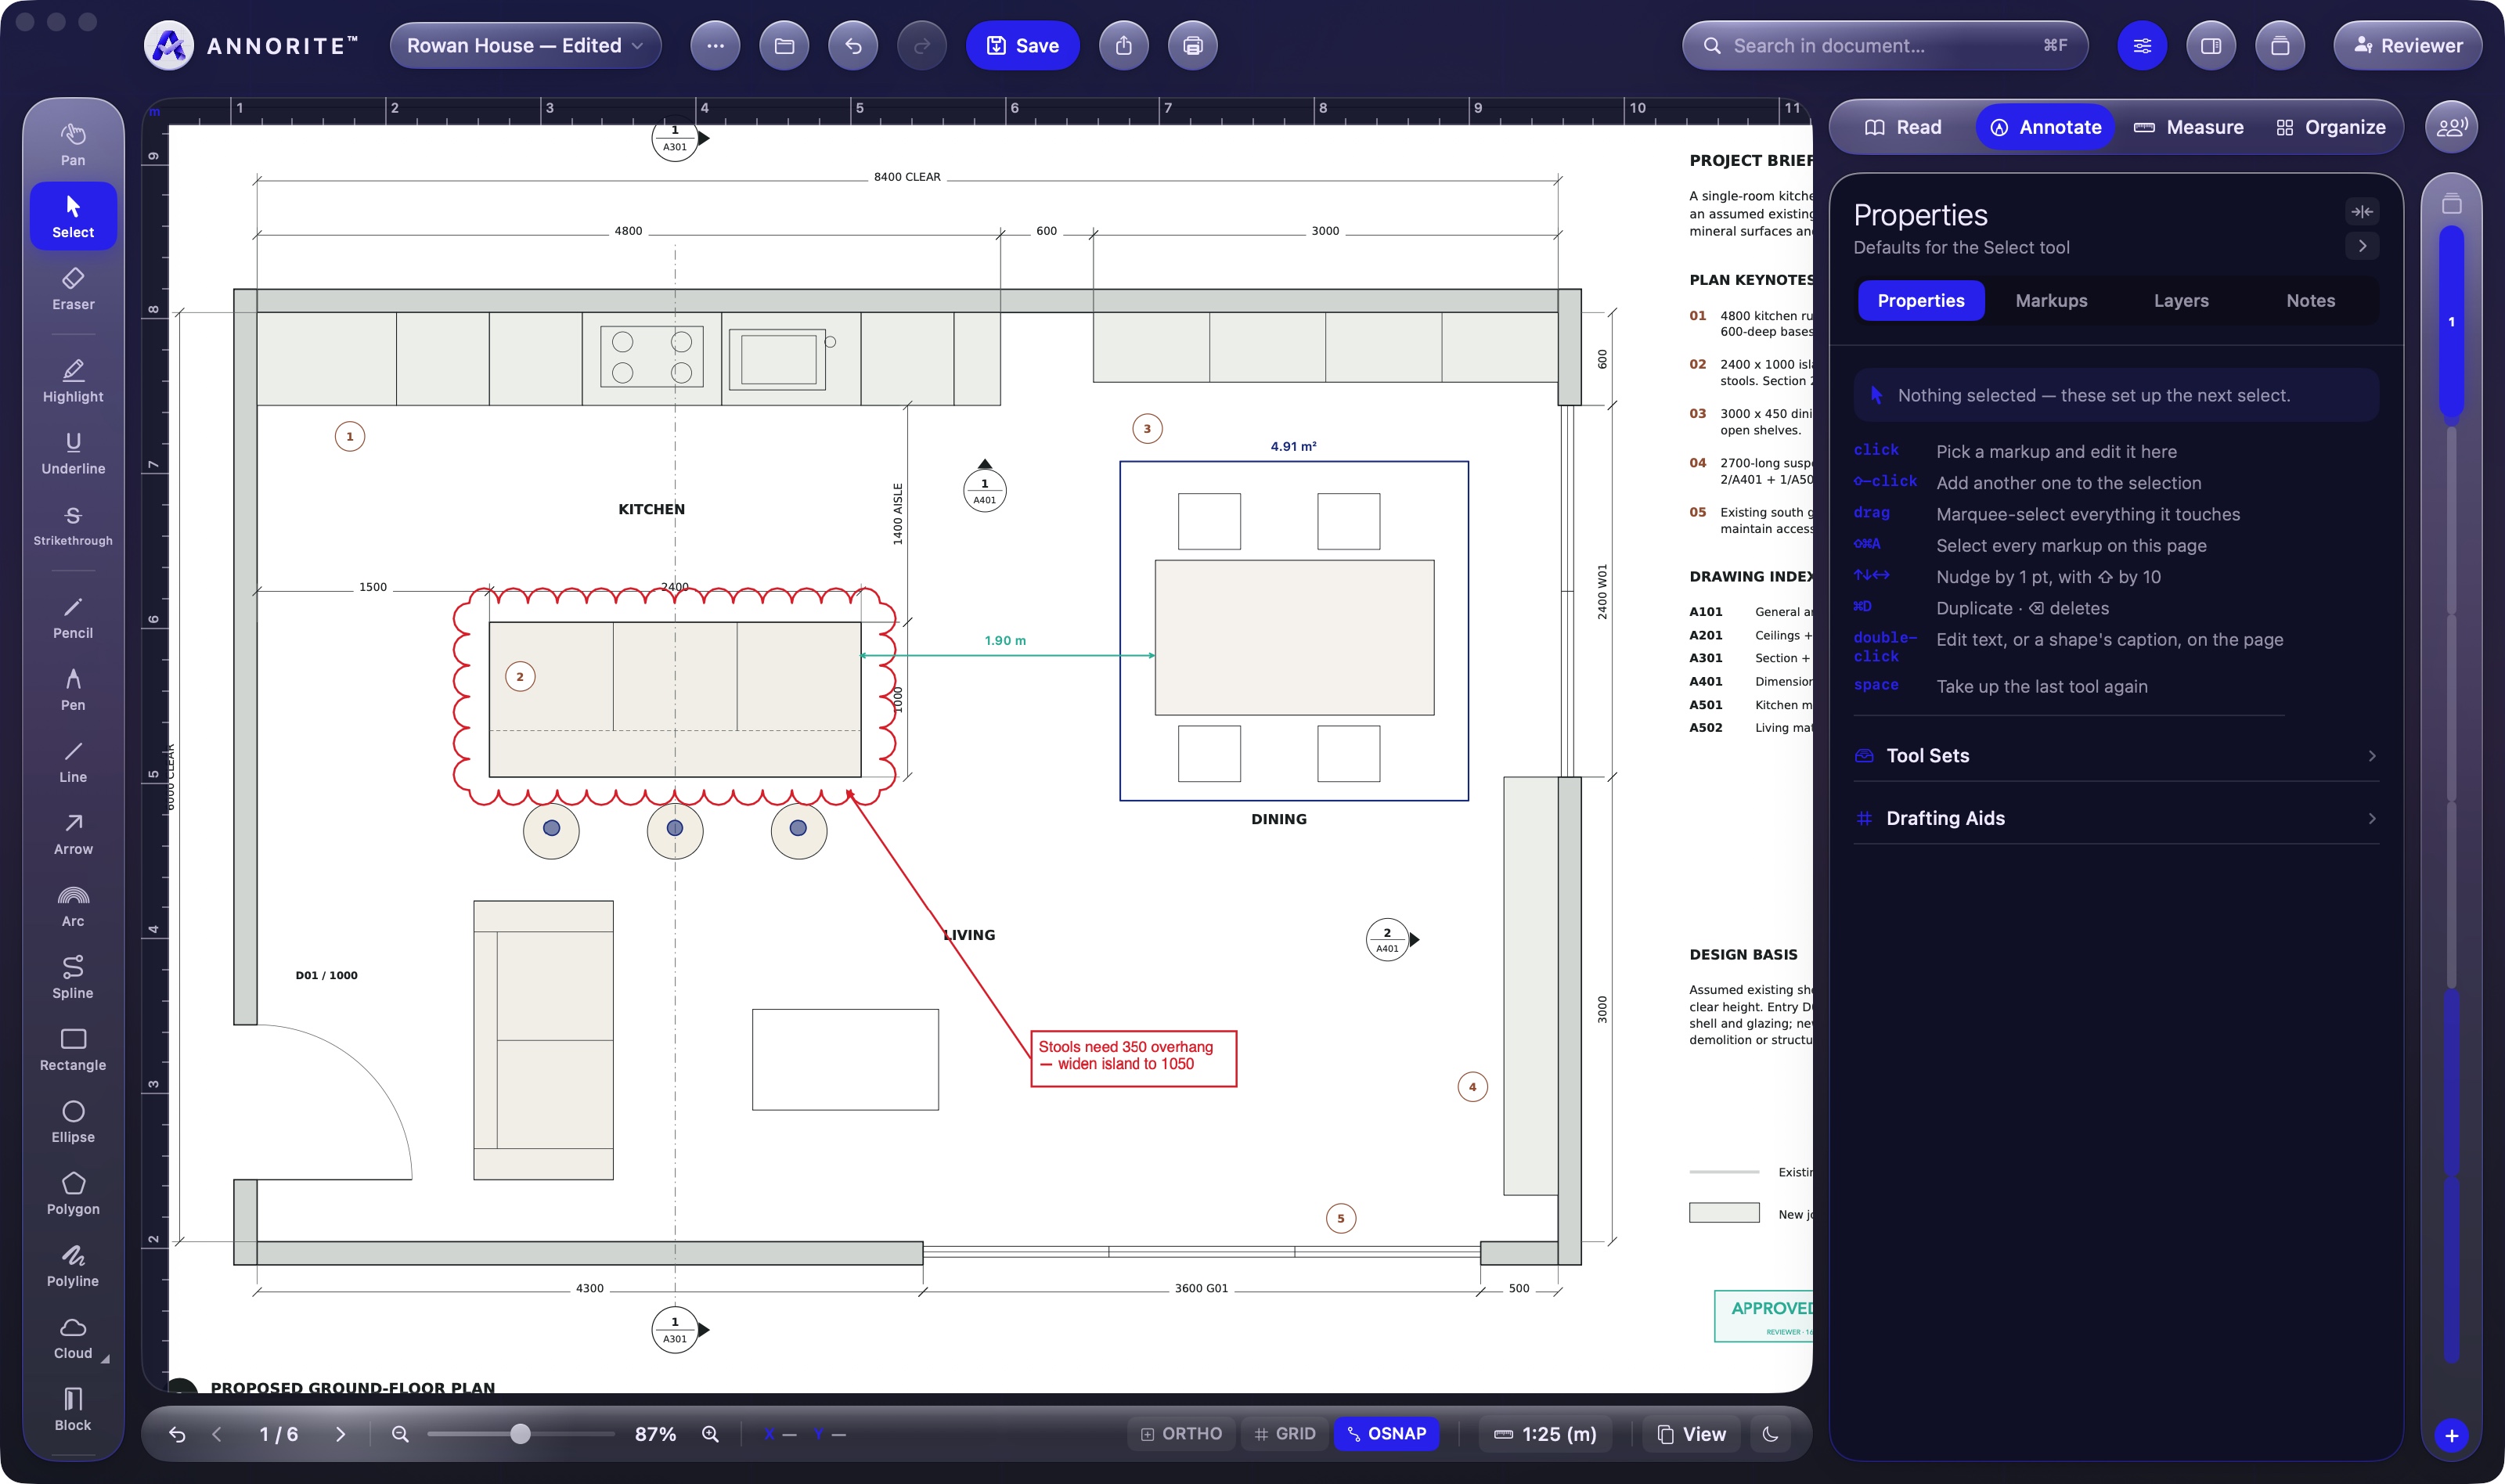
Dark Pages (the moon on the status line) is separate from the theme: it turns the sheets themselves light-on-dark and keeps markup colours as they are.
Troubleshooting
My markups don’t show in another app.
Save first. Annorite writes standard annotations that Preview and Acrobat display. A few viewers hide annotations by default; check that viewer’s settings. To make sure anyone sees them, share a flattened copy.
A measurement looks wrong.
Check that the scale on the status line matches the sheet, or calibrate against a dimension you trust. Drawings that were scanned or printed to fit are often not at their stated scale.
Highlight doesn’t follow the text.
Some drawings store their text as outlines, with no real text to follow. Drag an area with the highlighter instead.
The tools are greyed out.
Without Annorite Pro, Annotate, Measure and Organize open as a preview: you can see every tool, but only Select and Pan work. New subscribers can try Pro free for 14 days. Read mode always works. Open Account to see your plan.
I can’t move or delete a markup.
It may be locked, or on a locked layer. Right-clickPress and hold the sheet and choose Unlock All, or unlock its layer in the Layers tab.
The PDF says it is protected.
Its owner doesn’t allow changes. Annorite keeps your markups in a separate layer file beside the original. See Protected PDFs.
A nearby live session doesn’t appear.
Make sure Wi-Fi and Bluetooth are on. On iPhone and iPad, allow Annorite under Settings ▸ Privacy & Security ▸ Local Network. The host’s screen must be on with Annorite in front.
Someone dropped out of a live session.
Their device locked or they switched apps. They can join again; the host sends the drawing as it stands.
Merging says the markups were made on a different document.
The page counts differ. Markups are placed by page number, so merge only between copies of the same drawing.
Where are my notes and bookmarks kept?
On your device, with the document they belong to. They are not in the PDF, so a file you send on carries none of them.
Still stuck? Email [email protected] with what you were doing and, if you can, a screenshot. Please don’t attach drawings you aren’t allowed to share.
Nothing in the guide matches that. Try another word, or email [email protected].